Robert, my student, called me the other day. He bases his Cirrus SR22T out of Eagle Colorado (KEGE). He wanted to know if I was interested in attempting some of the maneuvers he had found in the Pilot’s Workshop document called the Pilot Exercise Program. It’s in a PDF for $49 or $69 if you want to add a spiral-bound workbook. Robert works hard to remain proficient in his plane and figured that the exercises would help. I wasn’t familiar with the exercise program, but after reading through the document, I agreed that it would be a great way to build proficiency.
The Program
It took me a while to read through the Exercise Program beforehand and understand what was intended. But I’m glad I did. The Program consists of 15 unique VFR maneuvers for a pilot to practice. The document describes how to perform each maneuver in detail. There are also cautions about various aspects of each maneuver where the pilot should be careful. Recommendations are made about whether a copilot would be helpful and what the copilot should be doing. There’s also a scorecard at the end of each maneuver listing performance standards so you can tell how well you did. Many of the maneuvers are similar to what is required for a private pilot or commercial pilot practical flight test. But all have plenty of differentiation from those maneuvers as well.
Robert had selected two maneuvers he wanted to try and asked me to pick two other maneuvers. Four maneuvers seemed plenty to keep us busy for one day. In fact, it was more than enough and we spent two separate days to get them under our belt. Even then we really barely scratched the surface and would need lots of practice to reach a perfect 10 on the scoring scale. That’s not too surprising when you consider that most students practicing for a private or commercial license require multiple sessions for a given maneuver; expect similar results for these maneuvers. But without the pressure of passing a practical test, doing these maneuvers was generally more pleasurable.
The area around Eagle Colorado is quite mountainous and ill-suited to most of these maneuvers. So, we headed over to Moab, Utah, 142 NM away. The terrain around Moab is more appropriate for the maneuvers. Plus, the weather is typically better than at Eagle.
Getting There
On this day, the weather around Eagle was a broken ceiling at 5000 feet AGL. Considering that Eagle sits at 6500 feet MSL, and the nearby mountains exceed 14,000 feet, we flew IFR to Moab. Being FIKI (Flight Into Known Icing) certified and having a fresh oxygen bottle, we weren’t concerned with our cruising altitude of 16,000 feet.

The hop over was smooth until just before Moab. With two regional jets preceding us, Denver Center gave us, “Hold as published at the Moab VOR.” It had been years since I’d gotten an actual hold under IFR. But this was Robert’s first assigned hold from ATC. It took him a minute to remember how to program the G1000, but he got it correct in time. ATC omitted the expect further clearance (EFC) time but a gentle reminder fixed that.
We finally got our clearance for the approach (in good VMC) and landed at Moab. After a quick break it was time for the main event.
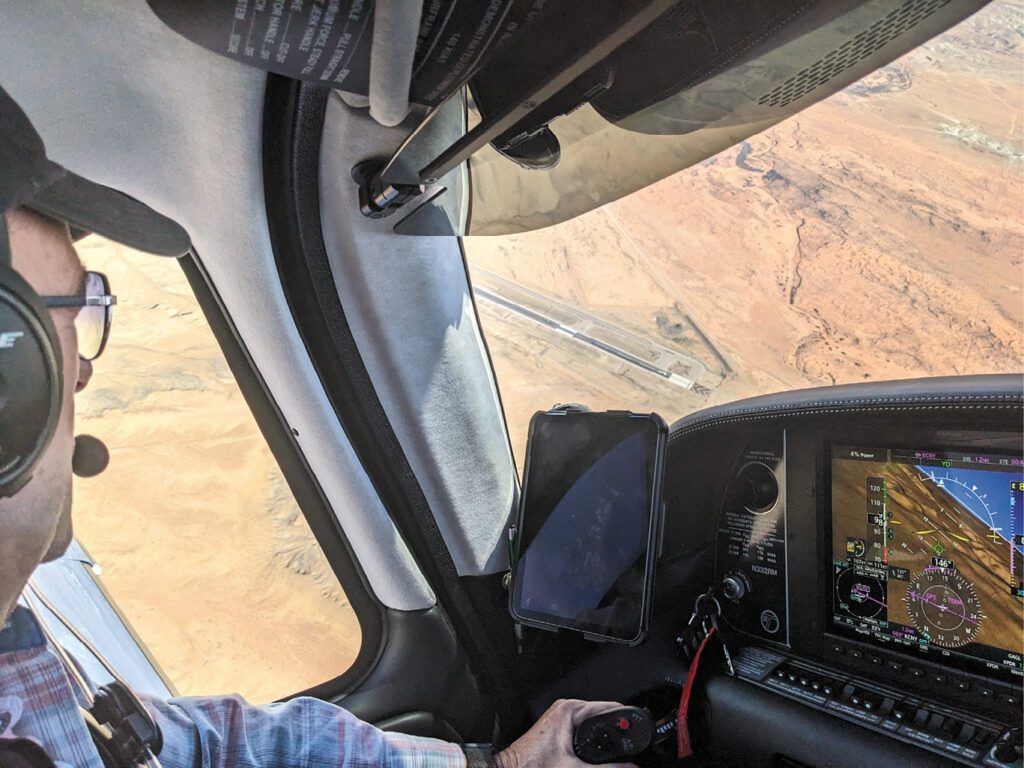
Robert really wanted to try the “Gliding Spiral to a Landing.” This maneuver is basically a combination of two maneuvers from the Commercial Pilot ACS—the steep spiral and the power-off 180-degree accuracy approach and landing. Robert’s Cirrus training focused on using the parachute for a serious emergency. He wondered if there might be times when a controlled landing might be a better idea. This maneuver provides the answer. It involves gliding to an airport from altitude, circling down, and then landing the plane on the runway within ± 100 feet of a designated spot all with the engine at a complete idle. Sounds simple, but it’s not. If you think you can glide to a runway without recent practice, give it a whack.
The first step was to determine how much altitude we would lose at best glide speed for each 360 degree turn. After a couple of turns we determined that we would lose almost 2000 feet for each 360. That’s a lot! But it was very consistent. Two thousand feet per 360 degrees was drilled into our minds.
Gliding Spiral to a Landing
Armed with that information we climbed to 5000 feet above the airport and began our first test. Knowing that each turn loses 2000 feet, we rolled out onto downwind right at about 1000 feet AGL. But we had been circling too far from the runway. When we turned base it was clear that without a working engine we never would have made the runway.
So next time, we began our circles so we would straddle both downwind and the runway numbers. This time, we would have made the runway but ended up being way too high. For the third attempt, I told Robert to keep talking to himself and asking the question, “Am I too high or too low?” If the answer is too low, you’ve made a mistake already. If the answer is too high, then add drag. In the Cirrus, about the only available drag is two settings of flaps. A strong slip can also add drag. So for the next attempt, Robert kept asking if he was too high, and adding drag as needed. This time we did get the plane safely on the runway.
Subsequent attempts improved Robert’s ability to make it the runway, but we never did make the designated point within 100 feet. The two takeaways from this maneuver are that 1) with practice safely getting the plane to the runway can easily be done and 2) it can’t be done without regular practice.
Wingovers
The next maneuver was back-to-back wingovers. This is similar to the Chandelles in the Commercial ACS. It’s not truly Chandelles, but the result is the same—a climbing turn followed by a descending turn that begin and end at the same altitude but with a 180-degree heading change. As with the first exercise, it’s more difficult than it sounds.
Our first attempt didn’t go well. It’s a bit like patting your tummy and rubbing your head. Coordinating both pitch and roll was no simple feat. It’s no wonder that the exercise labeled this maneuver as “high difficulty.” Getting the plane back to its original altitude and exactly 180 off the original heading was not simple. Plus, in this Cirrus we were fighting the autopilot the whole way.
 The GFC 700 combined with the Garmin Perspective (G1000) have Envelope Protection that attempts to prevent the aircraft from entering attitudes that it considers excessive. Once past 45 degrees of roll or 10 degrees of pitch, the autopilot (even if it is not engaged) will attempt to bring the aircraft back to what it considers a more normal attitude. You can overpower the autopilot or kill it with the disconnect button on the yoke, but the moment you let go, the autopilot returns to the job it considers essential.
After the flight we discovered a setting in the autopilot setup page to disable it permanently. But while practicing the maneuvers, Robert was left holding the disconnect button continuously, which was quite distracting. Even so, each time we practiced the maneuver, Robert got closer and closer to the standards listed for it. He felt that this practice got him much more “in tune” with the plane, improving his stick skills.
Rolls On a Heading
Next up was rolls on a heading. The objective of this maneuver is to bank the plane left and right while using opposite rudder to prevent the nose from moving off a point on the horizon. It’s the exact opposite of a coordinated turn. Like the wingovers in the previous maneuver, this one is also listed as having a high difficulty. Robert called his first attempt, “terrifying.” The problem was that his application and removal of the rudder was far from smooth. Once the bank angle was set, he added rudder to prevent the nose from moving, but stuffed it in all at once. The same thing happened as we returned to wings level. The result of sudden rudder application and removal was that the nose swung violently around.
During all this, the envelope protection (which we had conveniently forgotten about) tried to fight Robert and return the ball to center. All in all it was not a pleasant experience. After some discussion, we attempted the maneuver a second time. This time the use of the rudder was much smoother and the adrenaline level was much lower. However the nose swung easily 30 degrees off the point on the horizon. And we still were not connecting banks to the left with banks to the right. It took several attempts but by the end of the session Robert was able to connect left and right banks with smooth(er) rudder inputs. But the goal of heading changes of less than 5 degrees and altitude changes of less than 20 feet was left for the next time out. Clearly the predicted difficulty level of high was spot on.
Dragging the Runway
Our last maneuver for the day was dragging the runway. In this maneuver a visual approach is made to a runway that has a significant crosswind. Then you fly the length of the runway while banking into and against the wind so that the plane moves from side to side on the runway. All the while this is going on you must keep the nose pointed straight down the runway, maintain your height above the runway and your airspeed exactly.
However, the wind was uncooperative—it was straight down the runway. We modified our technique somewhat so that the maneuver was a bit more of rolls on a heading while low over the runway. Thus when banked to one side or the other, opposite rudder was applied to keep the nose pointed straight down the runway. With no crosswind, this meant that we were drifting left or right across the runway.
Once we got to one side we would begin the bank to the opposite side. Throughout this maneuver Robert attempted to maintain an exact altitude above the runway and a perfectly constant airspeed. That’s a lot to keep juggling. Our first few attempts ran out of runway before we could even complete one full cycle back and forth across the runway, even though the runway at Moab is nearly 7400 feet long. On subsequent attempts Robert was able to better complete the maneuvers, but as with all the other maneuvers we did, they were nowhere near the completion standards established in the Exercise Program.
Review
So were these maneuvers helpful? Robert gave them a double thumbs up. I’d have to say the same. Much like practicing for any new license or rating, working on these maneuvers will have you much more in touch with the plane. Attempting to accomplish several performance goals all at once is quite difficult. You will not be proficient in any of these maneuvers the first time you attempt them. However the more you practice each maneuver the better you become at each.
The practice will give you a better understanding of what it takes to make the plane do exactly what you want. With no pressure to attain a license or rating practicing these maneuvers is much less stressful. In the end, knowing what the plane is capable of under varying circumstances (along with better aviation decision making) will make anyone a better pilot.
Ken Maples lives and teaches in the mountains of Colorado where he’s always striving (and sometimes succeeding) to become a proficient pilot.
Above & Right: The results for gliding spiral to a landing were best when the spiral is kept close to the runway (on the left where the lines converge).