
Arriving or departing IFR around big-city airports can be an intimidating, high-workload experience. Surrounded by pilots who know the ropes, it’s easy to stand out if you make greenhorn mistakes. Getting a tongue-lashing from ATC can be avoided with a little research and planning.

Arriving in Style
If big airports are not regular fare for you, then your first exposure will probably be the arrival procedure. Check before you fly to see if the destination has any Standard Terminal Arrival (STAR) procedures specifically designed for slower, prop-driven aircraft.
If you haven’t thought about STARs since your IFR training days, remember to maintain the altitude you were last assigned unless the controller uses phraseology like “… descend via the KIMMO TWO arrival.” If you descend without a clearance, you’ll get chewed out—or worse. You’ll find those STARs in the front of your NACO book, or with the airport plates for Jeppesen.
One nasty pitfall is that ATC may assign a STAR that’s not listed in the charts for your destination. For example, if you were inbound to Riverside, Calif., ATC may assign a STAR associated with Ontario. Jeppesen notes this on the airport diagram for the airport in question. NACO plates don’t show this in print, but they do if you check them online. The STARs that might apply will appear in the list of plates for your destination airport. Services like PDFPlates often bundle them in for you, too.
To help expedite the flow of traffic, ATC’s preference is a visual approach. Expect the visual if the weather is good enough (three miles visibility and ceilings of at least 1000 feet) and you have the airport or the preceding aircraft in sight. Accepting the visual means you accept responsibility for traffic separation, obstruction clearance and wake turbulence. That last bit is partly why ATC likes the visual: Aircraft can get packed in far tighter than on instrument approaches. Some airports have charted visual approaches that you’ll want to review in advance.
Lining up on, and even landing on, the wrong runway or at the wrong airport is a real possibility with a visual in busy terminal areas. I’ve witnessed aircraft flying into the setting sun, inbound to Oakland, Calif., mistakenly line up for a runway at the nearby Hayward Air Terminal, which has an oddly similar runway layout. Prevent this by having the instrument approach ready for the runway you’ve been assigned, with the VOR or localizer tuned and identified or the approach loaded in your GPS.
If the weather is low, be prepared to fly any instrument approach, but chances are you’ll hear several aircraft ahead of you getting the same instructions for the same runway you’ll get when it’s your turn. The approach shouldn’t be a surprise. Approach charts all start to look the same after a while, so verify you have the right chart and have loaded the correct procedure into your GPS. This is especially important at airports where there are parallel runways with similar-sounding approach names.
In the Heart of It
You may know your home airport like the back of your hand, but taxiing at a big city airport without an airport diagram is bush-league. Your taxi clearance could be complicated and you don’t want to get lost or have a runway incursion, so write it down. There’s no shame in telling ground you’re unfamiliar and asking for progressive taxi instructions. That’s what they’re there for.
Having that diagram is just as important when it’s time to leave. It shows important frequencies like ATIS, whether or not there’s a dedicated Clearance Delivery frequency and if there are multiple Ground and Tower frequencies. You’ll also want to turn to the back of your trusty A/FD for the list of preferred IFR routings for many city pairs. In selected areas you’ll also find Tower En Route Control (TEC) routes for many common departure and destination cities (see “Gettin’ TEC Route Savvy,” May 2010 IFR). Study these routes and you’ll have a better idea of ATC’s routings.
Fltplan.com can be handy here for seeing commonly-assigned clearances.
You can usually obtain your IFR clearance 30 minutes in advance of departure, provided you didn’t just file your flight plan three minutes earlier. Getting your clearance early gives you time to comprehend the routing, set up your radios and GPS, and scope out the taxi route before calling Ground. Note any warnings on the ATIS of ground-stop or flow-control programs that could prevent a timely departure.
When the Clearance Delivery frequency is a rapid-fire sequence of instructions and read-backs, it’s natural to feel a sense of dread before keying the mic. If the clearance you get is not what you filed, it’s easy to stumble and fumble reading back unfamiliar VORs, Victor airways and waypoints. It’s likely to go better if you checked for preferred and commonly-assigned routings. But if ATC spits out a total curve ball, ask for clarification if need be.
Departure Gaffes
Calling Ground with “Ready to taxi,” should mean all your ducks are in a row: Airport diagram and charts organized, frequencies and GPS programmed, clearance fully-understood and a clear idea of what is about to happen. Note that you may not have a spot to do a run-up once you’re out on the taxiway. Check the diagram or ask at the FBO about this if needed. You may need to ask Ground to send you to a spot to do the runup, before they send you to the runway.
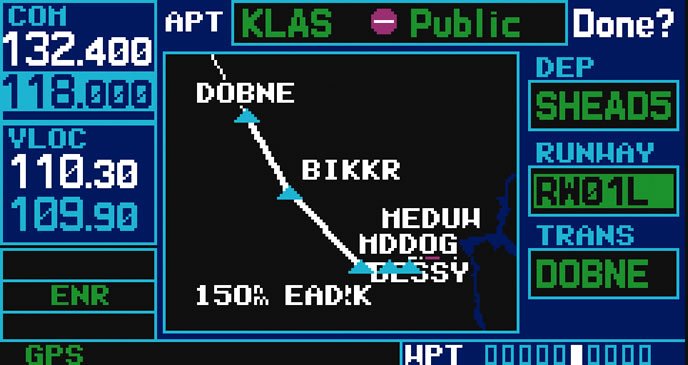
Standard Instrument Departure (SID) procedures simplify clearance delivery, but they also keep aircraft separated in complex airspace. A common trap with vectored SIDs is missing an altitude restriction, climbing too high too early, and causing a controller to lose separation between you and another aircraft. Brief a SID just like you would any other procedure and you’ll be better prepared to comply with specific heading and altitude restrictions. Review these restrictions right before takeoff. In addition to restrictions, the SID usually has your departure frequencies. If you suddenly notice that a departure frequency wasn’t included in your clearance, check the printed SID.
Complex vectoring can occur with some SIDs, so you’ll need to be proficient at activating legs of a procedure with your GPS. For most Garmin systems, view the flight plan, enter cursor mode, scroll to the lower of the two waypoints that define the leg, press Menu and press Enter twice to activate the leg. You can also press Direct twice and then Enter.
No Big Deal
Flying into big airports will go smoother if you stack the deck in your favor through research and planning. Avoid the common traps and no one will know you’re not a regular in the big city.
John Ewing is an IFR Contributing Editor.


