
Let’s discuss profiles—for flight, not social media—that provide whatto- do-at-each-point guidelines that govern how you fly your airplane.
During an IFR lesson, I often get questions like: “What speed should I be flying before intercepting the localizer?” Or, “When is a good time to put the gear down?” These and many other questions can be answered by developing a set of Standard Operating Procedures (SOPs). Developing a set of profiles is a way to help you visualize SOPs using a simple diagram that you create yourself.
We ran a couple articles on developing your own SOP back in 2017 in January, February, and May. There, we discussed and even illustrated a sample profile, but we didn’t go into much detail. Here’s that missing detail.
What’s a Profile?
A flight profile is a graphical timeline of the operational characteristics, configurations, and speeds of an aircraft along a flight path in a specific phase of flight or maneuver. You might have a profile for takeoff and climb, arrival, non-precision approaches, precision approaches, and landing. Profiles can also depict maneuvers like steep turns, stalls, and engine failures in multi-engine aircraft. Profiles help us visualize what we will do and when we will do it.
Profiles are an essential element of Part 121 and some Part 135 training. They are aircraft type specific. They help crew members work together as a team to solidify required callouts and desired corresponding actions. They are practiced most often in cockpit procedure training sessions, sometimes for hours a day. But the hard work pays off. Each crew member knows what to expect from the other and that leads to better flight path management and cockpit resource management.
The same concepts apply to singlepilot operations. In fact, profiles adapt well to single-pilot environments.
Why Profiles?
A set of profiles will help reinforce your SOP—or comprise the basis on which you develop an SOP. Profiles help you train more efficiently and allow you to better anticipate what you need to do at each step. Profiles are especially beneficial in instrument flying because they help create a mental model of how you manage a flight from takeoff to touchdown. They help set expectations.
Profiles help you do the right thing, the right way, at the right time, every time. They help create not only muscle memory, but mental memory. SOPs make you a more reliable pilot. It is important to recognize, though, that while having solid profiles and SOPs help routine operations, they are particularly valuable when something unexpected occurs. Fatigue, weather, or some mechanical problem can distract you from performing your normal duties. Wellconsidered and thoroughly mastered profiles let you perform important tasks automatically, while freeing up brain capacity to deal with the unexpected.
Let’s discuss performing tasks automatically. When you get in your car, do you stop and think about how to start it? I’m guessing you don’t. You’ve done it so often that it’s automatic. That’s what SOPs and profiles do. They script the appropriate actions at the appropriate times. When you are performing at that level, you have more mental capacity to manage the flight and, more importantly, the unexpected. If you have a standard point to extend the gear, then you will not have to think about it when distracted by other circumstances, and you are less likely to land gear up.
Getting Started
The starting point for creating a profile should be the pilot’s operating handbook or another official source. There you will find the numbers and sequences for your profile. This is also where the limitations for your aircraft are located. Regardless of how you create a profile, you should always respect the manufacturer’s limitations, such as landing gear and flap speeds.
There is no one standard for creating profiles, but we’ll use a basic two-dimensional format where time is depicted from left to right, the lower part of the diagram has trigger points, such as airspeed alive, or reaching a certain altitude. Above the trigger points we’ll depict the desired actions, such as gear and flaps. You can define any number of triggers and associated actions. I would caution, though, against making your profiles overly complicated because they will be harder to see, master, and use. Remember that they are primarily intended as guidelines to help you match situational awareness with flight actions.
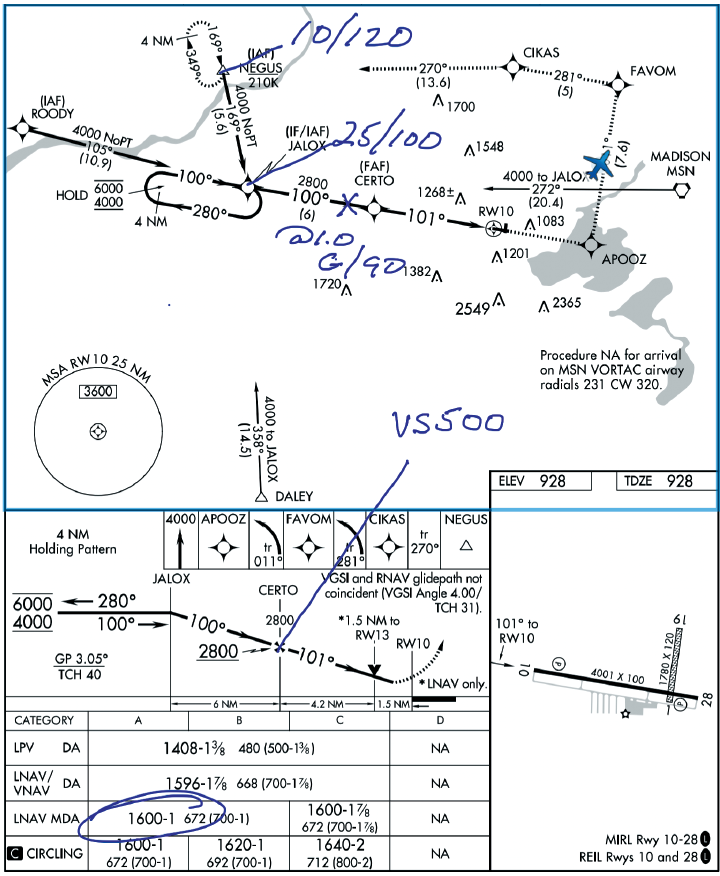
Let’s look at the ILS profile on the previous page. The key points on this profile are approach flaps and speed set while on base (pattern legs aren’t explicitly shown), course alive before intercept, landing gear down at glideslope intercept, and final landing checklist and speed set by the final approach fix. Additional callouts are depicted for 1000, 500, and 100 feet to minimums, then arrival at minimums, where either a landing or missed approach procedure occurs.
My goal on approach is to have speed set and everything configured before descending. This enables me to devote my attention to the most important part of the approach: needle(s) centered to minimums. If you fly approaches differently, customize to suit.
It is a simple matter to adapt profiles to a crew environment. In this case, we have the roles of the pilot flying and the pilot monitoring. Typically, the pilot monitoring is responsible for making the calls corresponding to trigger points. The pilot flying acknowledges and then performs the appropriate action.
Most of us, however, fly single pilot. Most of the same elements used in a crew environment can be used simply by verbalizing the triggers. Some find that this improves situational awareness.
Profiles On the Fly
Using paper charts or the markup feature on your EFB, you can even make profile notes on the approach chart as you go. This can be especially helpful at unfamiliar airports or on a more complicated or unfamiliar approach. This way, you can adapt and apply your profile to the actual situation. I use a shorthand notation to represent gear and flaps and then I just mark the location on the chart with the desired speed. You can use both the plan view (top-down) and the profile view (side-on) to make notes appropriate to your situation.
You Have To Adapt
Profiles exist to help you visualize a standard, textbook-like, procedure. But, you must adapt for an off-profile situation. For example, suppose your standard profile has you lower the landing gear upon glideslope intercept, and your profile is based on intercepting the glideslope at the altitude shown on the chart. It’s common for ATC to vector you onto the approach miles outside the FAF much higher than the charted glideslope intercept altitude.
No problem. You simply adapt your profile to that situation. You can intercept the course and glideslope at the higher altitude, but delay gear extension (and possibly speed reduction) until what would have been the normal point, usually just outside the FAF. Profiles are a way to standardize your procedures, but naturally you need to take operational considerations into account.
Remember, though, that if ATC instructs you to do something outside of your comfort zone, you can always say “unable” and explain what you can do instead. Giving ATC a suggested alternative that works for you can help everyone.
Before your next flight, take a few minutes to develop a few key profiles. Give them a try next time you fly, ideally with another pilot or savvy passenger to help monitor. Make any necessary adjustments to them after you land. Then use them consistently. You’ll be a safer and more proficient pilot.


Thanks you
Indeed, very good advices.
Like the Jan, Feb, and May articles,
Oops it should say, Like the Jan, Feb, and May articles, I don’t see an details.