
Area navigation using GPS has been around (for us) for about 30 years. Before that we did mostly the same thing using LORAN for a while. But, the National Airspace System was designed around VHF Omni- Range navigation stations, VORs, that long preceded GPS.
Technically, there are three types: VORs that just provide azimuth information, VOR-DMEs that include a DME station, and VORTACs (VOR plus the military tactical air navigation system) that, for our purposes, are the same as VOR-DMEs. Regardless of the type, though, the actual navigation is via azimuth information using the VOR.
GPS is wonderful. It’s simpler to use than a VOR, requiring a lot less fiddling. It allows direct routes—so much so that even a basic unit is capable of one-leg navigation from Portland, Oregon, to Portland, Maine, with a setup that’ll take less than a minute. And along the way, you’re traveling the great-circle (shortest) route with accuracy on the order of a few meters. So, with GPS, we rarely use VOR navigation anymore. Why bother? We’ve often talked about the Minimum Operating Network, MON, that describes the FAA’s plan to decommission many VORs while leaving just enough to provide reasonable navigation capability in case GPS is unavailable. MON makes it obvious that we must still know how to use VOR navigation. A recent GPS outage on the East Coast of the U.S. left more than a few pilots declaring an emergency because they couldn’t navigate. Really? Couldn’t navigate using VOR? Well, it seems so, because VORs were working normally.
With that in mind, we’ve decided that an article on VOR navigation is in order. For you old-school pilots for whom GPS is “new-fangled” (our editor included), and who are very comfortable using VORs, consider this a refresher. Meanwhile, for “new-school” pilots who grew up with GPS, here’s a review of what we all should know, or perhaps might have forgotten through disuse. You never know…
The VOR Station
A VOR station is a directional radio beacon that tells a receiver the azimuth relative to the station. The receiver can detect that it’s on the 090 bearing, or radial, from the station. Without DME or an azimuth from another VOR, you don’t even have a two-dimension fix. Contrast this with GPS that gives a precise three-dimension position in space. Borrowing from our June 2016 issue, we can conceptually think of the VOR as a lighthouse with a light beam that sweeps the horizon. This light beam has the direction embedded in it, so that a person looking at the lighthouse from the east will see “090” in the center of the beam as it sweeps past, while a person to the northwest will see “315.” This “direction” signal is the radial, the azimuth, from the VOR station detected by the receiver.
The VOR Indicator
The job of the VOR indicator is to take that received radial and compare it to a pilot-selected course to fly and provide a left/right indication the pilot can use to remain on the selected course. The simple VOR indicator in the cockpit has a knob (Omni Bearing Selector, OBS, or course selector) that the pilot uses to rotate a compass card to select a course to follow to or from the VOR station. A left/right needle (the course deviation indicator, CDI) shows the pilot how far from the selected radial the plane is located. Dots on the instrument’s face under the swing of the CDI show how many degrees the plane is off the selected radial. Each dot represents two degrees of deviation and there are typically 10 degrees of deflection on either side of the center of the instrument. The indicator also has a “To”/”From” flag or ambiguity indicator. If the OBS (the selected radial) is in the same hemisphere as the received radial from the VOR, the indicator will say “From.” If the OBS is in the opposite hemisphere from the received radial the flag will read “To.” Your actual heading is irrelevant. Say you’re directly east of a VOR and dial up 090 degrees in the OBS. You’ll see a “From” indication. In fact, you’ll get a “From” indication with the OBS anywhere from slightly past zero to almost 180. Similarly, you’ll get a “To” indication with the OBS anywhere from slightly past 180 to almost 360 (zero). From this you can see that the ambiguity indication will flip as you spin the OBS beyond 90 degrees from the setting where the CDI was centered, from the radial you’re on. One last way to understand that ambiguity indicator is that with the CDI centered and a “To” indication, if you actually fly the course that’s under the CDI, it’ll take you directly to the station (assuming no wind). Or, conversely, center the needle with a “From” indication and fly that course, and you’re flying directly away from the station. But remember that your actual heading is irrelevant; the indications are based solely on your position.
Using the Information
To identify your current radial, merely center the CDI with a “From” indication. The course index (the number on top of the VOR indicator, the OBS) is the radial of your current location; it is the azimuth from the station to you. 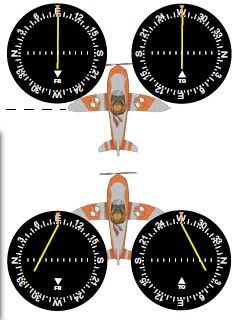 To intercept and fly a specific radial away from the station, set the OBS to the desired radial with a “From” indication. (If the desired radial yields a “To” indication, you’re either in the wrong hemisphere relative to the VOR, or you’ve misidentified the radial and should choose the reciprocal of the selected radial.) The CDI will then deflect in the direction the aircraft must turn to intercept the radial—turn towards the needle to get on the selected course. To fly directly towards a station, turn the OBS until the CDI is centered with a “To” flag. The course index is your course to the station. If there is no wind, flying this heading will take you to the station. To fly a specific radial to the station, set the course index to the desired radial with a “To” indication (with the same warning if you don’t get a “To” indication). The CDI will deflect in the direction the aircraft must turn to intercept the radial—once again turn towards the needle. When you’re intercepting a specific radial, either “To” or “From” the VOR, exercise some caution with your intercept angle. Say you want to fly 090 degrees “From” the VOR. You put 090 under the OBS pointer and the CDI needle is pegged to the left with a “From” flag. That 090 radial is north of you. The CDI is telling you that you’ve got to go to the left to get on that 090 radial. But, how far? You don’t know. Remember that the CDI is typically two degrees per tick mark of error. How far is that two degrees? Unless you know your distance from the VOR, you don’t know the distance magnitude of your error. This can make life interesting. If you’re 60 miles from the VOR, two degrees is two miles, but at 10 miles, two degrees is 0.3 miles. So, choosing an intercept angle is important and best done with even a guess about your distance. For small CDI errors at moderate distances from the VOR, say under perhaps four degrees and 30 miles, a 30-degree intercept might be a lot. But if you’re 75 miles from the VOR with eight degrees of error, even a 45-degree intercept could take some time to center the CDI. As you’re intercepting a specific radial, note how fast the CDI approaches the center. You can begin a gradual turn back to a heading that matches the OBS using some experience and judgment to reach zero CDI error when you reach the OBS heading. Then, merely make small corrections in your heading, probably less than five degrees at a time, to keep the CDI centered. You’ve seen that you can center the CDI with two different OBS settings. Say you’re east of the VOR, with 090 in the OBS, a “From” flag, and you’re flying away from the station. Correct toward the CDI. But, if you somehow ended up with 270 on the OBS and a “To” flag while still flying east, the CDI will seem to be backwards. So, when you use VOR navigation, your OBS, ambiguity indicator, and actual course relative to the station must all match lest you get CDI indications that are the opposite of what you expect.
Navigating with VORs
GPS provides point-to-point navigation between any two points—we’re typically always navigating to the next fix—to-to navigation. Given the limited service volumes of VOR stations, you would normally navigate from one station until adequately receiving the next one. You’d switch over, then navigate to the next station; this is from-to navigation. Let’s say you want to navigate to a VOR. You center the OBS with a “To” flag. As you fly, the CDI needle drifts to the right. If you turn to the right until your heading matches your course index, you will fly parallel to the desired radial but never intercept it. In order to intercept the radial, you need an intercept angle as discussed above. It might take a few minutes but the CDI will start to move towards the center. If it swings past the center, you simply turn the other way, chasing the needle, using the same process. If there is no wind, once you are on the radial you can maintain your heading and keep the CDI centered. If there is a wind, once you are on the radial, the CDI will indicate your drift. If the CDI starts to move to the left, the wind is making the aircraft drift to the right of the radial. You need to make a slight turn towards the needle to stay on the radial. Depending on the wind, you might have to fly with a correction angle to stay on the desired radial, just as you crab the aircraft to stay on the extended runway centerline when landing with a crosswind. If you have two VOR indicators, you can tell exactly where you are. Tune each VOR to different nearby stations, center the CDI needles with a “From” indication, and note the radials. On a chart you plot the two radials; where they intersect is your position, usually within a mile or two. Both Victor and Jet airways are courses between VORs. The airway might traverse many segments, but each segment uses a VOR at each end for navigation. While the concepts above might seem complex, they’re necessary for a full understanding of using VORs. But, actually flying an airway is relatively simple. You will begin flying outbound from the first VOR. Eventually, you’ll need to fly inbound to the next. That “changeover point” is halfway if not otherwise noted as a specific point on the chart (where radio reception might limit the use of one VOR before the half-way point), or at a bend in the airway where you simply can’t continue outbound from the first VOR. Let’s use a designated changeover point as our example. 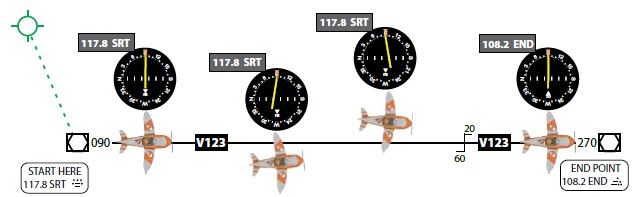 Say you’re departing an airport with the first VOR, “START HERE,” nearby. After takeoff, navigate to SRT as explained above. As you near the VOR, the CDI will become hypersensitive and you should stop chasing it. Stay the course until the “To” flag flips, becoming a “From” flag, indicating you’ve passed over the top of SRT. Then turn to the outbound course, here 090, and put 090 in the OBS. Once the hypersensitive CDI settles down as you get a few miles from the station, keep the CDI centered as described. This will require frequent small corrections. With practice, you should be able to keep the CDI within less than one dot from the center. Continue until you reach the changeover point. How do you identify the changeover point? It’s easy with DME. If the airway bends, wait until the course “To” the next station, “END POINT,” is centered, either by using dual VOR receivers and indicators, or with but one by frequently switching back and forth between START HERE and END POINT. On a straight airway, with only one VOR receiver, and no DME, you’ll have to use pilotage—time/speed/distance calculations—to determine the changeover point. Note that there’s definitely some “slop” in the changeover point and you can usually adequately receive the next VOR well before the actual changeover point. A note about charting is in order. Whenever an airway is depicted on the charts, the radial (not course) at each VOR is shown on the chart. In the illustration above, the airway, V123, is defined by the START HERE VOR 090 radial on the west end, then after 60 miles, by the END POINT VOR 270 radial on the east end. Recall that the radial is the azimuth away from the VOR. Thus, the chart shows 270 out of END to define V123. However, since you’re flying the airway “To” END POINT at this time, you wouldn’t select the radial, but its reciprocal, 090. Finally, note that the outbound radial from the beginning VOR and the inbound radial on the VOR that ends the airway segment won’t always be precise reciprocals. They’re frequently a few degrees apart. This is due to magnetic variation differences, differences on the survey dates, station calibration, or even local interference.
Maintain Your Skills
VORs still provide the backbone of the airway system used globally. Plus, for years to come, the VOR system will remain the backup to GPS in the event of a GPS failure. For these reasons, it’s best to occasionally practice with VORs (and no moving map!) to keep your skills sharp.


I still use a VOR to cross check radials on an approach that provides them. It backs up my ILS approach and keeps me current on usage.
This is an excellent article yet to be comprehensive one should include glass panel VOR navigation and not just steam gauge. I understand that editorial and production limitations may require editing that out.
Great explanation of the VOR using the lighthouse analogy! That’s the first time I’ve heard that, and it’s the perfect way to explain the technology without going in to the reference signal and navigation signal, which makes people’s eyes glaze over.
I can’t believe that I have been flying so long that everything in this article is “old hat” to me!
I use VOR tracking still to confirm the GPS fixes when cross radials are given and use two VORs to cross fix my position. Kind of a security blanket I guess.
Good article.