
If you’re flying behind round gauges—and plenty of us still are—you need to be ready for critical ones going belly-up. Used correctly, your GPS is a huge asset.
Despite the magazine vogue of articles on glass cockpits and technologically advanced airplanes, thousands of us continue to fly steam gauges. A well-equipped steam-gauge airplane enables a competent pilot to fly the same mission that a glass airplane can fly. The Apollo spacecraft were steam-gauge equipped and carried men to the moon.
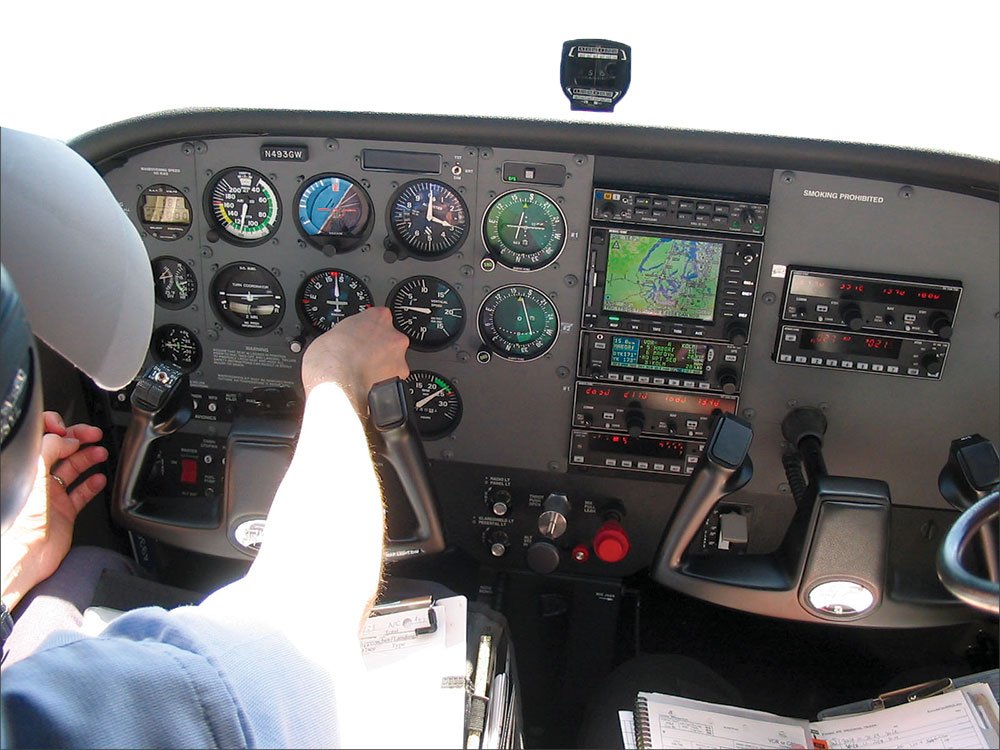
One area where steam gauges truly differ, however, is a no-gyro emergency. This can challenge even a competent instrument pilot. In this article we will cover strategies applicable in an airplane with vacuum-driven attitude and heading indicators without a standby vacuum system—and a single IFR GPS.
Whoa, That’s Not Right
The major difference between a simulated no-gyro situation during training and a real emergency is the simulated emergency is expected and obvious: The instructor will cover the gyros. After a vacuum-pump failure, the gyros will gradually spool down over the course of a minute or two. They’ll be sluggish at first, and then they’ll lie to you. Pilots invariably control the airplane by reference to the dying gyros until a disagreement between instruments reveals a serious problem.
This disagreement will be confusing at first and can lead to incorrect control inputs. Remember that the turn coordinator (or turn indicator) is independently powered and will be your only reliable bank instrument, with airspeed and altimeter providing pitch information. By the time the pilot has recognized and analyzed the situation, the airplane may well have entered an unusual attitude with little time available to regain control.
Slow and Steady
After you’ve regained control, the most important thing is to not rush anything. Smoothly control the airplane. If you were on autopilot when the gyro failure occurred, it may have mis-trimmed the plane. Set a moderate cruise power setting and trim the plane for it. If you’re in smooth air, release the flight controls for about 10 seconds and fine tune the trim (both elevator and rudder, if available) until the plane flies reasonably straight-and-level on its own.
Take a deep breath and settle down. You’re still flying, the engine is still running, you did not suffer an in-flight break-up or dive into the ground. Now it’s time to figure out how to get the plane, with you and your passengers in it, safely back on the ground.
Switch the GPS to the page displaying the pseudo-DG with ground track, or your GPS display’s equivalent, and use it in conjunction with the turn coordinator to return to the original heading. At this point you may be tempted to fixate on the ground-track information of the GPS, however, it’s critical to fly primarily by the turn coordinator, since attempting to fly a turn referencing only the GPS ground track information may cause you to overbank the airplane and enter the next unusual attitude.
A gyro failure in actual IMC is a serious emergency. Go ahead and use the “E” word. If the frequency is busy, get everyone else to shut up by starting out with “Mayday, Mayday, Mayday.” Then try something like: “Kansas City Center, Cessna Two Papa Tango is declaring an emergency, we are no gyro.” Stay on your presently assigned transponder squawk; if you change to 7700, then radar will drop your data block. Don’t report the nature of the emergency as a “vacuum system failure,” because the controller may not be aware of the ramifications. It sounds more like a home-cleaning problem.
The controller will start a game of 20 questions: “Cessna Two Papa Tango, Kansas City Center, copy your emergency. Say number of persons on board, fuel remaining, and request.” Provide what you’re comfortable doing without losing your focus. If you haven’t figured out what you want to request, advise the controller to “Standby on the request.”
You have one more housekeeping chore: Cover the inoperative attitude and heading indicators because you will instinctively scan them. Instrument covers are great, but a piece of paper from your kneeboard will do the trick. Fold it to the right size, punch a hole in it with your finger, and place it on the pitch-set knob of the attitude indicator. Sticky notes also work well. An iPad won’t work as an instrument cover.
Heading in the Game
My observation in over 30 years of teaching instrument students is that the lack of a heading indicator is the biggest challenge in partial-panel flying. Most pilots can fly pretty well if only the attitude indicator is inoperative, using the turn indication, airspeed, altitude and heading. Most pilots find it considerably more difficult flying accurately without a heading indicator, even if the attitude indicator is working properly.
Reasonably accurate heading control using only the magnetic compass and compass turns or timed turns is challenging unless the air is really smooth, and could almost be considered an academic exercise.
Scan the turn coordinator, airspeed, altitude and GPS ground track to control the plane. This is an awkward scan, as the turn coordinator is typically on the far left of the instrument panel and the GPS is in the radio stack. If you have a second, portable GPS attached to the yoke, set it to the best flight-instrument presentation it offers, and use the panel-mounted GPS like you normally would.
It is easy to lose the big picture and directional orientation when flying no-gyro. If you still have an ADF in your plane, rotate the ADF card to your target heading and use it as a heading reminder. Do this after every heading change. It will make it much easier to maintain awareness of which way is north or south, and helps avoid mistakes such as turning in the wrong direction.
Make a Plan
Your instinct will be to get the plane on the ground as quickly as possible. That may not be the best choice. Consider a flight of 500 miles that parallels a warm front. There may be low ceilings and poor visibility along your entire route. However, a 90-degree turn could get you to VFR conditions within 150 miles. If you have the fuel for it, that’s a smart choice.
Ask the controller for the nearest airport with VFR conditions, preferably with ceilings high enough for a visual approach from the MEA down. Ask for a tops report, and if they are within your plane’s performance capabilities and there is no icing above you, request a climb to VFR conditions on top. Once you break out into the sunshine (or get between layers) and have your plane pointed towards VFR weather, the emergency may be over. Your preflight of satellite images, weather depiction and low-altitude prog charts should also give you an idea where your best escape route lies.
If you do have to shoot a no-gyro approach, try to find an airport with weather well above minimums. Don’t continue to your intended destination unless you’re fairly close, and don’t return to your departure airport either unless the weather is better there or you feel safer coping with the emergency at a familiar airport. You’re supposed to land at the nearest suitable airport, but you decide what’s most suitable for you.
Diverting to an unfamiliar airport with an emergency in progress is considerably more challenging, even if the approach plate is readily available. You can ask the controller to read the information from the approach plate to you as it is needed. That way you can concentrate on flying with minimum distractions.
Many pilots assume that an ILS is the best choice for an approach. Considering the sensitivity of the ILS signal and the difficulty of precisely controlling the plane on partial panel, it may actually be the most challenging approach. If the weather is not too low, you’ll break out before this is an issue. You can also ignore the glideslope no-gyro and just fly it as a localizer-only approach down to the localizer MDA.
Because your plane is equipped with an IFR GPS, you’re probably comfortable flying GPS approaches. This is a good choice if you have a portable GPS to stand in for your failed DG, or you’ve practiced maintaining headings with just the ground-track information on the panel-mount GPS. You should be able to configure a moving-map screen to show precise ground track.
For a VOR approach, you can leave the GPS on whatever page works best for you to supplement your heading information. If possible, choose an approach with a configuration where the VOR is located on the field, or a VOR-DME approach that does not overfly the VOR. Crossing the VOR means a zone of extreme sensitivity and more work to get reestablished on course.
Load and activate the VOR approach on the GPS to back it up and assist. If the GPS course deviation is shown on a separate CDI from your VOR CDI, it will provide stable and linear course-deviation information, which will facilitate flying the approach. This is especially useful if an approach that overflies the VOR can’t be avoided.
Help From ATC?
Getting vectored onto the final approach course with no-gyro vectors can help. Rather than issue headings, the controller issues “Turn left” and “Turn right” instructions. This means you initiate a standard-rate turn and remain turning until the controller says, “Stop turn.”
But this isn’t as easy as it seems. It’s been my observation that frequently the pilot and the controller get out of sync during no-gyro vectors. If the controller wants a 90-degree turn, he will give an initial “Turn left” instruction, followed 30 seconds later by “Stop turn.” The “Turn left” wasn’t anticipated but the “Stop turn” was. This results in a slow roll-in with a crisp roll out. This causes the pilot to undershoot the turn by 20 to 30 degrees. Several quick no-gyro vectors to final may make it impossible to get stabilized on the final approach course before crossing the FAF.
Controller and pilots are usually unpracticed at no-gyro vectors. Frequency congestion is an issue here. We’ve had it happen on training flights where a controller’s “Stop turn” was stepped on by a plane coming on frequency with a lengthy request.
Regardless of whether you go for no-gyro or conventional vectors, ask the controller for an intercept at least five miles outside the FAF to give you plenty of time to get established. If you are not stabilized on course when crossing the FAF, break off the approach and ask to be re-vectored.
If you are in an area without radar coverage, keep it simple. DME arcs or even the typical T transition to a GPS approach with five-mile legs can get fairly busy and challenging in a no-gyro situation. A good-old procedure turn is probably the easiest way to get established. Advise ATC that you plan to extend the outbound leg, even if it’s a hold-in-lieu-of-a-procedure-turn. Commencing a no-gyro final approach from a one-minute teardrop entry is very challenging and should be avoided. There’s plenty of protected airspace for a light aircraft at approach speeds.
Once you are established inbound on the final approach course, make all heading corrections gently at about half standard rate. This avoids over-controlling and chasing the final approach course. Promptly begin the descent after crossing the FAF, and gently lead the level off at MDA by about 200 feet. That’s more challenging without gyros.
If you are flying a complex airplane, don’t get so preoccupied with the no-gyro procedures that you forget to lower the landing gear at the final approach fix. That’s a mistake many of my instrument students make. Forgetting to put the gear down will typically lead to a missed approach: Without the drag of the landing gear, the plane will typically not descend quickly enough to reach MDA before the MAP. At least you won’t land gear up if you have to miss.
Use Everything You’ve Got
Fortunately, most of our flights (and most vacuum-pump failures) take place in VMC. Even if it’s IMC, odds are that the weather will be above minimums somewhere in range. But no matter what you have to do to get back to terra firma, demand the maximum assistance possible from the ATC system and remember that your primary responsibility is controlling the airplane.
Herb Pello owns Prairie Air Service in Benton, Kan. His website is www.prairieairservice.com.
Getting the GPS screens right
If you’re going to use your GPS to augment your partial-panel flying, the most important piece of information is ground track, abbreviated TRK on most Garmin units.
But using track isn’t necessarily as intuitive as you might think. First of, you must not fly primarily by track because it lags behind the actual aircraft heading. You’ll chase it just as badly as chasing an ILS needle. Instead, fly wings level. Look at the track. Make a correction using what flight instruments you have and reestablish wings level. Then look at track again.
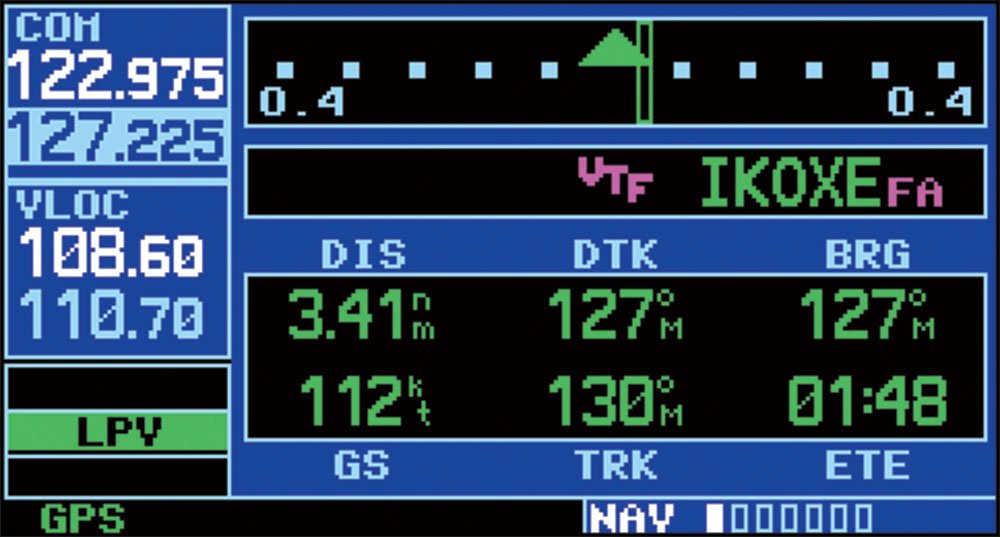
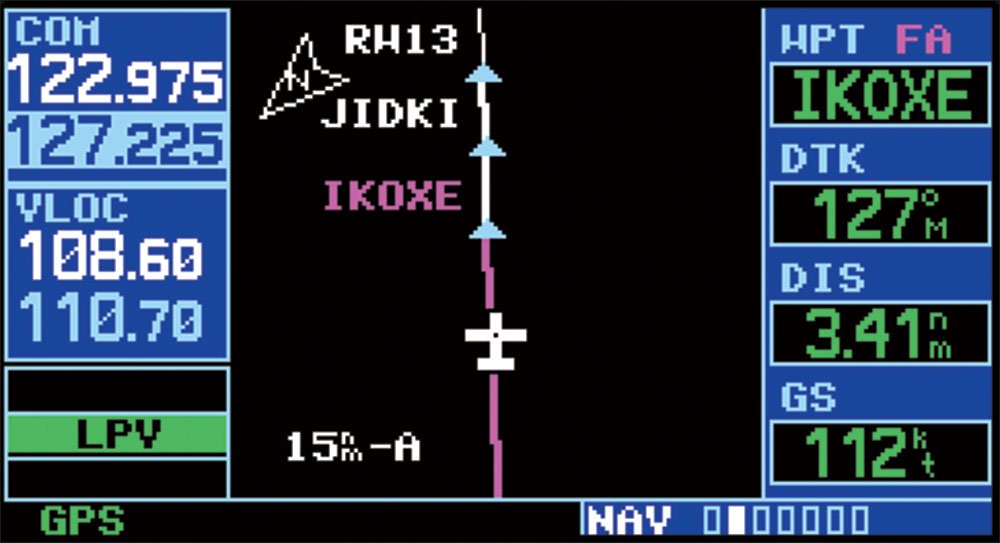
On the first Nav page of common Garmin receivers, you get a CDI showing course deviation and track versus desired track (DTK). In this case, 127 is the course you want over the ground and 130 is what you’re actually doing. The CDI says you’re also right of course, so this is doubly bad: You’re off course and will diverge further to the right unless you do something.
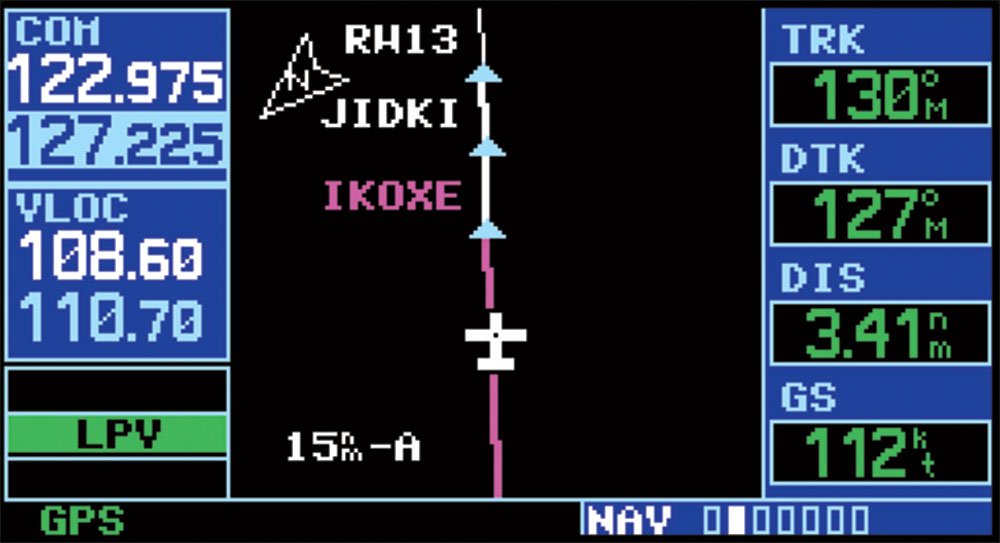
Another option for flying partial panel is to use a moving-map page with track up. Here you can see at a glance that you need to turn left. What’s not obvious is that you’re off course. The CDI shows that better, but presumably you have a real CDI in the cockpit to show that.
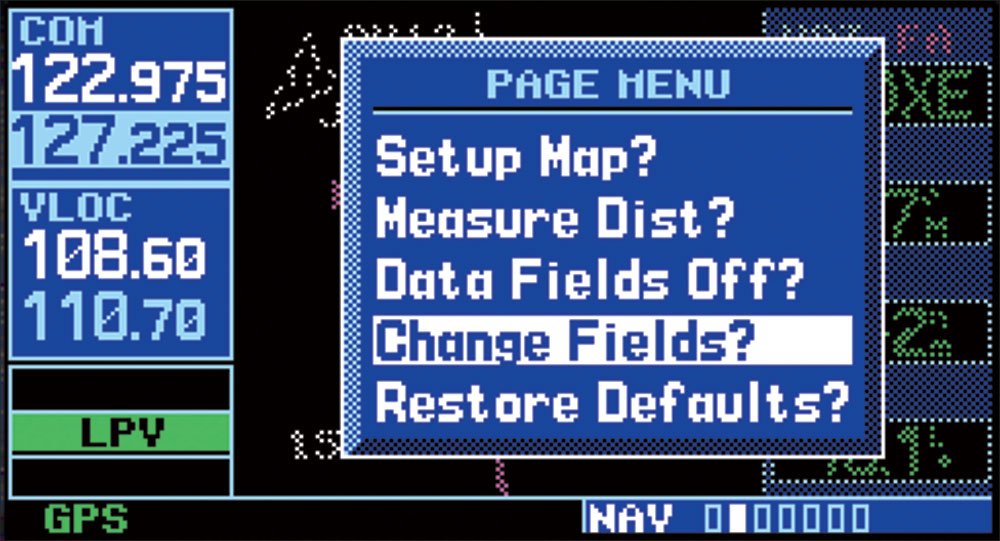
What the default page also doesn’t show, however, is precise track so you can find a heading where staying wings level will keep you on course. To customize this GNS 430 screen, you push Menu and then choose Change Fields. This lets you put track in any of the four boxes. We would substitute it for WPT, as that can be seen on the map, or DTK, which is also the course on your approach plate. Other GPS units have track in different locations and may or may not be customizable. You don’t need a panel-mounted GPS. Track is usually displayed on portable GPS moving maps and most iPad apps that have GPS data. —Jeff Van West
Getting right-side up when you’re one system down
If the plane has departed into an unusual attitude, time is of the essence. An incorrect response may be one of the last actions of your life.
If you’re on autopilot, disengage it. Check your airspeed first: If it is high, chop the power completely. Look at the turn coordinator and make the corrective aileron input with gentle elevator back-pressure to recover from the developing spiral dive. Be careful not to apply excessive back pressure as this could overstress the airplane.

Once the turn coordinator shows that the turn has stopped and the airspeed is back in a normal range, apply full power and regain the lost altitude. Don’t pull back too hard, because that could lead to a stall and make things even worse. A gentle climb at a slow cruising speed may be the safest. Don’t worry about heading at this point: climb back to your altitude first. After all, you are probably not flying in a valley with terrain higher than the MEA within six miles of the airway centerline.
If you see a low and decaying airspeed, a stall may be imminent. Apply full power and gently push the nose over, while rolling out of any turn. In most cases, the plane will have rolled into a left turn because the pilot did not apply right rudder to compensate for p-factor as the airspeed decreased. Once the airspeed has recovered, reduce power and descend to the assigned altitude.
This is the way you learned the unusual-attitude recoveries during training, and that’s still the way to do it. —H.P.


