
There’s an old joke about the retired airline pilot who checks out in a Cessna 172 after years of flying heavy iron. The pilot calls Tower from the hold short line saying, “I’ve lost my first officer, have only basic functioning equipment, and I’m down to one engine … I’d like to declare an emergency now.”
This Sim Challenge is sort of like that. These “approaches” test your skill and IFR imagination. You’ll be using equipment and published procedures in ways they weren’t designed to be used. We usually suggest flying something fast for the challenge and fun, but consider something simple and slow like a vanilla 172, at least at first.
Now hobble it. If the panel has a GPS, set it to a page with no useful information. You’ll need DME, however, so if your panel doesn’t have a DME receiver, set the GPS to the nearest VOR page and use the distance provided there. Or you can put the relevant waypoint in the flight plan and use distance on that page. Also turn off the ownship feature of your EFB.
You’ll probably also want to save each starting point because you’ll probably be reloading to try again after each failed attempt. Really.
Set the weather to 200 overcast with 1 SM visibility. Start with calm winds. Once you’ve successfully completed a stage, you can add winds to level up. Remember to reset the wind to calm before tackling the next stage.
Stage 1: Double ILS
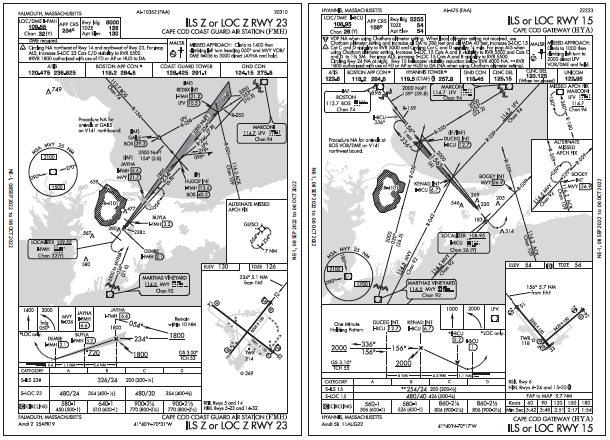
Set your airplane on Runway 5 at Cape Cod Coast Guard Air Station (KFMH). You’ll fly with military precision (hey, Coast Guard is military) by merging two ILS approaches. Call up the chart for the ILS Rwy 23 to KFMH. You’ll depart Runway 5 to track the Runway 23 ILS both laterally and vertically as you climb out. (It protects you on the way in; it must work on the way out.) The glideslope will likely be flagged, so your target is to cross JAYHA just as you reach 1800 feet. Ensure you cross BUYLA at or above 720. Use DME distances to I-FMH from the chart to help make this a continuous climb.
You’ll continue using the ILS in this perfectly normal and acceptable way, climbing at the same slope past JAYHA until your course and altitude intersects with the Runway 15 ILS at Cape Cod Gateway (KHYA). Turn right with sufficient lead to fly inbound on that ILS. You nailed it if you level off only briefly before that glideslope centers and guides you down to a landing at minimums.
How did you climb on a three-degree slope?
Poorly, is our guess. We like to climb much more steeply in IMC because of those darn obstacles. To get this to work, you either climb with low power, a low pitch angle, or both. One thing that helps is only rotating to hold roughly a three-degree pitch attitude on the climb (presuming your AI said zero pitch on the runway). That won’t be quite right, but it’s a good start.
How did it feel using DME without any moving map?
Familiar? Lonely? Terrifying? It probably depends on when you started flying instruments. We’re glad you’re warmed up. You’ll need that for Stage 2.
Stage 2: DME Arc Traffic Pattern
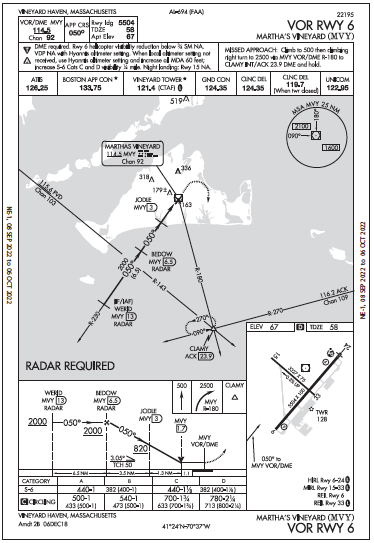
This isn’t your ordinary traffic pattern. You’re going to fly a “Radius-to-fix,” (“RF” leg type) using nothing but VOR and DME. Position the plane on Runway 6 at Martha’s Vineyard, Massechuttes (KMVY). Consider setting your altimeter to zero when you’re on the runway. You’ll see why in a moment.
The objective here is to use a 2.0 DME arc from the MVY VOR in lieu of a traffic pattern. MVY is an on-airport VOR. Note its location on the airport using the chart for the VOR Rwy 6. You’ll depart and fly runway heading until reaching the 2.0 DME from MVY as you climb to pattern altitude. You’ll turn left to join a two-nautical-mile arc and hold that arc and pattern altitude.
When you’re on about R-330, which is 90 degrees to Runway 6, begin a descent as you continue to fly the arc. Arc until you can join a radial back to Runway 6 and break out at 200-feet AGL with the runway in sight.
It’ll probably take you more than one try to get this one right. Think it through, make a plan, and give it a go.
Tip: It helps to draw it out first. Think about departing and getting to 90-degree point as one task and descending on the arc to intercept inbound as another.
How did you join the arc?
The old-school key to flying arcs is to determine what radial you’re on and turn to fly perpendicular to it. That means twisting the OBS to center it with a FROM indication, and turning to a heading 90 degrees left of that. The key is how much you lead the turn. At 90 knots, 0.5 NM is a good choice, so you’d start turning at 1.5 DME to join the 2 DME arc.
How did you maintain the DME distance?
This close to the VOR it’s a constant banked turn. You could just watch the DME and adjust as necessary, or even maintain zero knots on the DME groundspeed (actually just closure rate on a real DME). But you also need to track your position around the arc so you know when to descend, and when to turn inbound. Do that by periodically re-centering the CDI and checking the radial. Now you know your position, as well as the current on-course heading (read from the left side of the OBS). An RMI makes this much easier as you can keep the bearing pointer on your left wingtip the entire time.
How did you manage the descent?
Ideally, you flew a continuous descent to reach the inbound radial at the appropriate altitude for a straight-in landing. But you won’t see the runway until really short final. You can attempt to judge the appropriate altitude for that turn inbound using distance to the runway. Or you can use the time it took to fly the first half of the arc and assume flying the same speed for the second half will take the same amount of time. Or you could use math. Whatever you do, relax in the knowledge there are hardly any obstacles around here, so no doubt this blind, curving descent should feel totally comfortable.
What radial did you use for the final approach course?
You might have picked R-230 (050 inbound) from the approach chart. But that’s slightly offset from the runway as indicated by the arrow on the airport sketch. If you were really clever, you might’ve centered the CDI needle on the runway before takeoff to know what radial intersects the threshold and then set your heading bug to the runway to know where to look for pavement. Either way, the runway will be there … somewhere.
How did you join the course inbound from the arc?
Again, 0.5 NM is useful if you hold 90 knots, but how many degrees lead is that? There’s an old rule of thumb that 30 NM from the station, 1 NM distance is 2 degrees of arc, at 15 NM 1 NM is 4 degrees, and so on. Run those numbers for 0.5 NM and 2 NM from the station, and the turn inbound should start crossing the radial that’s 15 degrees before your inbound course. Of course, how useful that is for you depends on your speed and configuration inbound, but it’s nice to have a starting point.
How many tries did it take to make it work?
If you got it on the first try, we’re impressed.
Stage 3: DR Mode
You’ve demonstrated that you can use your navigation equipment up to and beyond its intended limits. Now’s the time to show that you never even needed it in the first place. Put the plane back on Runway 6 at KMVY. You’re headed to Falmouth Airpark (5B6). You can get there however you want, with one slightly major caveat: You just can’t use any navigation equipment. You also can’t scud run. You must climb into the clouds and your first view breaking out of the clouds must include the runway at Falmouth. Good luck. You’re gonna need it.
If you want a slight crutch, allow yourself to check your radial and DME from MVY only once every minute, and then make a correction. Next time, try checking only once every two minutes and so on.
This is a tough one, and you’ll probably fail more than once. But that’s fine because the consequences for bollixing up instrument flight are trivial—as long as you do it in the simulator. So, just limit these exercises to the pretend world, okay?
How did you determine the course and time to fly?
Fortunately, there’s no wind, so it’s a matter of picking the right heading and speed, and then flying it as precisely as possible for exactly the right amount of time. One solution is to use your EFB to plot a route from one runway to the other, perhaps accounting for a top-of-climb point (see the next question). You could use your EFB navlog’s course and distance info, but remember that it likely uses the forecast winds aloft. Setting the departure date well into the future will revert to no-wind calculations (and probably warn you as such).
What airspeed did you use?
This is sort of like a timed final approach segment approach where groundspeed math is king. Pick a speed that’s easily divisible by 60 to make the calculations easy. If you fly at 90 knots, you can divide distance by 1.5 (NM per minute) to get the time to fly. To up the challenge, crank up the wind, and dust off your E6B.
What altitude did you choose?
Ideally, the lowest obstacle-free altitude. That way you minimize the time to climb from the calculation. Your EFB’s profile view could help determine that altitude. In this area you’ll be over low, flat terrain, so that altitude is pretty low.


