
Keeping your instrument-flying skills sharp is like high school football. No, not the social activities after the game; we mean the combination of drills and scrimmage. This sim challenge is a bit of both. The scrimmage part is that you’ll practice in the context of a (nearly) complete flight. The drill part is that flight is focused on one skill: the anvil descent.
Why Would You Ever?
Sometimes you just have too much altitude, groundspeed, or both. That’s groundspeed, not airspeed, because instrument procedures are built on angles, not rates. An approach leg descending from 3000 to 1000 in five miles is a four-degree descent. You could do that at 100 knots and about 650 fpm, or 200 knots and about 1300 fpm, but it’s still four degrees downhill.
Tailwinds are a common instigator for a rapid descent. Tailwind approaches aren’t anyone’s first choice, but sometimes there’s only one approach, or an inconvenient thunderstorm blocks the better option. Wind at the initial approach fix might be opposite of wind at the surface.
Other times you can’t dally at the published intermediate altitude. Passing through an icing layer leaps to mind. So does flying an approach out west downwind of a forest fire. They create altitudes where you can’t breathe, let alone see.
Fly enough IFR and there will be a time you need to get down in a hurry and then level off (or join a glidepath) with enough time to shed any extra energy and complete a normal approach.
Employ Your Tools
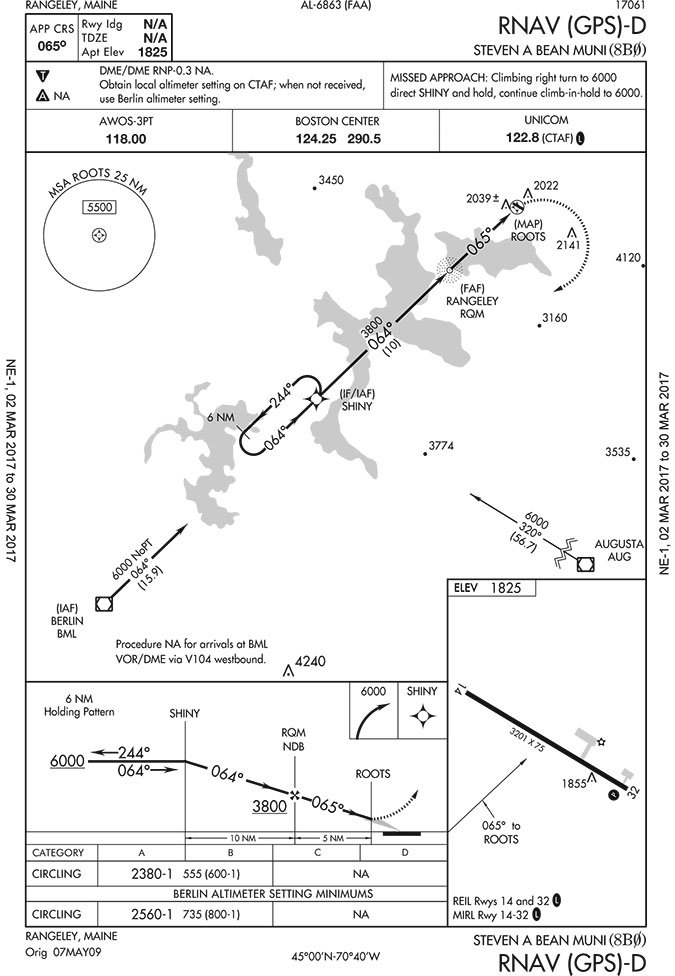
This month’s challenge starts over the Berlin VOR (BML) at 8000 feet. (Alternately, you can depart Berlin Muni (KBML) Runway 18 and climb in a hold at BML.) Step one is flying the published transition from BML to SHINY along the 064 radial (R-064) for the RNAV (GPS)-D approach to Bean Muni (8B0). If your sim doesn’t have GPS, substitute the NDB-A to Bean. It’s almost the same approach with the same two key waypoints at SHINY and RQM (the Rangeley NDB).
You’ll fly this transition at 8000 feet and above the clouds. Set your sim for clouds from 7000 down to about 100 feet over MDA (2500 for the RNAV, 2600 for the NDB). Also, set a 50-knot tailwind from 240 at 8000 feet. Make that wind 15 knots from 190 at the surface. Set the visibility at two miles.
We’ll assume there might be ice in the clouds. Your plan is maintaining 8000 until you can make a continuous, high-speed descent (1500 fpm or more) that passes through 3800 feet just as you cross RQM and continues down to the MDA of 2380 (or 2520 for the NDB).
The secret to success rests primarily on when you start down and how you manage your energy. Descent from 8000 to 3800 means you have 4200 feet to lose. Quick math says that’ll require 2.8 minutes at 1500 fpm.
Round up to three minutes for a little transition time and that means your Top of Descent (TOD) is three minutes from RQM—at your current groundspeed, which is higher than airspeed due to the tailwind. Simplify by assuming you’ll hold close to this speed throughout the descent, pitching down for 1500 fpm with probably near-idle power and whatever configuration of gear and flaps (and speed brakes) works best.
If you don’t have a way to measure time to RQM directly, estimate a distance like this: If you average 150 knots from TOD to crossing RQM, that’s 2.5 miles per minute. You’ll start down (2.5 miles per minute 3 minutes) 7.5 miles from RQM. You use the DME from BML for this. SHINY to RQM is 10 miles and SHINY is 15.9 DME from BML. So start down at (15.9 + 2.5) 17.4 miles from BML. Again, this math is only at 150 knots. Your mileage will vary.
If you have GPS, you can see the time to reach RQM directly, as well as your instantaneous groundspeed. This is a terrific help and makes a good how-goes-it as you descend. You should be at about 6600 feet when two minutes from RQM and 5200 feet when one minute out.
Vertical Navigation (VNAV) is also a great tool, although some systems won’t allow descent angles as steep as we’re shooting for here. Just using the vertical speed required (VSR) feature is often easier. Set a target of RQM at 3800 and you’ll see the required descent rate at your current groundspeed to hit exactly that target. You can adjust pitch and power and see the effect immediately.
Consider this part of the sim challenge a success if you rocket from 8000 to cross RQM between 4200 and 3800.
As you cross RQM, continue down, but transition to an approach speed and configuration. It’s five miles from RQM to the missed approach point (MAP) at ROOTS, so you should have plenty of time for this. Don’t forget the massive retrimming you’ll probably need after that descent. Success here is stable, level flight at no more than 1.3 Vso and configured for landing no less than one mile before ROOTS. (Note, though, that a “stabilized” approach usually means fully configured, on speed, at the FAF.)
That’s for GPS pilots. NDB pilots have the extra challenge that they must use timing from RQM to determine the missed approach point. Estimate a time that seems logical based on the average speed you expect over those five miles.
Back Up, Over, and Down
Unfortunately, you won’t land. If your sim has good visuals and you see the runway in time, circle for Runway 14, but as you line up on final, assume you lost it in a low cloud and climb back up. If you never see the runway, continue to ROOTS (or to MAP by timing on the NDB approach).
Make a climbing right turn to SHINY (RNAV approach) or RQM (NDB approach) for the published missed, except climb to 8000. Climb in the hold if necessary, but given the headwind, it probably won’t be.
Your alternate is Berlin Regional, so upon reaching 8000, fly heading 230 to join V104 and then inbound to the Berlin VOR. Winds aloft are still 240 at 50 knots at 8000 feet and 190 at 15 on the surface. Put the ceilings at 2200 and visibility at two miles.
Maybe the encounter with ice made you nervous, or maybe you’re just wishing you passed on that caramel double macchiato on your way to the airport. Either way, you want to land ASAP and the VOR/DME approach can be done covering less than 10 miles total if kept in close.
You’ll cross the VOR at 8000 for the turn outbound and the procedure turn. Again, the goal is the maximum descent in the minimum distance to cross the VOR inbound at 2400 and continue down to 2060 for a landing on Runway 18.
GPS time-to-waypoint isn’t as helpful in planning here, but standard rate turns can be. Assuming 1500 fpm, you need about four minutes to lose the (8000 now − 2060 at mins) 5940 feet. Each 180 degrees of turn at standard rate takes one minute. The math could be something like this: 45 seconds outbound on R-030, 15 seconds of turn to 075, 30 seconds outbound on 075, one minute standard rate turn to 255, about 50 seconds inbound on 255 (depends on the net effect of the winds), and about one minute inbound on R-030. So, your total time is 4:20.
Because the procedure turn is depicted as a barb, you can do any kind of procedure turn you want. You must decide how close to cut it while still allowing enough flexibility to adjust for changing winds. Speed over the ground at any given point doesn’t matter—so long as you’re slow enough crossing the VOR inbound to finish the approach.
Unlike the Bean approach, you only have 2.2 miles from the VOR to your missed approach point at WUGAV. If you’re at MDA at WUGAV, you’ll be 899 feet above a touchdown point only a mile ahead of you, which is a nine-degree descent, or about double “normal maneuvers” for most GA airplanes. No wind, you’d need to have the runway in sightonly a mile past the VOR. With the wind, you can push it a bit further. Plan accordingly, and land straight in on Runway 18.
Questioning Oneself
Fire up that simulator and go fly this challenge. Or use the simulator of the mind to walk it through from the top once more. Then answer these questions below to help analyze how it went.
1. Every approach might end in a missed, and in this case that would have you holding at 6000 (or 5100 for the NDB), which is right in the layer you want to avoid. This entire approach is out of radar contact, so what can you ask from ATC before you even start the approach?
2. If you maintain cruise speed to TOD based on approach speed, you’ll be way above your planned airspeed as you descend, and will be high by the time you reach RQM. How do you decide when to start slowing to approach speed before even reaching TOD?
3. What configuration, airspeed, and descent rate did you choose?
4. As you approach RQM, you realize you’ll descend below 3800 before crossing RQM. Will you slow your descent rate or increase your airspeed to fix this?
5. Suppose you see the runway right at ROOTS. Where will you see it (relative to the nose)?
6. You see the runway before ROOTS and break off right to circle for 32. Turning final you lose sight of the runway. How do you fly the missed?
7. Assume you got light rime ice from 6000 to 5000 on the approach. You must climb back through this layer to get on top before going back to Berlin. What’s the best way to do that?
8. On the VOR/DME to KBML, do you have to pass YEKUK outbound before starting the procedure turn? How far outbound from the VOR did you go before the procedure turn?
9. Suppose the MDA was 1200 feet above the touchdown zone and the missed approach point was at the threshold. How close to the MAP can you get to have no more than a six-degree descent?
This challenge is tough to nail the first time out. If you find yourself chasing those crossing points, fly it again. When you can hit each one exactly and still level off for a reasonable approach and landing, you’re done with practice for today… and free to engage in your social pursuits after the game.
Debriefing Points
1. You know you don’t want the published hold at 6000 (or 5100) feet, so tell ATC that in the event of a missed approach you want to climb to 8000 and head for Berlin. Negotiate alternate missed approach instructions, even if they are only, “… climb in the hold as published. Upon reaching 8000, cleared direct Berlin at 8000.”
2. Every IFR pilot should know roughly how long it takes to slow from a cruising speed to an approach speed in level flight. You’ll start slowing that many minutes before TOD. Alternately, you can pitch down at cruise speed and slow down somewhere on the way down to still hit your target altitude at the right speed—assuming you can slow down and go down at the same time. Just make sure your calculation for TOD takes that into account.
3. There’s no one answer. If ice is a concern, a clean descent is often the right choice. Dropping gear and/or flaps helps with drag, and might be required for high-performance aircraft. Lots of drag also lets you keep some engine power in to keep the cylinder temps in line. Just have a plan and know what performance to expect.
4. The whole point is to maintain a rapid descent, so if you blew it, the best bet is probably to maintain vertical speed and increase airspeed. But, you’ll probably cross RQM faster than you want, and have a tough time getting in position to land.
5. It’ll be under your seat. We’re used to looking at the profile view to see how far the MAP is from the runway, but that’s misleading here. The key is that there’s no distance shown in the profile view between the MAP and the runway. In the plan view (top-down), you can see the waypoint for ROOTS is right on top of the runway. Bonus points if you knew this star-in-circle icon means it’s a fly-over waypoint (meaning you must hit it exactly), rather than just a fly-by waypoint like SHINY.
6. With your heart in your throat, probably. The missed approach starts at ROOTS. Starting it anywhere else makes you a member of the FAA Flight Test crew. In general, going missed from a circle-to-land means a climbing turn toward the center of the airport and then joining the missed approach course as best you can.
7. The best way is not to do it at all, but if you do, you want to make it as brief as possible. Consider leveling off for just a bit below the block of altitudes in question and building speed. Then pitch up and zoom climb, shedding this energy as you go. This is more helpful on high-performance aircraft than trainers. It also assumes you’re above the standard or published climb gradient required for the missed approach—you wouldn’t want to avoid ice only to hit rocks.
8. YEKUK is a stepdown for the procedure turn inbound, but if you could manage the descent and not get blown too far north by the winds, you could do the entire turn inside YEKUK. We tried crossing the VOR, turning right 90 degrees, and then back left 270 degrees, it’s possible with over 3000 fpm descent to get turned around before getting blown too far north and outside YEKUK. And then you have to slow down for final approach. Good luck with that.
9. Remember that for every mile from touchdown, 100 feet up is about a one-degree angle. That means 1200 feet at one mile is 12 degrees of descent and 1200 feet at two miles is six degrees. The touchdown zone is about 0.2 miles down the runway, so, even with a headwind, 1.8 miles from the MAP is probably the last point from which you can land with “normal maneuvers,” unless you’re landing into a gale.


