
Operations below minimums on an instrument approach can be quite simple if the ceilings and visibilities are significantly above minimums. But when the chips are down along with the ceilings and visibilities, things aren’t quite so simple. Let’s take a deep dive into what it takes to get an airplane on the ground after a successful instrument approach.
Da Rules
The ability to operate at altitudes below minimums for an instrument approach is governed for most of us by §91.175 (c). Satisfy those requirements and you should be both legal and safe. Those requirements fall into three different areas—visibility, identification, and maneuvering.
The visibility requirements of §91.175 (c) states that you must have the visibility required by the approach procedure. But how do you know if you actually do have the visibility required when conditions are close to minimums? One way might be to listen to the ATIS or AWOS. But the regulations refer to “flight visibility” and not the ground visibility that those sources report. Furthermore the report can be almost an hour old. Of course, AWOS is “one-minute weather” and when conditions are changing, the ATIS can be updated, but it’s unlikely to be updated often enough to match a fast-moving system.
So if the ATIS is reporting a quarter-mile visibility and you need a half-mile, how can you tell what the actual flight visibility is when you break out of the clouds? There are in fact several ways to tell.
If the airport is your home ’drome, and there is a big oak tree or a Walmart on final you can measure the distance from there to the threshold on a sunny day. Then as you fly over your designated landmark and see the threshold, you will know that you have the measured distance.
Another way to tell the distance is by using the approach lights. Approach lighting systems are a known, published length. For example a MALSR is at least 2400 feet long. If you can see the entire array in front of you, you know you have at least a half mile. See the entire array in front of you and the same distance again? Then you have nearly one mile.
Yet another way to determine visibility is with a GPS approach. Most approaches, even non-GPS approaches, have a waypoint placed exactly at the threshold of the runway. If you see the threshold, take a look at the GPS and see what it says the distance is.
Whatever method you choose, you must decide how you will determine the distance well before you break out of the clouds. Being close to the ground and wondering if you have the required visibility is a bad plan. And using your thumb held out against the windscreen at arm’s length, then saying, “That looks about right,” (the TLAR method) is not going to work when an FAA inspector asks how you knew you had the required flight visibility. It’s not going to keep you safe either.
In Sight?
In addition to required visibility, the runway environment must be “distinctly visible and identifiable.” “I think I have the runway lights in sight,” is not good enough. You have to be sure. And what exactly is the runway environment anyway? Again, see §91.175 where (c)(3) lists 10 specific items that qualify. Rather than listing all 10 here, suffice it to say that with the exception of two items, the rest are on the runway or immediately next to it. Taxiway lights, the airport beacon, and the airport diner do not count. The two items that are not on or immediately next to the runway are the VASI/PAPI and the approach lights.
The approach lights are unique among the 10 items in that they allow you to descend further without being able to see the runway. Many folks believe that the approach lights allow you to descend an extra 100 feet below MDA/DH. But a close reading of §91.175 (c)(3) reveals that you can use the approach lights to descend all the way to 100 feet above the touchdown zone elevation (which is published on the approach chart).
At that point you have to see either the red terminating row of lights in the Approach Lighting System or any one of the other nine runway environment items if you want to continue the descent. Almost all airports that have an instrument approach will have runway lights and a VASI or PAPI. One way to help yourself acquire the needed visual references is to turn up all the lighting to its maximum intensity level. At a non-towered field, you should be able to use pilot controlled lighting. At a towered field ask the controller to turn the lights up to maximum even if it’s daytime. You’ll see that it can make a dramatic difference in finding the runway.
Normal
If you want to go below minimums, beside visibility and runway identification, the third item required is the ability to land using normal maneuvers. But the regulations don’t say what “normal” is. I think that’s a good thing. Unless you are a glider tow pilot most folks would agree that a 2000 fpm descent is not normal for landing. But how about 1000? Is that normal?
The FAA won’t say. Nonetheless they’ll haul you into court for busting the “normal descent” rule. So just be safe and use a normal gentle descent for landing. That’ll typically work out to 500-750 fpm. Much more than that and, well, be prepared to argue what’s normal for you.
The same thing applies to bank angles. Most of us would agree that 60 degrees is not a normal bank angle while landing. So keep it safe and stay with a maximum bank angle of a standard rate turn. Close in, even consider using half standard rate.
Landing … How?
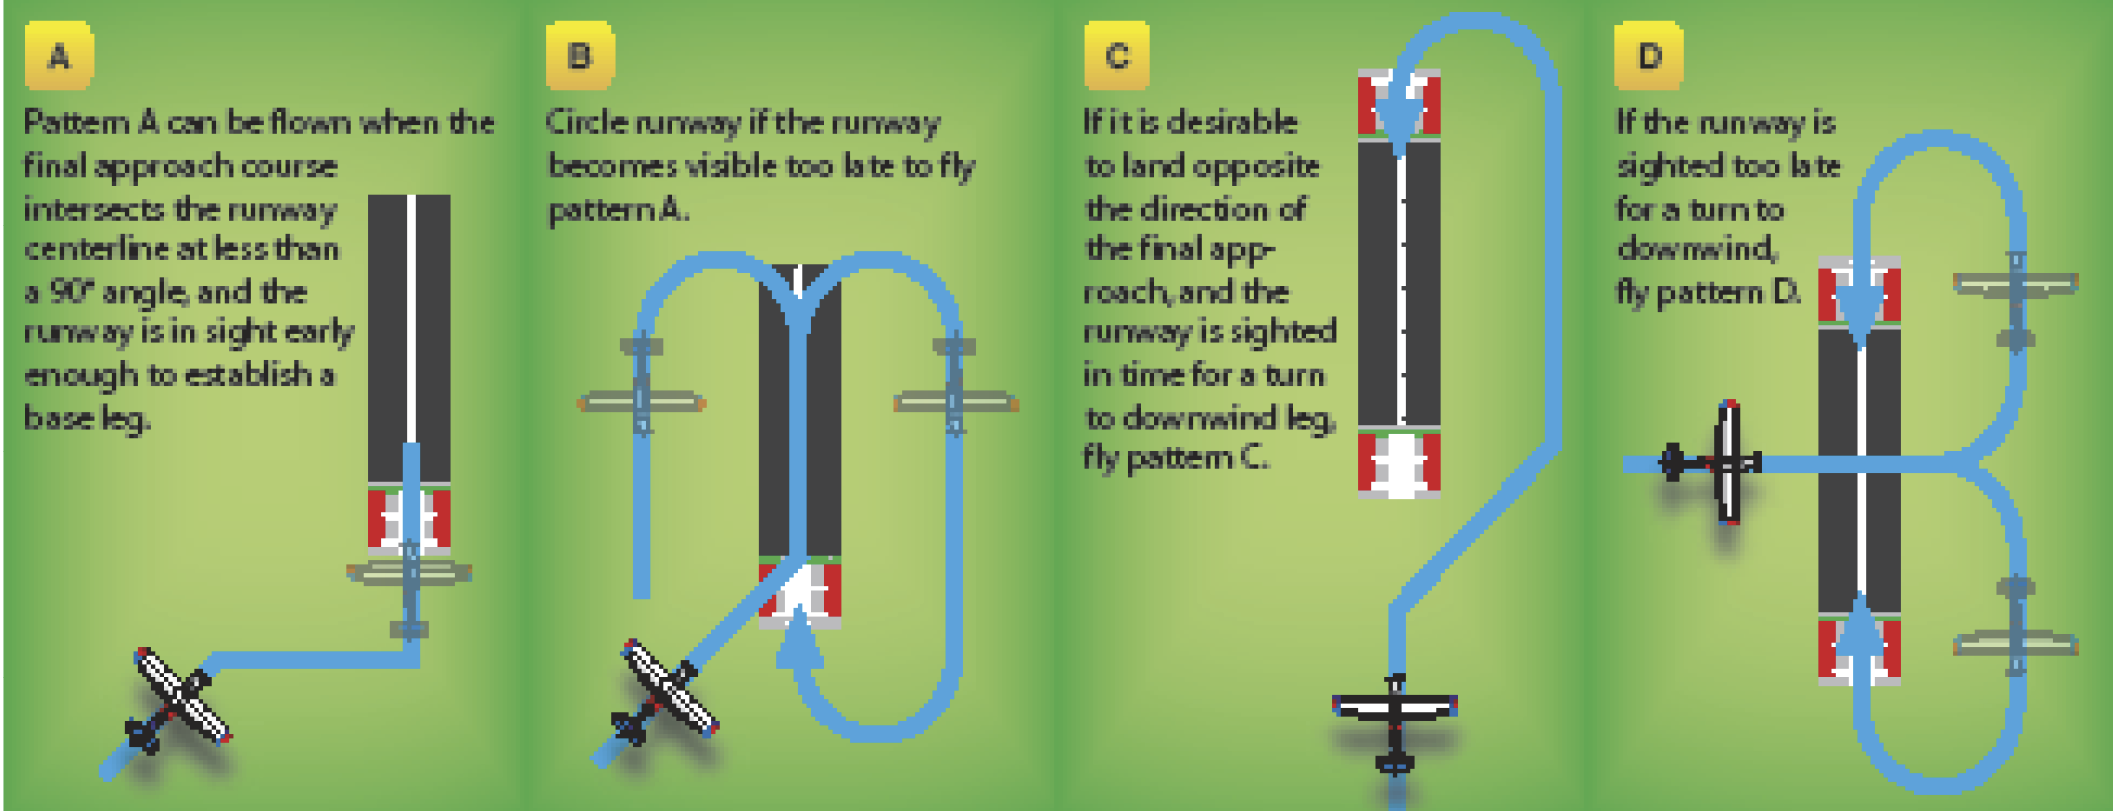
Once you have the three required items for landing, you have to decide if you are going to land straight in or if you are going to circle to land. Of course, this expectation should be set well in advance.
Straight in is much simpler. In fact, many airlines prohibit their pilots from circling approaches, especially at night. But if you do circle to land, you should be on the lookout for clouds on the far side of the airport. While circling you must remain in visual conditions. Paragraph (e)(2) of §91.175 says that if you reenter IMC while circling you must immediately execute a missed approach. That’s sound advice.
But how do you execute such a maneuver when you are over here and the missed approach point is over there? The first step is to begin a climb. When you are close to the ground and in IMC, climbing is always a good idea. Once you are climbing, turn in the general direction of the landing runway. You may not know exactly where it is since you are back in the clouds but you should have a general idea. Head that way.
Of course, your GPS can help with this part of the maneuver because it typically doesn’t sequence to the missed approach without a button push by the pilot. If that’s the case, use the GPS to get back in position. Once you are reasonably close, allow the GPS to start sequencing to the missed approach segment. Follow its guidance to regain the missed approach course.
If your GPS automatically sequences to the missed approach segment, then continue the turn to the airport and see where the GPS is taking you. Using your knowledge of the terrain as shown on the approach chart, do your best to regain the course. Obviously, reentering IMC while circling is fraught with danger and is best avoided by not circling when ceilings and visibilities are near minimums.
If the ceiling and visibility are poor, but you decide they’re still sufficient for you to circle on the approach, how far can you circle? The FAA doesn’t guarantee terrain clearance at minimums all the way to the next state. In fact, the area that is clear of obstacles at minimums is very small. For a Category A aircraft, you might hit something while at minimums if you stray more than 1.3 NM from the end of the runway. In your light jet doing 140 KIAS while circling, the protected airspace could be as close as 2.7 NM from the runway. That’s not very far. Keep it in tight, but remember that you must use normal maneuvers. There’s the rub.
Got Protection?
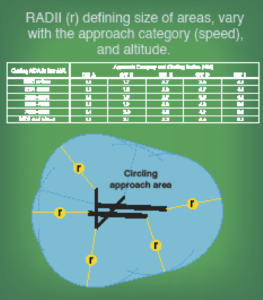
Several years ago the FAA realized there was a problem with the way that they evaluated protected airspace for circling. As shown in the diagram on the previous page the airspace a given radius from every runway end is evaluated to be free of obstacles at the MDA. These distances vary depending on the category (speed) of aircraft. However the indicated airspeed at which you circle is not the same as the true airspeed, and of course the difference increases with altitude.
So in 2012, the FAA changed the dimensions of the protected airspace depending on the altitude at which you are circling. As can be seen in the chart, protected airspace for a Category B aircraft is 1.7 NM for each runway end at sea level. But at an airport at 9000 feet MSL (think Leadville, Colorado) that protected airspace goes out to 2.1 NM.
Another thing to consider when circling is the direction to circle. At a towered airport, the direction to circle will be dictated by the tower—for example, “Circle northeast.” At a non-towered airport the Instrument Flying Handbook in Figure 10-13 (previous page) seems to indicate that you can circle in any direction that makes sense. But several legal interpretations have shown that the FAA wants you to circle in the same direction that VFR traffic is required to travel.
That makes sense: if there is VFR traffic in the pattern when you break out, fit in with the VFR flow. However at some airports, there is a note on the chart saying that circling is prohibited on the same side of the runway that the VFR traffic should be using.
In this case, first look for a better-suited approach. If none, you have two choices. The first would be to cancel IFR once you are in VMC and then follow the VFR pattern direction. If weather prevents that, you must obey the notes on the chart, even if they force you to circle in a direction contrary to the VFR pattern (which is hopefully empty in IMC). Doing so can put you in opposition to any stalwart VFR traffic so, as always, keep your eyes open wide.
Operating IFR below minimums is done safely hundreds, if not thousands of times a day, every day. It’s the only way to land when the weather is low. But doing so safely and legally requires significant advance planning and thought. Be sure to consider the weather in advance. Well before you arrive at the IAF, make a detailed plan to get on the ground. Doing so requires plenty of forethought but should go a long way to making the final few minutes of the flight as stress-free as possible.


As a Part 95 driver, you can legally attempt a below minimums approach. When still in the soup a few hundred feed above DH, head for the darker sky. There is less cloud between you and the darker ground when breaking out in the ‘seam’ between two cloud bottoms. There is usually enough wiggle room to keep the localizer off the pin while getting an additional 30 or 50 feet of ceiling.
Part 95: You can’t drink all day if you don’t start in the morning.