
The opposite of a dive-n-drive descent on an approach is called a Continuous Descent Final Approach, or CDFA. You might think of an ILS as the ultimate CDFA. More specifically, though, this technique is applied to a non-precision approach. So, we’ll use the synonym, Constant Angle Non-Precision Approach (CANPA) for a CDFA on a non-precision approach. What are they? Should you fly one?
Big Picture
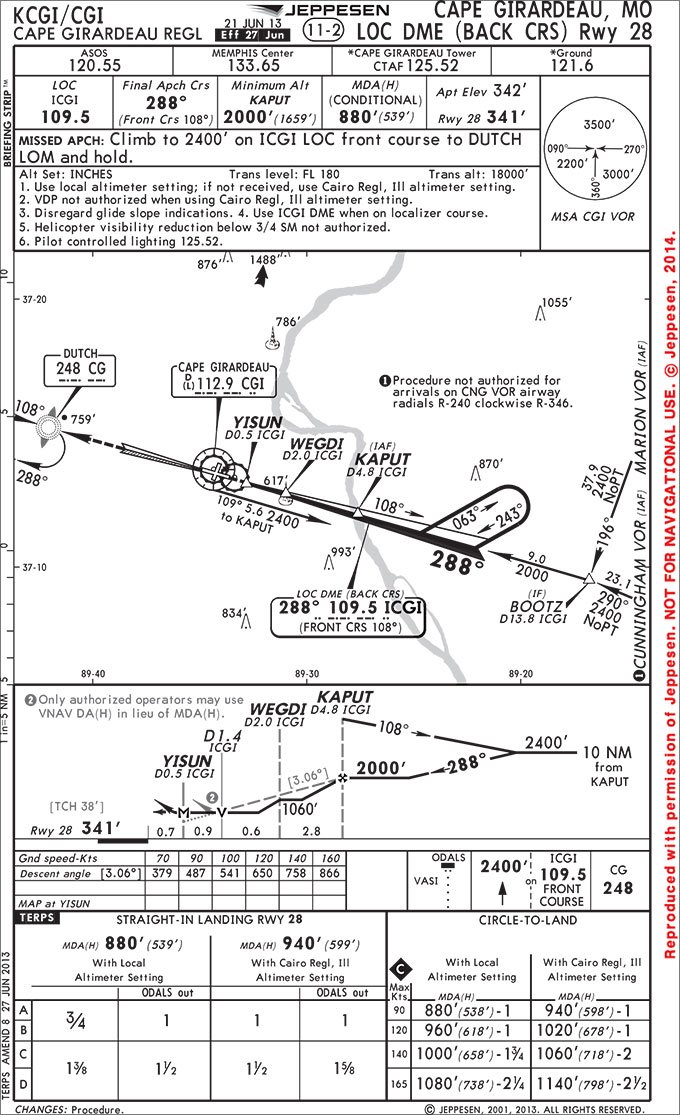
Look at the profile view of the Localizer DME Back Course Runway 28 approach to Cape Girardeau, Mo. Recall that a vertical descent angle (VDA) takes you (typically) from the FAF to the touchdown zone.
There’s a stepdown at WEGDI, requiring at least 1060 feet. Also note that a visual descent point (VDP) is charted where the VDA passes the MDA.
With a CANPA, you begin a descent at the FAF or other designated point and follow a standard angle descent to the MDA, clearing any intermediate stepdowns. With the runway in sight, you continue below the MDA. This way, you configure once by the FAF and just maintain a constant rate of descent and power setting all the way down.
Let’s clarify a point of confusion. Any GPS approach that offers real or derived (+V) vertical guidance is a CDFA. Those are easy because the magic wonder-box gives you a glidepath to follow. With the CANPA we’re discussing, you are flying a terrestrial-based non-precision approach—VOR, LOC, etc.—with no vertical guidance beyond your vertical speed.
Assuming No Obstacles
Hopefully, by now you understand that TERPS don’t guarantee obstacle clearance below the MDA on non-precision approaches. Yep—ya gotta look outside. But, since we’re discussing following that VDA, it might be good to take another look at what the chart tells you about possible obstacles, especially since Jeppesen and AeroNav do it differently.
As a rule of thumb, if the Jeppesen chart has the note, “Only authorized operators may use VNAV DA(H) in lieu of MDA(H)” the visual area is clear below MDA. If AeroNav charts have the note, “Descent Angle NA” the visual area is not clear below MDA. Also, if AeroNav identifies a VDP, the visual area is clear, but lack of the VDP doesn’t indicate obstacles. Even with visual area obstacles, you could still fly the VDA to the MDA, but we don’t recommend it as it’s just natural to continue the descent below MDA.
The visual area is clear on our approach, so you can safely fly the VDA to the runway, as long as it’s in sight before you reach MDA. But unless you can program in a 3.06 degree descent to begin at KAPUT, how would you go about flying this CANPA-thing?
How Fast Ya Goin’?
Make sure you’re stabilized on speed and fully configured about a mile before the FAF. As you near the descent point, simply read your required descent rate from the table on the Jeppesen chart. For example, if your groundspeed is 100 knots, a descent of 541 feet per minute will keep you on that VDA path on this approach.
With AeroNav, use the Climb/Descent table from the inside back cover of the approach booklet. Move across the 3.1 degree vertical path (3.06 rounded) row to your groundspeed column.
If your groundspeed isn’t in your table, interpolate. But don’t bother interpolating the AeroNav table for varying descent angles because it makes very little difference. However, if you can maintain a descent rate that closely, well, there’s probably an app to do the interpolation.
To start your descent, just nose over and power back. Descend at the required rate and maintain airspeed. Varying groundspeed from wind shifts won’t matter much. Autopilot or not, it’s important to keep your descent rate as close as possible to the target. Avoid the temptation to nose over further and use a higher rate, lest you clip a stepdown.
Watch Those Stepdowns
Stepdown fixes are charted for a reason—obstacle avoidance. While concentrating on holding your descent rate and airspeed, steal a little brain power to monitor your progress.
You must cross WEGDI at or above 1060 feet MSL. Check your altitude a mile before WEGDI, at 3.0 DME. On a three degree descent you lose about 300 feet per nautical mile, so a mile before the fix you should be above 1360. If you’re below, reduce your descent rate to clear WEGDI. But, if you’ll be much above 1400 feet at WEGDI, your descent is too shallow and you should back off the power a smidge.
You want to cross stepdowns as close to the minimum altitude as possible without going lower. If you’re too high, you might have trouble making the runway with the normal descent mandated by 14 CFR 91.175.
You get a last chance to fine tune your descent if there’s a VDP. Use it as another fix to check altitude. Here, the VDP is at 1.4 DME, so as you pass 1.4 DME you should be at the 880-foot MDA. This is important because in limited visibility it can be difficult to judge your height or descent rate. So, make one last descent rate adjustment at the VDP if necessary, then look outside and continue your continuous descent to the runway.
Don’t Bust Minimums
The instrument practical test standards do not permit going below MDA at all without seeing the runway environment. You shouldn’t either, even on a CANPA.
Don’t be confused by Jeppesen’s note about using a DA. Some certificated operators are authorized to treat the MDA as a DA, making a land/miss decision at MDA and consequently going a bit below on the miss. General aviation isn’t one of those authorized operators. Don’t do it.
But there are a couple techniques you can use. Many certificated operators fly CANPAs without being authorized to use the MDA as a DA. They add a buffer, typically 50 feet, so when they miss at the buffered MDA, they may descend a bit lower but won’t reach the published MDA.
There’s nothing regulatory about this buffer for GA. It’s just a trick to stay above MDA. What should you use? Well, 50 feet is a good start. If you only descend, say, 20 feet below decision altitude on a missed approach, then you can use 20 feet. You obviously want the buffer as low as possible to maximize your chance of getting in, but it needs to be enough to prevent you from busting MDA on a miss.
Or, upon reaching MDA, you could revert to the dive-n-drive technique. This negates the CANPA’s advantage of remaining stabilized, and it can divert your attention from finding the runway while leveling off at MDA, but it offers one advantage.
Note that our VDP is 1.6 miles from the runway. If you fly the CANPA perfectly, you’ll reach MDA at the VDP. For most GA aircraft the minimum visibility is 3/4 of a mile. With visibility at minimums, you won’t see the runway environment from the VDP.
Rather than missing as you reach MDA at the VDP, you could level off and drive along to the MAP (YISUN) at 0.7 miles from the runway. However, if you do see the runway at YISUN, you’ll then have to descend at an excessive rate. The actual math works out to be 7.22 degrees, well outside a normal descent, in violation of 91.175.
There’s no official guidance on what constitutes 91.175’s “normal rate of descent using normal maneuvers.” With standard at three degrees, you could easily make a case that 4.5 degrees is within reach of normal, so we’ll use that. For a 4.5 degree glidepath, you’ll need to start your descent to the runway about 1-1/8 miles out—still more than the minimum visibility of 3/4 of a mile. Get much closer than that and, well, “normal” leaves the maneuver description.
Most non-precision approaches have unrealistically low visibility minimums for a normal descent from MDA—by the time you see the runway from MDA at minimum visibility, you’re too close to descend normally, so you miss anyway.
Late Start?
Sometimes, a stepdown fix is high enough that starting a reasonable VDA from the FAF doesn’t work—you’d bust the stepdown. See the Middleton, Wisc. VOR Runway 28 approach chart.
AeroNav has you clear that stepdown fix by simply starting the VDA at the stepdown fix instead of the FAF altitude. This is depicted by placing the VDA and threshold crossing height notation just inside the stepdown fix. Note that this information, when valid from the FAF, is placed most anywhere else, but when put as you see here, indicates that the VDA starts from the stepdown fix.
Jeppesen projects that VDA from the stepdown fix up to the FAF crossing altitude and shows the VDA starting after the FAF. Flying the angle shown from the delayed starting point—that can require some math to locate—clears the intermediate stepdown fix.
Flying a CDFA is more relaxed than the traditional dive-n-drive. However, as we explained last month, the dive-n-drive technique clearly still has its place. Where you can fly a CDFA, however, they substantially reduce your workload, allowing more attention for precision and a broader situational awareness. If you haven’t tried one, grab a safety pilot and give one a shot. You’ll probably wonder why you didn’t adopt them sooner.
At first, Frank Bowlin was reluctant to try a CANPA due to its unfamiliarity, but when he finally did, he decided there’s no better way to go.


