I had the pleasure of lunch several years ago with one of the designers of the Boeing 777 cockpit. She said something that has stuck with me for years: “Good design obviates the need for training.” Held up to this standard, our efforts for GA glass cockpits are a dismal failure. (Perhaps the 777 cockpit is as well; I don’t know.)
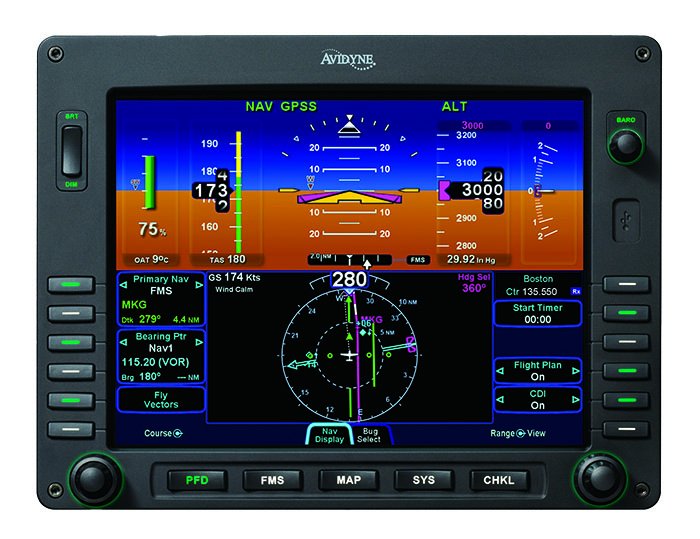
Looking just at the Primary Flight Display (PFD) portion of a system like the Avidyne Entegra or the Garmin G1000, things fare a bit better. Pilots competent on traditional flight instruments can find most of what they need in a few minutes. Some things take some explaining—”Where’s my rate of turn on this infernal thing?”—but keeping the plane upright is never in doubt.
Pilots transitioning to glass adapt their techniques over time. Some of this is intuitive. Some is after screwing up one too many times and consciously building a new habit to fix the problem. As with most organic transitions, improvement usually stops at “good-enough” rather than striving for “best possible.” While there is no best way to adapt your scan to glass, here are a few tweaks that have helped glass-panel pilots, whether they realize they’re doing it or not.
The Vertical Scan
One of the central tenets of instrument flying is that if you hold wings level, your heading can’t change. So if you want to stay on a heading, your scan is actually structured around keeping the wings level. It’s analogous with pitch: If a given pitch and power combo is holding level flight, then use a scan that locks your pitch and you’ll hold your altitude.
A traditional way to do both on round instruments is with the “inverted V” of attitude indicator (pitch and bank), turn coordinator (bank only) and the VSI (vertical trend as a proxy for pitch). On most glass presentations, turn rate and vertical speed are second-class citizens, painted along the top of the HSI and the right of the altitude tape, respectively. That leaves the huge attitude display, but it can be hard to make fine-tuned adjustments on such a big area. The fix is focusing on the tips of some triangles.
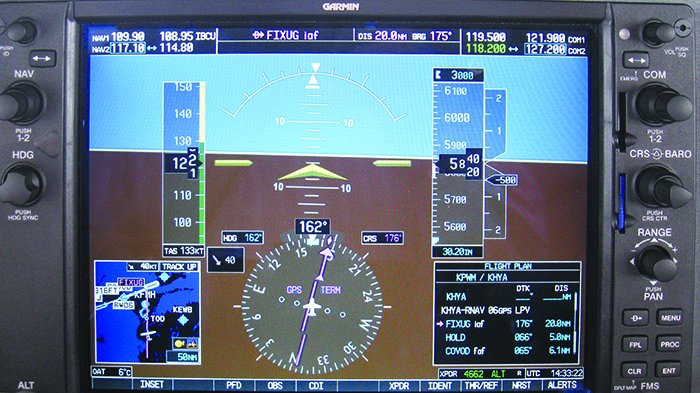
For roll, the top of the display often shows two triangles with points that touch at true zero bank. The display is incredibly sensitive so the slightest bank shows instantly. Unless you’re supposed to be turning, these points should be perfectly matched. It’s the first point on the PFD I look—and the first thing I correct—when returning to the flight instruments after looking away for some other cockpit task. Pitch on the PFD is similarly displayed, with an up-facing triangle or “W” shape with a vertex pointing to some degree of pitch. Focus right in on the top of that triangle. If you’re supposed to be two degrees nose-down in cruise, make sure that point is right at two degrees.
Another round-gauge, straight-and-level scan is the right angle of the altimeter, attitude indicator and heading indicator or HSI. This has the benefit of checking your actual altitude and heading. When holding a 1000-foot altitude on a round gauge, it’s easy to see at a glance if your altitude is off on a round gauge because the 100-foot altimeter hand isn’t straight up. Similarly, the heading is usually aligned with a whole number or major tick mark.
With glass, you must actually read the number for altitude or heading to see that it’s off. The fix here is to always use your bugs. When you glance at the altitude tape, just note if the altitude bug is centered or not. If it is, move on. If not, the small pitch correction needed will always be in the direction (up or down) of the bug. The same is true with heading: Use the heading bug and check to see that it’s top dead center. If it is, you haven’t banked (or you did and then accidently corrected already). If it’s left or right, your correction is again in the direction of the bug.
Making Changes
Initiating a turn, climb or descent is, again, mostly a vertical scan on the center of the PFD. I like to roll to an approximate bank angle by the roll indicator at the top of the display and keep or change pitch by pegging the top center of the triangle to a specific place on the pitch ladder. A standard-rate turn coupled with a 500-FPM descent in a high-performance single at altitude might be 20 degrees of bank and a three-degree decrease in pitch.
Then you can check the effectiveness of the action with the turn rate, which is usually a bar or arrow on the top of the HSI showing where the heading will be in six seconds, and the vertical speed, which is usually to the right of the altitude tape. Adjust bank angle and pitch as needed.
The glass-panel scan should include your track. Track is your actual path over the ground and is the end goal of flying a specific heading. You’re not really trying to keep a heading of 112 on the ILS to Runway 11; you’re flying a heading to achieve a track of 112 over the ground and keep you centered on the localizer. The point of using track is that you may be perfectly centered with the needles, but if your track is 115 instead of 112, you won’t stay on course. Track lets you correct preemptively, before the CDI needle even begins to move.
Track is displayed as a pink diamond on G1000 HSIs or a white dotted line and triangle on Avidyne HSIs. Many systems also show the value as a number, or even a cross-track error showing how many degrees left or right you need to correct your track. No matter how your system shows this info, your track must be part of your scan if you’re flying a course rather than a heading assigned by ATC (and there are arguments that you can fly track for these, too).
So you check that you’re on altitude, check that you’re wings level and check that you have the correct track. As a side tip, when your moving maps are set for track up, the magenta line (desired track) can cue you that you’re turning slightly. It will appear slightly jagged when it’s not pointed straight up.
Everything I’ve said until now assumes you’re hand flying, but it’s a rare glass cockpit that doesn’t have an autopilot at the ready. I’m all for using autopilots, but I’m seeing a trend where pilots can’t get by IFR without them. You shouldn’t be so dependent on George that if he were to go belly up while you were in the clouds it would be an emergency. A good way to keep up your scan even with the autopilot on is to scan the instruments just as you would if hand flying. Scan less often, for sure, but scan just as methodically when your eyes do return to the PFD.
All Those Other Pixels
The purpose of an efficient scan isn’t just to fly straight and level or make climbs and turns without rolling upside-down. Most primary students can keep the craft upright if the only thing they’re doing is watching the instruments. A good scan lets you quickly check and correct the aircraft’s attitude and position in space, and then look away knowing things are stable and will stay that way while you change a frequency or start briefing an approach plate.
When you’re hand flying, the old rule of “do one thing, then back to the scan, do the next, then back to the scan,” is just as critical with glass. Maybe it’s more critical, because there’s so much more to look at and do versus your father’s cockpit. Help yourself out with a plan for how to organize your displays.
Many dual Garmin 430 users like to have traffic on the lower 430 and moving map on the upper. I do the same for VFR flying. But for IFR I have a different set up, with my flight plan always on GPS 2. For a G1000 system, I’ll often use the moving map on the flight plan page on the MFD and then set up the main map page to weather. That way I can quickly toggle between the two screens with only the FPL key. I also like to set a fixed zoom level for approaches and always use it because I’ve developed an intuitive sense of how long it takes to move across a certain amount of screen.
The point is that if you organize the information on the available displays, you can retrieve information faster and with fewer mistakes.
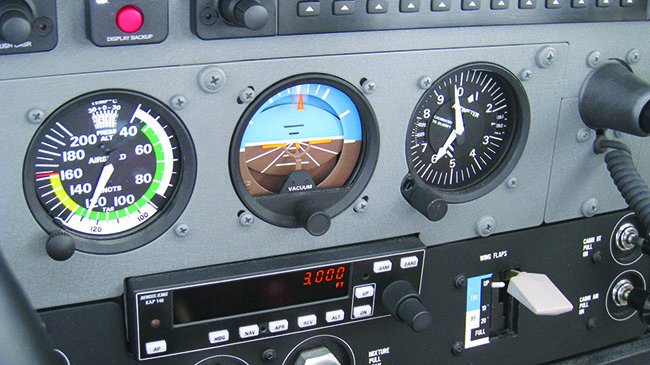
There’s an open debate as to how much (or if at all) you should scan the backup instruments. Here’s my two cents: I don’t scan them at all, but I do practice flying on them sometimes. While there are rare occasions that glass panels have been reported giving erroneous attitude information without the big, red X removing the bad data from view, this is no worse than a traditional panel where you must discern the bad instrument. If PFD indications seem to be conflicting, then you include the backups to help resolve the error. (And you play the lottery after landing because this kind of error is so rare.)
However, you do need to practice flying using only the backups for attitude, altitude and airspeed since they are not in front of you. Losing a digital “gyro” is a real possibility that you should be prepared for. In some installations, this leaves you without an autopilot just when you could use it most.
Focus, Young Jedi
The last scan you should perfect for yourself is the scan for the last 1000 feet of the approach. You want to have a discipline here to tighten your focus to just the key elements: Pitch and bank, track, CDI and glideslope needles (as applicable), distance to go to DA/MDA/MAP and, of course, visibility outside.
The exact order of these elements depends on your cockpit setup, but only a critical item, such as wind shear requiring a substantial check of airspeed and power setting, should be worth your distraction. Double checking a frequency or where the rain is right now or what the runway picture looks like on the MFD are off limits for your eyes.
Your glass cockpit may make you feel like the preverbal kid in a candy store, but leveraging real gains in safety and utility means, a little self-discipline. It might not take much training to just fly a glass panel acceptably, but it takes an effort on your part to use it well.
Jeff Van West is the editor of IFR.