Even after a couple hundred hours behind my Garmin GTN 650, there are still things I struggle to do properly. Chief among those is flying multiple approaches. Sure, we mostly have to do that in practice, but if you miss at a busy airport or the winds change after you’ve set up, you might find yourself needing to plug in that second approach, or third. If you were like me, you’d get things hopelessly bollixed up before you just cleared the flight plan and started over.
While this brute-force approach does work, it’s not very efficient, and it certainly isn’t confidence inspiring. So, with some help from my friends at Garmin, I figured it out. Here’s the quick course in flying approach after approach.
There Can Be Only One
The most important thing to remember is that your magic wonder box can only hold one approach at a time. It can be at any airport on a multi-leg flight plan, but you can only have one approach at a time.
That sounds pretty limiting, eh? Well, perhaps, but it’s not that bad. Let’s walk through a couple scenarios. The first will go nowhere; we’ll just depart and fly a couple approaches at the same airport. The next will involve multiple airports and approaches.
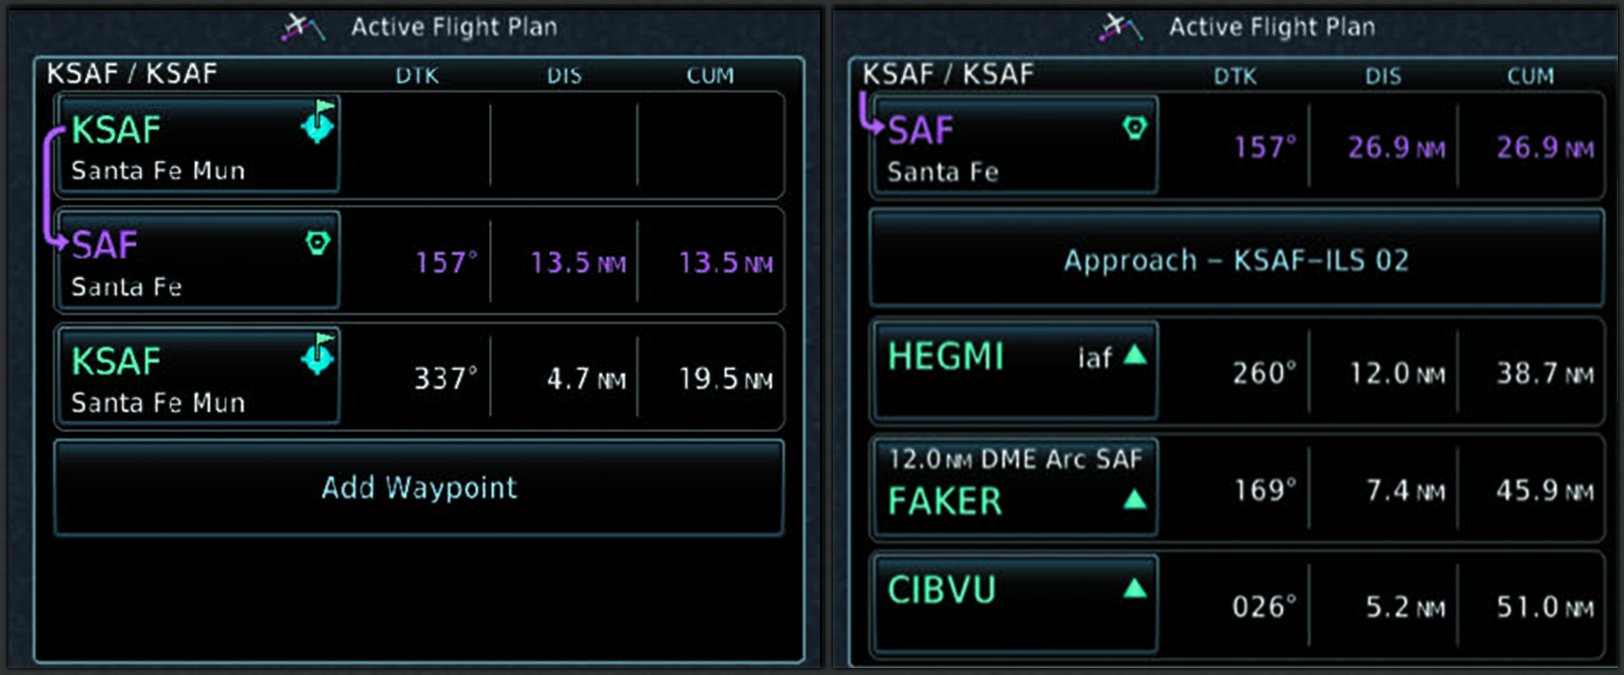
I’m based in Santa Fe, NM, KSAF. So, that’s my starting and ending point. For the first scenario, unlike entering airports in your logbook, you can’t create a flight plan KSAF – KSAF. There has to be a fix in between. I choose to use the Santa Fe VORTAC (SAF). Use anything you want. You don’t have to go there; you just need some fix in between.
My flight plan starts, then, with KSAF SAF KSAF. Say Runway 2 is in use, so I’ll choose to fly the ILS Runway 2 via the closest IAF, the arc via HEGMI, so I load that approach. That’s about all I can do on the ground. (Note that the version of the GTN trainer I’m using to work all this out has an outdated database. The principles are all the same but you might get a little confused if you’re using current data.)
My flight plan now has KSAF SAF, which is the active leg, then the fixes on the approach starting with HEGMI. Note that with the approach loaded, I could delete SAF, but there’s no benefit in doing so. I won’t bother.
Go Fly
I take off on Runway 2. Tower cooperatively gave me left traffic with an altitude of 11,000 feet. As I turn base, I get direct HEGMI and cleared for the approach; cross HEGMI at or above 10,400 feet. I dutifully hit the Direct button on the GTN and select HEGMI from the flight plan and fly the approach. It’s all routine so far.
After the miss, I’ll want to fly the RNAV Runway 15 approach. Once on the missed, I’ll load the second approach from the KARSE IAF. Here’s one place I was really messing things up. Previously, I’d go to the flight plan page and try to load the next approach. You can do this, but you’ve got to be careful exactly what you do or you’ll end up really messing things up.
I found that it’s cleaner to load the approach not from the flight plan page, but from the PROC page from the main menu. Do that, and the new approach is appended right at the end of your flight plan without disturbing your current missed approach segment.
While this seems in violation of the only-one rule, it’s actually just the missed approach part of the first approach that gets retained. Looking at the flight plan in the box, I note that there’s only the missed approach point and subsequent procedure. The previous segments are gone.
So, whenever I’m done holding at DOMAN—or even on the way to DOMAN if I don’t want to wait for the hold, I’ll simply go direct to KARSE, the IAF for the RNAV Runway 15 approach. From there I fly the approach normally.

Try Again
Let’s say I bollixed up that approach, and want to try it again. In this case, the missed approach holding point is KARSE, the same as the IAF I used.
On the miss, I’m headed to KARSE. To fly the same approach again, at some point when things are stable on the way to the missed approach holding point, KARSE, I’ll just select direct to KARSE, the IAF (not KARSE, the missed approach holding point). When I do that I’m going back to the IAF for another try.
Remember my ILS approach had a missed approach hold at DOMAN? Remember also that I loaded the RNAV Runway 15 approach and the box retained the hold at DOMAN in the flight plan and made KARSE, the IAF I selected, the next fix after the missed approach hold? Note that the hold at DOMAN is still in the flight plan with KARSE as the next fix. So, I won’t activate the leg to KARSE lest I want to intercept a course from DOMAN to KARSE rather than just heading to KARSE as I would on the missed from the RNAV Runway 15.
So, I’m now on my way to KARSE for another shot at the approach. This’ll be my third approach in a row at KSAF. I nail it this time, so once I’m on the missed and back to KARSE I can load that next approach. I’ve selected the VOR/DME A approach via POAKE. Same as before, I can load that approach while on the missed to KARSE. Either from the hold at KARSE if I want, or on the way there, when suitably cleared, I select direct to POAKE and I’m flying the VOR/DME A approach—my fourth.
Let’s review. I took off from KSAF and want to fly approaches there, so I created a flight plan from KSAF to KSAF with a fix in between. I then load my first approach while still on the ground. While on its miss, I’ll load the next approach from the PROC page. When I’m ready for that approach, I’ll simply select direct to its IAF. If I want to fly the same approach again, I select direct to the IAF again.
If I want another approach, as before, during the miss, I load it from the PROC page and wait until I want to go to that approach’s IAF. I could keep this up all day and the box just keeps adding the next approach after the previous approach’s missed approach holding fix.
Multiple Airports
By now you’ve probably realized that what we’re doing applies not just to multiple approaches at a single airport, but also at multiple airports. To be sure, let’s run through a multiple-airport scenario.
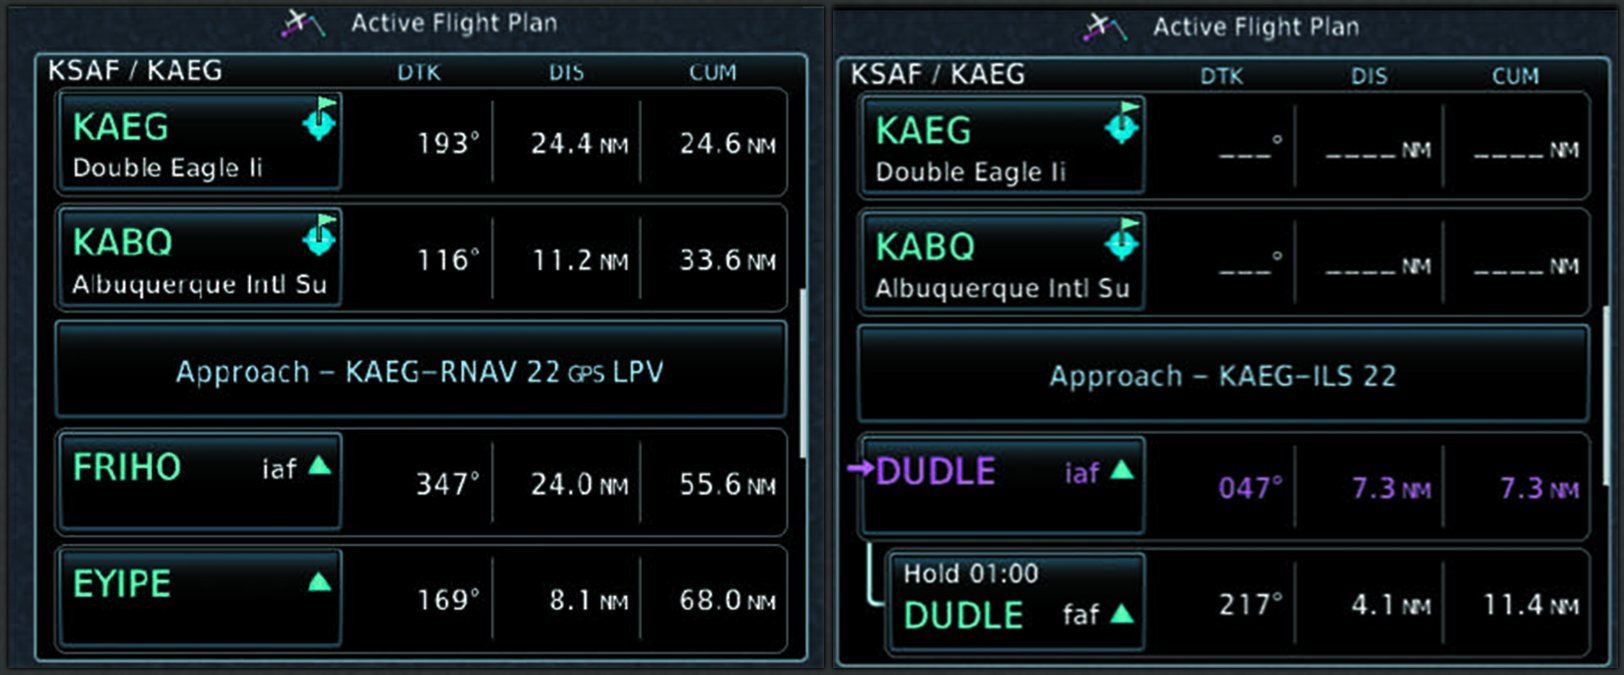
I’ll often depart KSAF and fly to Double Eagle for some approaches, then even over to Albuquerque. I’ll start my flight plan with just that: KSAF KAEG KABQ. Using Santa Fe’s ZIASE2 departure procedure will nicely set me up for my first approach at Double Eagle, so I’ll fly that specifying the ABQ transition, but I’ll just delete the ABQ vortac so KAEG is after ZIASE. I load the KAEG RNAV Runway 22 with FRIHO as my IAF.
At this point you’ll notice something a little odd. The GTN places the approach procedure at the end of your flight plan. Since the flight plan was KAEG then KABQ, this places the approach into KAEG after the KABQ leg. Don’t let that bother you. After the turn at ZIASI go direct FRIHO and you’re on the approach.
Looking ahead, I want to fly the KAEG ILS 22 next. For convenience, I don’t want to miss my present approach and go all the way to the published missed approach holding fix at YECUG. Instead, it’d be great if I could just go to DUDLE for my missed approach because that’s an IAF on the ILS that I want to fly next. Unfortunately, the process of putting that in manually (insert DUDLE before YECUG) is more work than you might want. So, while on the miss to YECUG, I load (via the PROC page) the ILS 22 approach with DUDLE as the IAF. I load and activate the approach immediately to go direct to DUDLE now instead of YECUG where I was headed. I’m now flying the ILS 22 from the DUDLE IAF.
Once on the miss for this ILS Runway 22, I want to bug out to KABQ for the LOC Runway 8 via CRSTN. While flying the missed approach segment, I could use the same PROC page as we’ve been using, but that’ll require selecting a different airport. So, in this case, I’ll just go to the flight plan and touch KABQ to select the approach.
Keep it Simple
I was getting into trouble before by trying to load the next approach while actually flying the first approach. That led to all kinds of unpleasant surprises. But, if you are just a little patient and wait until you’re on the missed approach procedure, you can easily fly the same approach again, load another approach at the same airport, or even load an approach at a different airport. There are many ways to accomplish this, and I’ve just explored a little bit of the power of the GTN navigator. But hopefully this will help you with less button pushing (and more certain button pushing) next time you’re up practicing approaches, or when ATC keeps changing its mind.
Load vs. Load and Activate
Many Garmin users seem to get confused between loading an approach and loading and activating an approach. Let me start with a hint: You don’t ever have to explicitly activate an approach. (Or, said differently, there are many ways you can automatically activate the approach without explicitly selecting Activate.) Does that confuse you? Yeah, it did me, too.
Loading an approach simply puts the waypoints for the approach at the end of your flight plan. That’s it. You can think of activating the approach as the same as activating a given leg on your flight plan. So, if you activate the approach, you make the first leg of that approach the active one. This is the leg to the selected IAF. Or, if you chose vectors to final, it’s the leg to the FAF.
I’m going to boldly suggest that proper planning in real life means you’ll almost never load and activate an approach. Instead, when you listen to the ATIS at cruise or simply observe the winds, you’ll load the expected approach. If you were to activate it, your current leg changes to go direct to the first fix of the approach, and that’s probably not what you want yet. If you’re later given a different approach, simply load that one instead and it’ll replace the previously loaded approach.
When you get cleared for the approach, simply select direct to the appropriate fix or activate the appropriate leg within the approach so you intercept it via the assigned vector. Once you’re on any leg of the approach, the navigator will automatically sequence.
Using this technique, outside of flying multiple consecutive approaches, I almost never load and activate an approach, and seldom even explicitly activate it at all. Direct rules.
Frank Bowlin keeps current data in the airplane. It gets interesting if he first masters an approach at home on the GTN trainer with different data.