
Portable GPS units are the Mighty Mice of the cockpit. They have enough navigation power and display enough data that you could fly a below-minimums approach in an emergency using nothing but that GPS and a gyro or two to stay upright. Many can supply frequencies or airport elevation faster than you can find it on a chart. And, for the majority of us pilots who fly on conventional gauges, they can take most of the guesswork out of IFR flying—even if you have a panel-mount GPS.
In Your Scan
There are two reasons you want your portable GPS in your instrument scan. The first is that if you’re going to use the GPS during critical phases of flight—such as getting precise track information or seeing terrain warnings during an approach—you don’t want it far from the instruments you’re also watching like a hawk. The second is that, unless you fly on autopilot all the time, time spent on the GPS pushing buttons or looking something up is time away from your primary instruments.
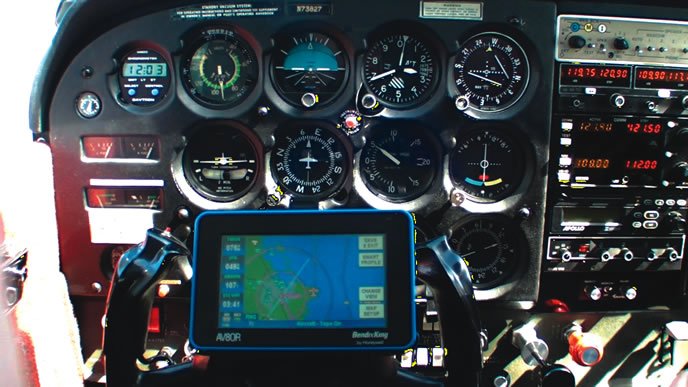
This concept makes the most common mount for a portable GPS—the yoke—not the best choice for many aircraft. The yoke mount has the advantage that it usually won’t block any instruments, but it means looking down and up with physical head motions in most set-ups. That’s not a show-stopper, but it gets uncomfortable over time and can promote spatial disorientation if you have to move your head too far.
My preference is a suction-cup or on-panel mount to put the GPS closer to eye level. A quick flick of the eyes can capture critical information on the GPS as part of a normal scan pattern. When extended time is spent on the GPS, such as exploring weather along the route, the AI is still in the peripheral vision and can be checked every few seconds with the same quick flick of the eyes. The trade off here may be obscuring some lesser-used gauges, such as the fuel gauges.
We’ve said it many times: The most valuable field you can have on your portable GPS for IFR flying is track (TRK on most GPSs). IFR procedures are all about maintaining specific courses over the ground. Without an instantaneous readout of track, you must bracket the course. That means picking a heading with the CDI needle centered, waiting to drift off course, applying a correction to get on course, dialing out some of that correction to hopefully stay on course and waiting for needle motion again.
With track, you short-circuit that process. With the CDI centered and a heading chosen, you immediately look at track. If the track matches the inbound course to the degree, you’ll stay on course. If it doesn’t, you’ll drift off. You can dial in a correction before you drift, however, and make it so the CDI needle never budges. Turn left or right by whatever correction you think you need and then reference track again. Do this until they match perfectly.
The big caveat with this technique is that you’ll fail trying to make changes while looking at track just as badly as when you chase CDI or glideslope needles. See that track doesn’t match your desired course, scan back to the AI (or turn coordinator) to make a tiny turn and return to level flight, and then reference track. Repeat until you break out with the runway in sight. Now you can see why it’s critical to have the GPS easily within your scan. This technique works on en route course tracking, too.
In addition to track, bearing to waypoint, ETE to waypoint, and altitude are great data fields to have at a glance. If your static port iced over or clogged, GPS altitude could be a lifesaver.
The other function you’ll want to master is vertical navigation. This is a great tool to smoothly meet crossing restrictions, plan a descent to hit an initial approach altitude no earlier than needed, or even plan the descent on a non-precision approach to minimize time tooling along down low.
Lines On The Map
Nobody needs to be taught how to use a moving map at its basic level. But there are ways to use your map better.
If your portable GPS can load the final approach course into the flight plan, all the better. But even if it can’t, many can show runway extensions. These lines provide a pseudo-final-approach course. The visual of being on or off track can be made even stronger with an extended course line for the aircraft. Many portable GPS units have this turned off by default, as many pilots don’t like the line sticking out from the front of the little airplane until they get used to it.
When coupled with a magenta course line or a runway extension, the extended course line instantly shows if you’re tracking on course or not, because the two lines either align—or they don’t.
Another technique I’ve found useful is to always fly approaches at the same map scale. This helps you develop an intuitive feel as to when to start a turn on course. This can be coupled with the extended course line for even better intercepts. Note that some GPS units can show the course line for a given number of miles ahead, or a given number of minutes. I find the latter is more useful and versatile.
With your flight plan on the GPS, the map becomes a good “what if” tool to look at how changing your route might line up with developing weather or shave time off the trip. Some GPS units can automatically pull the flight plan from your panel-mount GPS, which is a great trick. It’s good to know how to disable this feature on the fly, though, to make experimental changes to the portable’s flight plan.
Many pilots will tell you how, in an emergency, they could simply turn to the nearest airport they see on the portable, or use the Nearest function, and then circle down over that airport even in IMC. What I find shocking is how few pilots have ever tried to do this for practice with a safety pilot on board. It’s harder than you might think to time it so you can land engine out. Try it some time.
Direct and Other Legalities
Back when I trolled the skies around Seattle nearly every day, you could hear the freight dogs calling in to Seattle Approach many a low IMC morning with “Seattle Approach, Ameriflight Two Sixty-two, VFR-on-top direct Spokane.”
Now these guys were flying Beech 99s with nothing more fancy installed than a couple VORs, but they had a portable GPS and wanted to shave off whatever time they could getting through their day. So they thought nothing of going direct for 200 miles with their portables under IFR.
“Hold it,” you say, “they were VFR-on-top, not IFR.” Yes, they were in visual conditions above Seattle’s cloud soup, but VFR-on-top is still an IFR clearance. These guys were flying IFR and going direct with a portable GPS—and not breaking a single FAR.
This is one of the vagaries of IFR flying that’s often misunderstood. Your GPS doesn’t need to be panel-mounted and TSO’d any more than your stopwatch and paper chart do. You can request direct from anywhere, to anywhere, without a certified GPS so long as you can maintain the required terrain clearance along the route, can be reasonably certain you can stay on course, and ATC has you in radar contact (and approves your request for direct). Whether you stay on course by ded reckoning, crossing VOR radials or ESP is up to you. Using your portable GPS as part of your IMC navigation formula is just fine.
Some pilots like the CYA of asking ATC for a heading even though they have a fine one on the portable, but that’s really unnecessary. So is being VFR-on-top: You can use your portable in the clouds to “supplement” your navigation direct. The freight dogs simply knew that a direct request coupled with VFR-on-top was more likely to get approved, so they mentioned it. Also, some company’s ops specs only allowed off-route navigation in VMC.
Another question comes up with datalink weather. Can this weather and visual display of TFRs work in lieu of a weather briefing? What about as weather information for an airport prior to an approach. I’d say that’s more true for VFR than IFR. You’d want to find out about huge TFRs before you took off and NOTAMs for your destination aren’t available via datalink.
But more than once I’ve used recent datalink weather for an airport with ASOS rather than use the ATIS to set up for an approach. Just use common sense here: A METAR report from the airport that’s two hours old isn’t as useful as the five-minute weather on the ASOS. But a report that’s 12 minutes old on a stable-weather day is, I think, just fine. Do remember that winds on a METAR are reported in degrees true while ASOS winds are degrees magnetic.
And weather on your GPS can be a critical tool in negotiating with ATC for reroutes as you go. In fact, that’s probably a global truth about portable GPS: The real power comes from integrating what it shows you into the way you currently fly.


