Last time in this series on building a home simulator we said that Part Three would discuss adding third-party extensions to your basic sim. We’re going to keep that topic as “next time” and instead jump into a debate about how far you should, or need, to take your project. An argument is made that you don’t need to replicate any specific airplane, let alone what you fly, just to use the sim for instrument-procedure proficiency. As the argument goes, it could even be best not to since you’ll never fully reproduce your cockpit and you’ll never get the aerodynamics just right. So, why not go with something completely different so you’re not confused by subtle discrepancies?
The other side of that argument, taken to extreme, is that if I fly a Cessna 340A piston twin with EFIS and touch navigator—I do—how much real benefit would I get in a round-dial 172? Would there be any useful knowledge or skill transfer to my real flying?

My Answer—Not Yours
Like so much in aviation, I’m going to unequivocally state that the definitive answer is, “It depends.” Are you a student, building skill? Belong to a club, where you take the 172 one day, maybe the Arrow the next? Or, do you exclusively fly one bird. If you’re in one of the first two groups, you have to be versatile. Thus, it can make sense to keep your home sim generic, with no attempt to duplicate any specific airplane.
But, if you (mostly) fly one bird, I believe that the closest you can economically and practically come to that bird is best. I fly my 340 over 100 hours a year and my biggest challenge isn’t being able to understand and fly the procedures, it’s using the installed equipment to do so. Thus, if I practice on round dials with a GNS 430 navigator, or even a G1000, that will make me competent on those, but will do little to improve proficiency with my G500 and GTN.
So, for me there is no point to install X-Plane, hook up a monitor, yoke, throttle quadrant, and rudders, and go fly for proficiency in the included round-dial, GNS-equipped 172 or even the round-dial Baron. No, instead, I’ve got to acquire different parts and pieces and get them working seamlessly together in an attempt to more closely simulate my airplane. Fortunately, that’s not an insurmountable task—not easy, but doable.
You Decided—Now What?
Close your eyes and envision the cockpit of the plane you most like to fly. Reach out and touch the mouse, the QWERTY keyboard. What? Don’t have those? In a home sim you’ll likely need them to operate the plane and certainly will need them to operate the sim. Let’s talk about that.
X-Plane can actually be flown from a keyboard and mouse—completely unrealistic and non-transferable to the airplane, but possible. Even adding a yoke, throttle, etc., once you get the airplane you want up on the screen, you’ve still got to manipulate buttons, switches, dials, knobs, etc. How, if not with keyboard and mouse? But, that’s unrealistic and you might wish to build a sim that doesn’t need computer controls to fly. (Create scenarios, set weather and such, yes, but not to actually fly.)
At the other end of the spectrum is hardware hooked up to X-Plane that provides real buttons, switches, dials, knobs, etc. Unless you build it all yourself—possible, but technically challenging—that hardware will be arranged in a manner convenient for the sim, not as representative of any airplane. (In fact, this is how most commercial Aviation Training Devices operate—using physical panels to house all the controls, but those panels do not resemble any airplane and can place controls in odd or awkward places.)
The instrument panel is depicted on a computer monitor. How could you put, for example, the physical HSI knobs for heading and course in the middle of the monitor? So, an unrealistic means of using those controls is where most home sims and commercial ATD sims end up.
You can use a touchscreen, which is enabled for most of that stuff, but while touching an on-screen switch to flip it is conceptually close to a physical switch, swirling your finger around the heading knob is much further from realistic than you’d expect. Or, you can use that touchscreen together with your keyboard, but that’s even less realistic. (There’s a compromise from Air Manager we’ll talk about in a subsequent article, that allows you to touch a knob on screen to select it, then go to one physical knob to change the selected knob’s value.) Bottom line is you might want as much actual hardware as practical, but you’ve got to define “practical” for yourself, usually in terms of complexity and cost.
External Hardware
There’s good news and bad news. Bad news is that unless you go to extremes, you’re not going to get a physical heading knob on your HSI; it must be off screen, thus in an unnatural place. The good news is that, other than the few knobs associated with round-dial instruments, you can get (mostly) realistic physical controls for your radios and even EFIS.
There are companies that make realistic discrete navcoms and even bezels for common navigators (GNS, GTN). While the navcoms are self-contained and just talk to X-Plane to allow selecting frequencies and such, the navigator bezels require additional effort. They contain all the hardware—a small screen the size of the actual navigator’s, surrounded by the appropriate buttons and knobs—but require some additional manipulation in X-Plane for GNS (easy) or additional software for GTNs.
The biggest player is RealSimGear. From them you can get bezels for GNS and GTN navigators, G1000, G500/600, audio panels, autopilot controls, etc. Other companies, such as Precision Flight Controls make an entire avionics stack that doesn’t emulate the real thing as well, but are functional for most common devices like navcoms, DME, ADF, autopilot, etc. This stuff isn’t cheap; a single navigator bezel from RealSimGear can run up to $500 and radio stacks from Precision Flight Controls start at $3300.
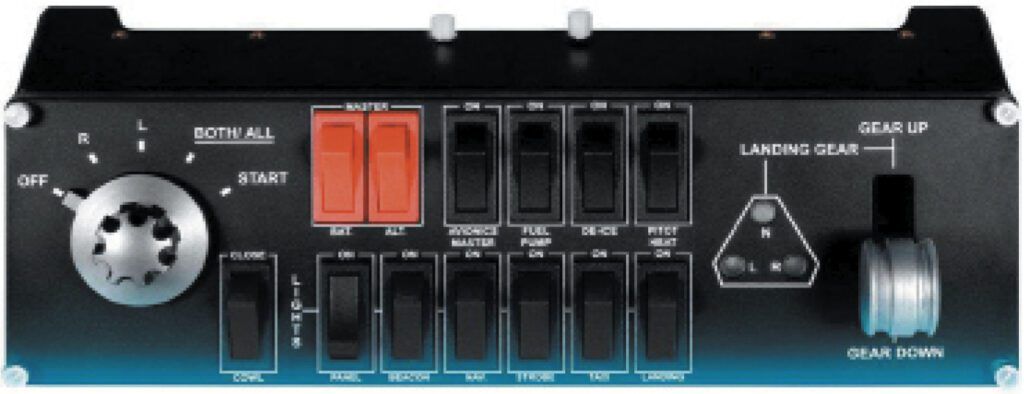
Inexpensive separate switch panels for mags, lights, pumps, etc. are available from a variety of sources, including Logitech, starting under $100. We’ll talk in more depth about this third-party add-on hardware and software in the next installment.
Not Like the Real Thing
If you’ve been following along, you likely realized that while you can get most of the controls used in the real airplane, and the avionics might be quite realistic, you’re still not going to get things in the right places to build muscle memory to let you, for example, reach for your landing light switch in the real airplane. That’s possible, but will require a much deeper dive into do-it-yourself land, well beyond our scope here.
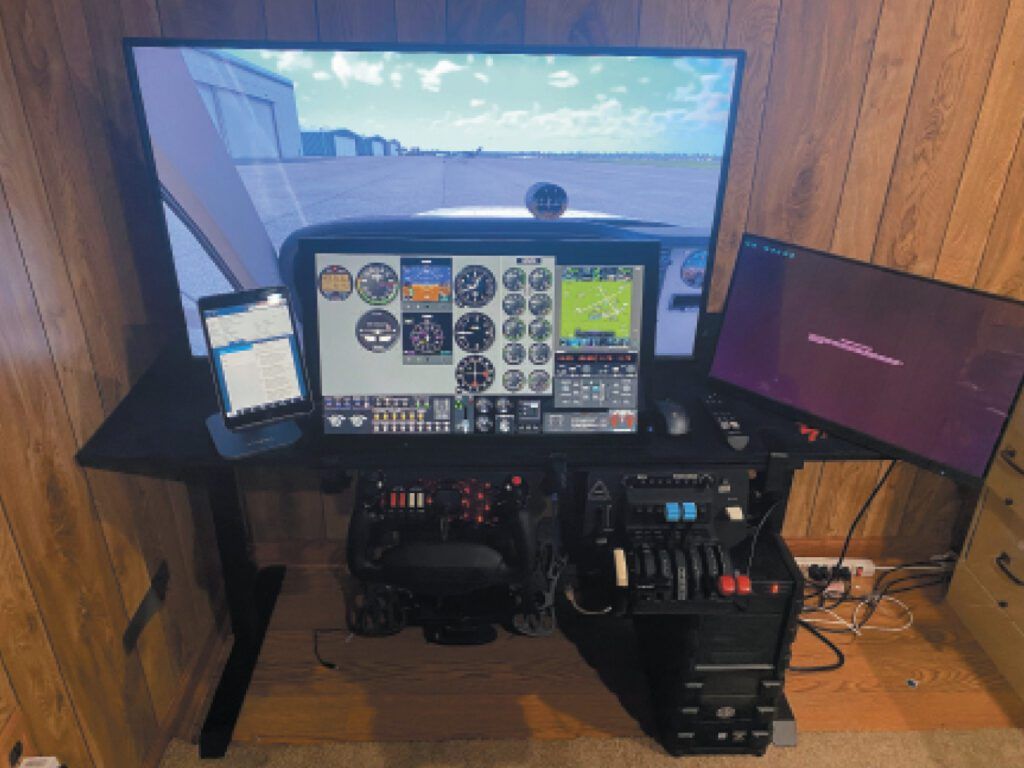
My recommendation is to start with the largest touchscreen monitor you can justify. (As of early October, a ViewSonic TD2760 27-inch touchscreen monitor was available for $520. We merely found this available, but haven’t used it.) Then, use this solely for the instrument panel—possibly via Air Manager—and see if a realistic instrument panel in X-Plane (or an add-on aircraft) outweighs the unnatural means of using the controls. If so, go forth and sim. If not, you’ll need to explore the available options, some of which we’ll discuss next time, and decide what’s best for you.


The instruments on a closeup touchscreen, plus outside world on a (bigger) more distant display is a natural combination. And Air Manager does a good job of making the instrument knobs movable. The knobster rotary switch peripheral adds to the realism.
A problem in practice is positioning the touchscreen and yoke, and relating them to the pilot’s seating position. You have to have height of eye greater than top of instrument panel. The 27inch screen is 17 inches high–and the yoke’s axis has to be beneath that level. You have to be able to adjust your seat position up and down to get the correct height of eye. Having done so, the instrument panel monitor blocks a substantial portion of the outside world screen, and the yoke feels too low. You can raise the position of the big screen a bit, which helps forward view, at the expense making the side views a bit unnatural.
I think the 27 inch monitor is a bit too big. I use a 22 inch, and suffer a bit from the unavoidable seating geometry problems. I am considering going to a combination of two 15 inch screens, in portrait mode, so I can position the yoke more naturally between them. But it’s easy to spend lots of time on configuration issues, thereby reducing your simming time.