
Southern California, the land of Zen mountain centers, surfer vibes, and the Big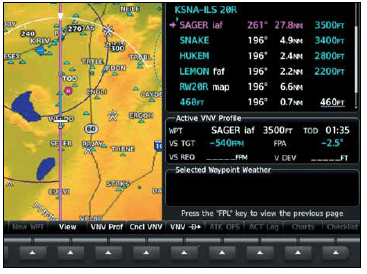 Lebowski, is one laid-back place. Is there a better spot then, to introduce the most relaxed and no-big-deal of all arrival descents, the vertical navigation profile?
You’ve just completed a retreat in Palm Springs, finding inspiration for your big screenplay, and now you need to fly back from Palm Springs International (KPSP) to John Wayne Airport (KSNA) to drop it on a few bigwigs’ desks.
Your IFR flight has you following a Victor airway westbound at 10,000 feet in your Cessna 172. You’re still about 30 miles out, as ATC tells you to expect the ILS into Runway 20R at John Wayne, starting from the SAGER intersection. A look at the approach chart shows there is a hold in lieu of procedure turn here, but let’s assume for this scenario that we’ll get cleared straight in. The altitude restriction in the hold at SAGER is between 3500 and 4500 feet, so you plan that for your crossing at SAGER.
Step by Step
As you continue the brief, you see something a little bit unusual. There are two intermediate step-down altitudes after SAGER, plus another to LEMON, the FAF at the lowest intercept. Proceeding inbound from SAGER at 3500, we’ll want to drop down to 3400 at SNAKE, then 2800 at HUKEM, before dropping to 2200 feet for the glideslope intercept at LEMON.
Many of us employ the old, “dive ‘n drive” technique on step downs, descending and leveling off repeatedly as we hit each successive minimum altitude, but this is SoCal and all this extra stop and go action is a total bummer and is best left to the traffic on the I-5 Freeway beneath us. We could go super laid back and just intercept the glideslope at 3500 feet. By itself, this doesn’t necessarily break the regs, but following the glideslope from this far back doesn’t guarantee we’ll make our crossing restrictions at HUKEM and SNAKE.
There’s a way to plan our descent to both meet all our crossing restrictions and limit the amount of leveling off we would have to do diving and driving. What if we could compute a descent angle that would carry us on a smooth glidepath through all these points and set us up perfectly at our glideslope intercept? The airlines call this the Continuous Descent Final Approach, or CDFA. If we’re equipped with avionics like the Garmin G1000, we can use the Vertical Navigation function to plan out such a descent and a good autopilot can follow it, allowing us to just chill as we monitor everything.
G1000 Earns its Keep
ATC tells you to proceed direct to SAGER, the initial fix, and to descend “at pilot’s discretion” to 3500 feet. AIM 4-4-10 defines the term “at pilot’s discretion” to mean that we have the option to start the descent as early or late as we want. You’re at 10,000 feet. The colder temps aloft let you true out about 10 knots faster than you would closer to sea level, so you’ll want to stay up here as long as you can and start a descent as late as possible to still make SAGER at 3500. This is a perfect opportunity to use your vertical navigation function.
You’re going to activate the approach. You pull up the ILS for Runway 20R by pressing the PROC hard key on the MFD bezel and following the prompts like you would for any approach; selecting SAGER as the initial since you’ve been instructed to go direct to that fix. Once activated, the flight plan page shows the altitude restrictions for each of the fixes on the approach. These should correspond with what you see on the approach chart itself. Note that you can change these values if you wanted to. For example if ATC told you to descend only to 4000, you could alter the 3500 restriction at SAGER accordingly.
There’s some risk in changing the altitudes within a procedure, though, as those requirements don’t change even though you might choose to do something different (hopefully less restrictive). A better procedure might be to add a phantom fix, in this case perhaps a mile or two before SAGER, for your 4000-foot altitude.
Below this, there’s a box titled Active VNV Profile. The SAGER fix is active on here, with the 3500-foot altitude restriction shown. The system has calculated a point along your flight path where you should start your descent. This is the top of descent point, TOD. It is a reference only that will change based on conditions; it is not a fix. It is highlighted on the moving map, and there’s also a countdown to this point in the profile box. The G1000 continuously takes the ground speed, determined by GPS, and calculates where a descent should start, that will take you on a 2.5-degree glidepath from the current altitude to the crossing restriction of 3500 feet.
The 2.5-degree angle is defaulted in the box in the field titled FPA, and can also be adjusted up and down if you want. Also, a vertical speed target is computed, 540 feet per minute, which will keep you on that glidepath at your current ground speed (which is around 120 knots). This vertical speed will change as your ground speed changes.
With your top of descent point and vertical speed target alone, you could manually fly your descent to SAGER. But you won’t get to be the king of Hollywood by dirtying your hands with such grunt work. Have your people call Garmin’s people and set it up. In other words, have the autopilot fly it.
Pink Lines and Carets
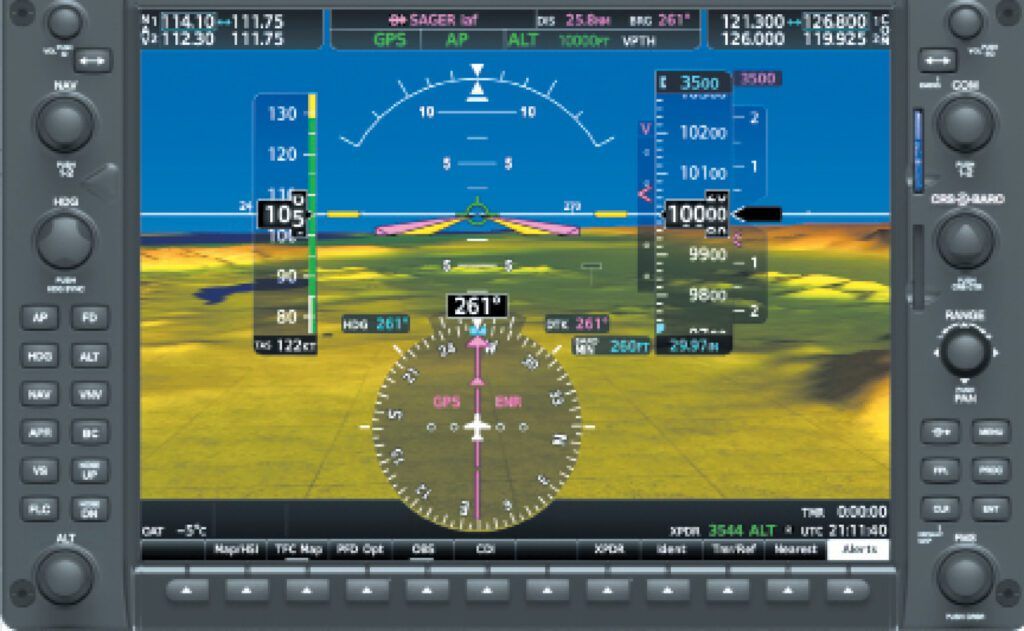
For now, just twist the altitude selector knob to the 3500 feet of your clearance. There’s no need to tell the autopilot to descend yet since you’re on “pilot’s discretion.” When you’re one minute from the computed top of descent point, the unit audibly announces, “vertical track,” and some new indications will appear on the PFD.
There is a bar to the left of the altitude tape with a pink caret or “V” at the top. This is a vertical deviation indicator. It functions almost the same as the glideslope or glidepath indications we’d get on an instrument approach. We can even think of this like a glidepath for our programmed descent. The pink caret positioned above center is showing that that path is still above you as you are approaching TOD.
There’s also another pink caret on the vertical speed tape to the right of the altitude showing your currently required descent rate. As you get closer to the TOD, that pink caret will slide down towards the 540 feet per minute target. That other pink caret on the left, the deviation indicator, will start to slide down towards center, again just like a glideslope or glidepath. When you start your descent, your actual vertical speed, shown by the black bar, should be placed over that pink caret.
Finally, the 3500 figure has shown up in pink, to the right of your selected altitude, which now also reads 3500. This is an important point: vertical navigation will stop at the higher of the selected altitude and the pink altitude of the profile. If you hadn’t adjusted your selected altitude and left it on 10,000 feet where you are now, the vertical profile wouldn’t engage to take you any lower. Should you set the selected altitude even lower though, say to the glideslope intercept of 2200 feet? Since you haven’t been cleared for the approach, and your lowest cleared altitude is 3500, that’s where you should keep things for the moment. Setting the right altitude is an easy thing to forget when flying vertical navigation.
Now you’re all set up to arm the autopilot to follow the vertical navigation profile. It’s as simple as hitting the VNV hard key on the PFD bezel. Vertical path mode has been armed as shown by VPTH on the status bar. The pink deviation indicator slides down towards the center. As you reach your top of descent, vertical path mode activates and the descent begins, matching that required rate indicated on the vertical speed tape. It’s your job to manage your power to keep a desired airspeed in the descent—there’s no fancy autothrottle capability in your plane. That’ll be in your next airplane once our screenplay gets greenlit.
The autopilot flies a nice, relaxed descent towards SAGER. On the MFD, the moving map now shows a BOD, a bottom of descent, and a timer counting down to that point is in the VNV box. As you get close to SAGER, you get an approach clearance that includes crossing SAGER at 3500. Arm approach mode by pressing APR. You can now also set a new bottom altitude. As you’ve been cleared for the approach, you’ll have VNAV fly all the way down to 2200 at which point you’ll intercept the glideslope and won’t need vertical navigation anymore. So you set that 2200-foot altitude into the selector.
Crossing SAGER, the autopilot turns you inbound on the approach course, and levels off at 3500. You’re back in altitude hold mode, but still have vertical navigation armed, as shown by VPTH on the status bar. A new TOD has been computed for the short descent down to 3400 to cross SNAKE. When it’s time for that descent to start, the autopilot kicks in once again. A new bottom of descent is computed. Unlike before though, it isn’t at your next waypoint on the approach. It skips over HUKEM and goes all the way to LEMON, where the glideslope intercept will occur. So you’re on a continuous descent from SNAKE to that point. Again, all you have to do is manage airspeed with throttle.
In the Loop
You should frequently check your autopilot status bar to see what you can expect to happen next. You’ve armed approach mode, so you see LOC on the left, even as you continue to follow the GPS course. You’re in vertical path mode, descending to the HUKEM restriction of 2800 feet. Altitude capture mode is armed, which will level at 2200. Finally, glideslope is also armed, so that you will capture and follow the glideslope once that hits center.
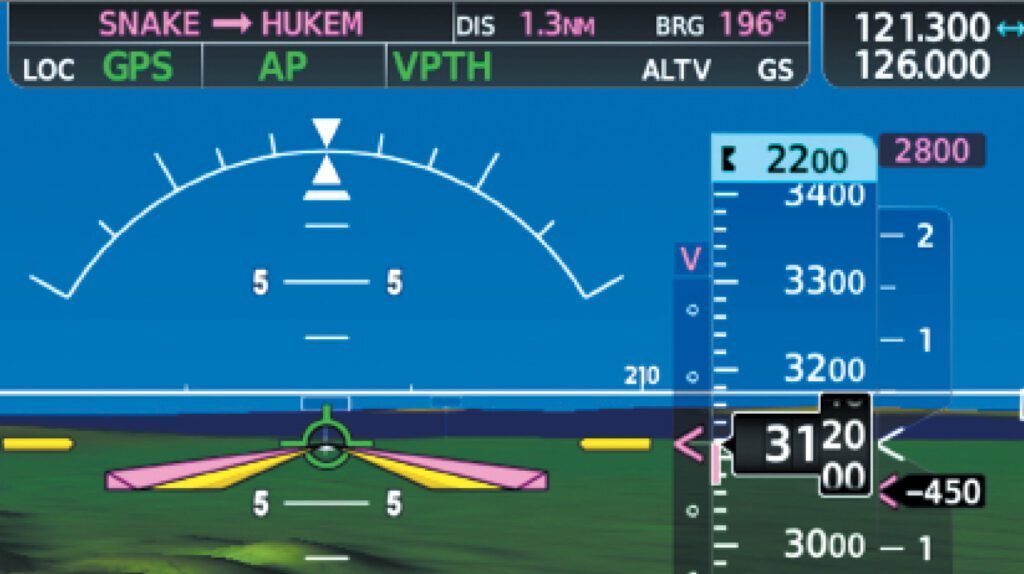
You pass HUKEM at the required crossing altitude of 2800. This time, you won’t level off. VNAV will change the descent rate slightly so that you make LEMON at 2200. The pink needles of the GPS are automatically swapped out for the green needles of the ILS, causing LOC mode to go active. As you arrive at 2200 feet the autopilot levels off momentarily. You can configure for the approach (power, flaps, and gear), and the glideslope is captured at this point. You’re no longer following vertical navigation. You can set the missed approach in the selected altitude, which is 3000 feet, and from here it’s a normal ILS approach. Following the localizer and glideslope all the way down into that Pacific sunset. Real chill, dude. No worries.
Dan George, CFII founded FlightInsight, an online ground school, to help pilots perfect their flying. He’s tripped, stumbled, and slid his way down from cruise so many different ways that he wonders if this whole descending thing is just too much of a bother.


