Three simple conditions must be met to land from an instrument approach: being in a position to land, having the runway environment in sight, and possessing the required flight visibility. The first requirement is straight-forward and the second is thoroughly articulated in the regs. The third requirement, though, is a little thorny.
Unlike commercial operations, which are restricted from conducting approaches with reported weather below minimums, GA pilots can take a peek no matter what the AWOS is blabbering. If you land with reported weather below minimums, an FAA inspector might ask you about the visibility. The answer is simple—you had the required flight visibility. The regulations only require you to have the flight visibility printed on the approach plate. The ol’ Pilot/Controller glossary defines flight visibility as:
“The average forward horizontal distance, from the cockpit of an aircraft in flight, at which prominent unlighted objects may be seen and identified by day and prominent lighted objects may be seen and identified by night.”
To make a quick and accurate assessment of flight visibility at minimums, a pilot must know what to expect. Runway markings and approach light systems aid you in making that determination.
Markings
Runways are awash with markings that provide distance information. There are three types of runway markings—precision instrument, non-precision instrument, and visual. A visual runway will have at least designation and centerline marks. If it’s over 4000 feet long, aiming points will be added. Non-precision runways add threshold and aiming point marks. Adding touchdown-zone marks and side stripes makes a precision runway.
Most of these marks provide distance information. The most common are centerlines. Stripes are 120 feet long with 80-foot gaps, resulting in 200 feet from one stripe to the next. The stripes aren’t always exactly 120 feet long; they can be adjusted to fit a runway. Adjustments to stripes and gaps start at the center of the runway. Stripes cannot be reduced to less than 80 feet and gaps to less than 40. But, 200 feet is a good rule-of-thumb.
Many runways contain aiming points. They normally start at 1020 feet from the threshold, but they can be adjusted based on threshold crossing height, PAPI angle, and runway slope. They can also be moved 200 feet when crossing runways cause markings to overlap. Aiming points typically replace the second touchdown marking group (next paragraph), but if big adjustments to the aiming point location are required, aiming points win out.
Touchdown zone markings are white stripes on either side of the center line at 500-foot intervals. The beginning of the bar pinpoints the distance and the stripe is 75 feet long. A full installation has five sets of touchdown zone marks and the aiming point marks, providing 3000 feet of distance information. Almost 8000 feet of runway is required to fit precision markings at both ends; markings within 900 feet of the runway center are eliminated, leaving an 1800-foot dead zone to prevent confusion.
These marks allow a quick judgement of flight visibility. Aiming points are 1000 feet from the threshold. Threshold markings appear every 500 feet. Centerline stripes are about 200 feet apart. Still, more is needed to assess flight visibility.
Lighting
Approach lighting systems (ALS) are vital for squeaking in on tight approaches. With them in sight and confirmed flight visibility, you can descend on any approach to 100 feet above touchdown zone elevation. (The FAA doesn’t like calling that a new DH/MDH.) This lower altitude better positions the pilot for another visibility assessment before landing.
Precision lights stretch 2400 feet from the threshold. Non-precision systems extend only 1400 feet. Most systems incorporate a decision bar—a horizontal row of lights to aid transition between instrument and visual flying—at 1000 feet to the runway.
Tops on the coolness scale are systems with sequence flashing lights (ALSF). These lights (the “rabbit”) scurry to the runway twice a second. An ALSF-2 has red side-row lights from the 1000-foot decision bar to the threshold that are considered part of the runway environment. An ALSF-1 system does not have red side row bars, instead using red terminating bars. Lights on ALSF systems are closely spaced at 100-foot intervals for pairing with CAT II/III approaches.
Few of us need the detail of ALSF systems. Instead a simplified short approach-lighting system or a (lower-powered, electricity-saving) medium-intensity approach-lighting system will suffice. They come in two different lengths: 2400-feet long for precision runways and 1400-feet long for non-precision runways. Longer systems have a runway alignment feature.
The runway alignment feature is a string of sequence flashing lights extending a thousand feet from the beginning of the steady lights. Runway alignment lighting is designated by an “R” in the lighting code. Therefore, MALSR and SSALR are 2400-feet long, while SSALS, SSALF, MALS, MALSF are 1400. (Astute students of acronyms will recognize that some of these shorter systems can have sequence flashers without runway alignment. In these cases, the first three light stations have flashing lights). Lighting is spaced 200 feet apart on these systems.
The oddball of approach lighting systems is omnidirectional ALS (ODAL), which are comprised of seven omnidirectional flashers. Five extend from the runway threshold at 300-foot intervals creating a 1500-foot long system. Two flashers adorn either side of the runway acting as runway end identifier lighting (REIL).
Pilot Positioning
Runway markings and approach lighting systems tell only half the story. You also need to know your position relative to these indicators. A little high-school trig can shed some light on where we are at minimums.
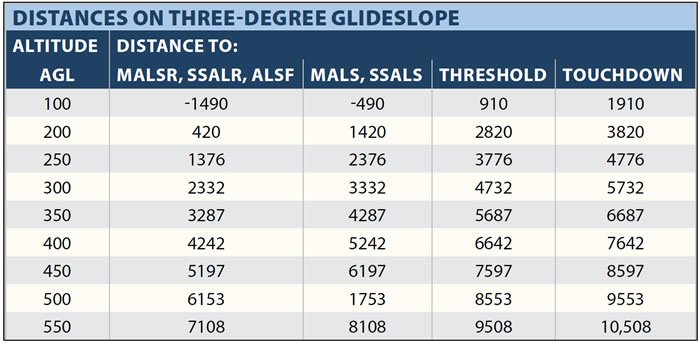
Although most GA airplanes can descend at hellish angles, three degrees is a normal glideslope to a point 1000 feet down the runway. See the table for the distance from threshold and touchdown based on various decision heights on a three-degree glideslope. For a normal precision approach with a DH at 200 feet, you’ll be about 2800 feet, or a little over a half mile from the threshold. That’s no coincidence with normal 200- mins.
Let’s put this into action at the Raleigh-Durham (KRDU) RNAV (GPS) Y Runway 23L approach (with MALSR). Assume the weather is at the precision LPV minimums of a 200-foot ceiling and a half-statue mile (2640 feet) visibility from the conversion table. At 200 feet AGL, you’re 2820 feet from the threshold, so you shouldn’t see it just yet, but you should see four light groups past the decision bar to indicate 1/2-mile visibility. With the requisite flight visibility verified and the approach lights in sight, you can continue your descent to 100 feet AGL.
When you reach 100 feet AGL on the glideslope, you’ll be 910 feet from the threshold. With 2640 feet of visibility, you’ll see the runway and most pilots will land. But if questioned, how would you say you had the requisite visibility?
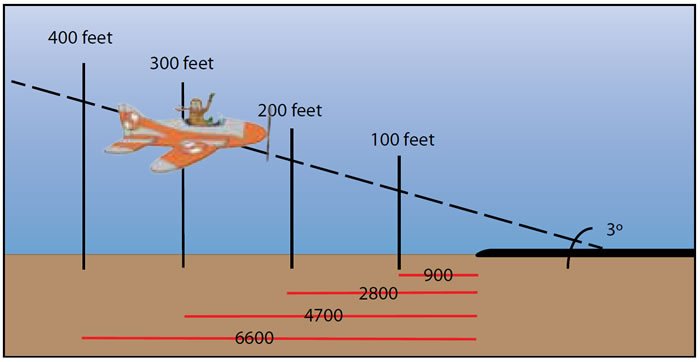
You know you’re 910 feet from the runway, so you need to be able to see about 1700 feet down the runway. See the aiming points? Good, that’s 1000 feet. See the next touchdown markings? That gives you another 500 feet. If you can see one full centerline stripe beyond that, you’ve got your 1700 feet. You’ve got your required flight visibility. Land.
Precision approaches provide a convenient sequence of events. At DH the ALS should be in sight to judge visibility and allow further descent. At 100 feet above TDZE, runway markings should be available to make an assessment. If you can’t see far enough down the runway, it’s time to bug out.
On non-precision approaches, you can arrive at DH with the required visibility without seeing anything. Let’s look at the LNAV mins for this same approach. You reach the MDH of 565 feet (TDZE is 435 feet) about two statute miles from the runway. Even the lights are well over a mile away. With a half-mile of visibility required, you could have the necessary visibility without seeing the ALS.
This is common for non-precision approaches. If you’re truckin’ along at MDA to the MAP, at some point the ALS and runway environment will come into sight with minimum visibility. In this case, you see the lights about a statute mile from the threshold—half-mile visibility to the lights plus half-mile of lights. This translates into almost a six-degree descent angle; double that if you wait until you see the runway. Don’t even think about it.
Don’t Violate Yourself
One of the best lessons I learned flying single-pilot cargo is not to violate myself. Nobody but you knows what you saw, unless you tell them. So when an inspector comes over to question how you were able to land, have your answer ready.
For a standard ILS, it is pretty easy. At DH, the runway threshold was in sight. At one hundred feet above TDZE, you could see a little past the third touchdown zone marking. Non-precision approaches aren’t as simple. Common setups are a 400-foot DH requiring one-half mile visibility to a runway with a MALSR. In this condition, seeing the ALS at DH indicates visibility over 3/4 mile.
Training and checking often focus on determining runway environment—see the runway and land—and completely ignore flight visibility assessment. Judging flight visibility on the fly is challenging. By knowing what to expect, making a split second decision with weather at minimums is a breeze. So next time you land with the AWOS squawking below mins, you’ll have an answer ready for your friendly inspector.
Jordan Miller’s getting to the age where a visual assessment requires reading glasses. An overachiever, he flies for a major airline, writes for IFR and in his spare time went back to school and got his master’s degree.