
Remember when Garmin first came out with their GNS 430? What a wonderful list of features it had. But, even after a few years in service, it turned out that many pilots were intimidated by the sophisticated routing capability and few ventured beyond using direct-to for navigation.
There’s a long held theory called the 90-10 rule—90 percent of the users of a sophisticated application only use 10 percent of the application’s features. Maybe in some instances it’s closer to 80-20, but in the case of sophisticated GPS navigation applications like ForeFlight, that typically means that a large percentage of users mostly use the basic maps and approach charts.
We’re going to dig deeper into ForeFlight Pro to examine a few of ForeFlight’s less obvious, but highly useful features.
Not surprisingly, exploring the other 90 percent of ForeFlight’s features and capability is too much to cover in just a couple pages. Seeking a logical path for discussion, I’ve decided to simply use ForeFlight’s design and discuss each of the areas that are reached by the buttons at the bottom, in sequence:
Airports, Maps, and Plates. I’m just going to cover a few tricks, so your challenge is to find the rest. One way to do that is to press or touch each and every button. Keep in mind that a large percentage of the information available requires Internet access, either through cellular data or WiFi.
Airports
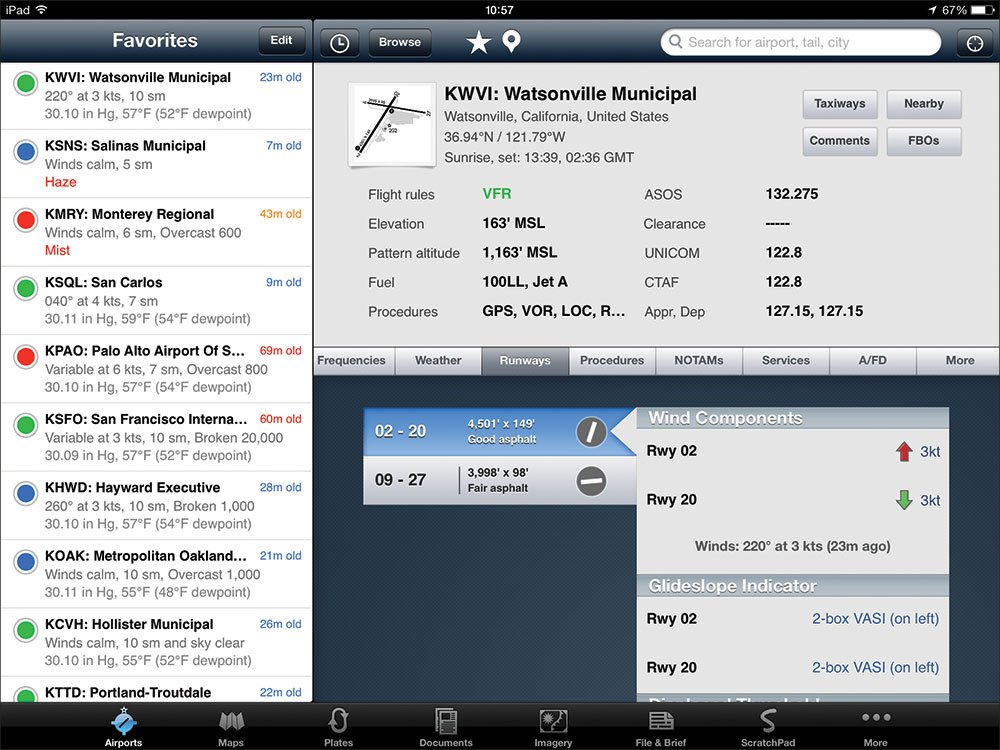
The Favorites list at the left side of the Airports screen is the perfect place to add not only your home airport but also other local airports. To prepare for a trip, add the enroute stops and destination airport along with any logical nearby airports. With this listing, you can get a quick overview of local weather by looking at the colored Flight Rule Symbols at the left of each listed airport and drill down for the detailed weather if you want.
There’s a potential issue with this if you’re planning an instrument approach. In my case, there are two other airports with weather reporting within 25 nm of my home airport. A review of the Flight Rule Symbols has, on occasion, indicated that the weather at my home airport is Marginal IFR while the weather at the other two is Low IFR, thus indicating that my home airport might be the preferred choice.
But that isn’t necessarily true because while the symbols show the FAA’s categorization of the weather, they don’t take into account the minimum altitudes of the approaches at these airports. The other two airports have ILS approaches with low minimums, while my airport only has a localizer approach with a 700-foot MDA. So, you still need to examine the approaches in order to determine whether a successful approach is possible.
The Nearby button at the top-right of the Airport panel shows the same information for airports located near the selected airport. Also, the Nearby icon on the top right of the screen shows airports near your current location. Selecting the All or Weather Only buttons at the bottom of these two Nearby screens determines whether all nearby airports are shown or only those with weather reporting.
There is a fourth list of nearby airports that is accessed by selecting the METAR option for the current selected airport. The METAR option displays the current reported weather both in standard format and broken out by topic. If you scroll down there is another list of nearby airports that only shows those with weather reporting.

Touching an airport in any of these lists immediately makes that the default airport on the Airports page. This can be useful when you need to refer to another airport’s information because you can easily and quickly select each of the displayed airports.
Just before a flight, consider reviewing your destination’s TAF for the expected weather, and the Winds Aloft forecast for winds and temperature aloft forecasts.
The Runway tab can be quite helpful in choosing the appropriate runway for the winds because it indicates by a green arrow which runway(s) favor the wind. It even provides the actual crosswind component which can be handy when there are strong crosswinds. At the bottom of the runway information is a list of the approaches applying to that particular runway so you can easily select the one you want.
The A/FD tab gives instant access to the appropriate airport page in the A/FD. While most or all of the A/FD information is available in other locations within ForeFlight, reading the A/FD page can ensure that you don’t miss a critical item. And, as long as you’re doing research, the Comments button at the top right of the panel has Remarks for the official notes, and Comments for information that is entered by ForeFlight users. If you find something useful for yourself and/or others you can add your own comment.
MAPS
Since the Map screen is probably the most-used screen, you’d think its features would be familiar to every ForeFlight user. In my discussions with other users I’ve found that isn’t necessarily the case.
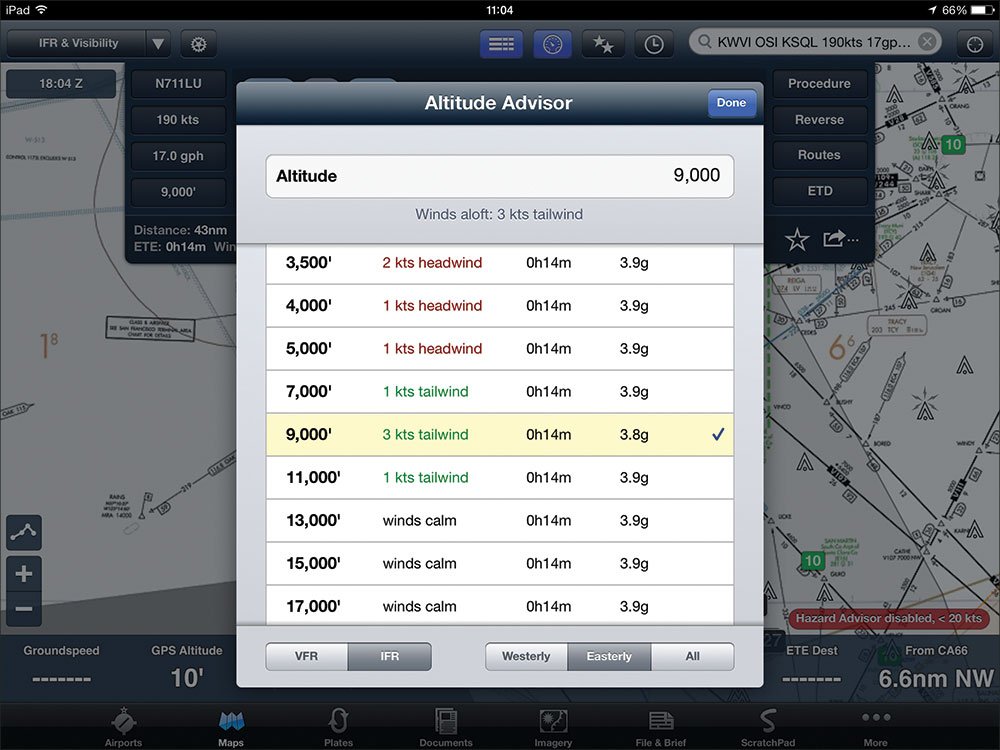
When preparing a routing for a briefing, touching the altitude button at the lower left side of the Edit and NavLog box gives a listing of altitudes with the current tailwind or headwind component. To select the final altitude you’ll still want to factor in the enroute MEAs yourself.
Most users should be familiar with the Procedures button for choosing the airport diagram, departure/arrival procedures or approach. ForeFlight goes one better than just a list of procedures; it lists them for the specific runways.
The Reverse button reverses the current route so you don’t have to reenter it when planning the return flight. Plus, of course, the Route button utilizes ForeFlight’s “Route Advisor,” allowing you to choose the most appropriate route from actual clearances provided by ATC.
If there is a route that you want to be able to use again, pressing the small open star “Favorites” icon at the bottom of the Edit and NavLog box prompts for naming and saving the route as a favorite for future use. Saving even a one-time route as a favorite can also be a good idea as insurance against the off chance that you accidentally erase the routing while enroute. (Yes, that’s a recommendation based on personal behavior…)
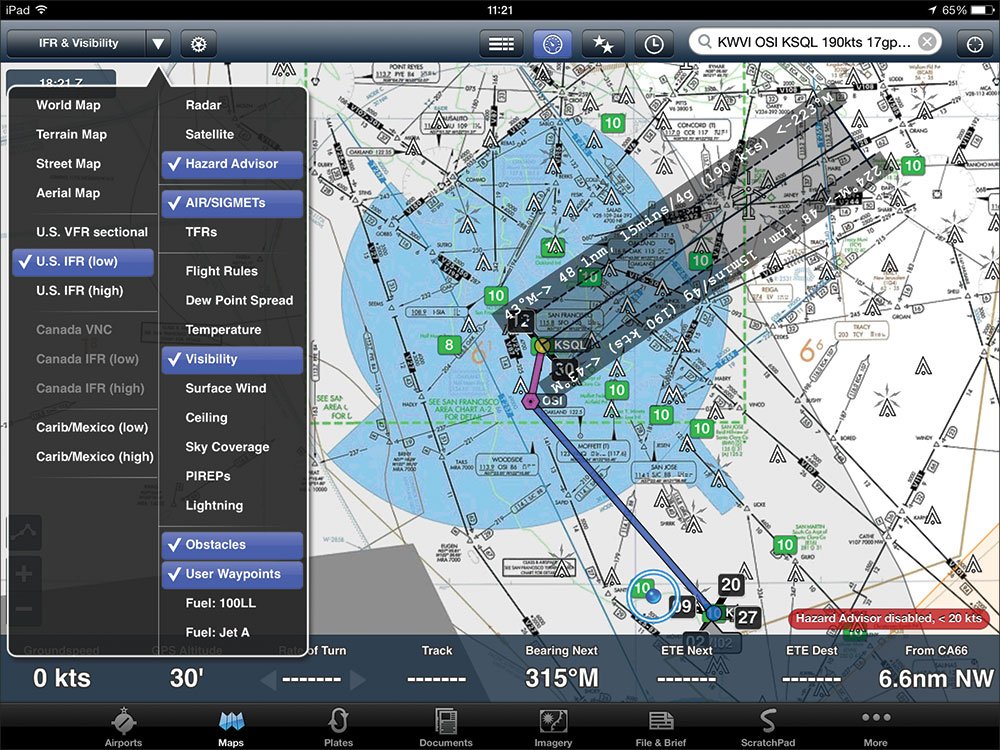
Now we come to one of ForeFlight’s more interesting and challenging features, both to explain and to use. The IFR & VFR Flight rules button at the top left of the Maps screen offer a spectacular variety of maps and overlays. Simply stated, you can choose one option from the left column from World Map to U.S. IFR (high) and one additional from Carib/Mexico low and high.
From the right column there are lines that divide the categories and, in theory, one item can be selected from each category—except, you can choose both Obstacles and User Waypoints. But, you can’t choose an item from the third group (beginning with Flight Rules) and either of the Fuel options.
There are two important points to make here. First, the best way to learn what works and what doesn’t is simply to click on the items until you get what you want. Second, remember that you can change the choices to suit the situation. I find that I often change the options I’ve selected according to the situation I’m facing at that moment.
There is one more interesting option that I rarely use but when I need it, it’s extremely handy. Let’s say that you’ve been fighting a strong headwind and decide you need to refuel. Placing one finger tip on the aircraft’s icon and one on the desired airport displays a ruler between the two showing the magnetic course, distance, ETE and gallons required. You might use it to determine a rough ETE to your destination or alternate. Or even with the map scaled wide enough, for an approximate time and distance for flight planning purposes.
There are times after you’ve scrolled around the maps that you would like to be able to quickly have your aircraft’s current location shown on the map. Pressing the “Near-me” icon at the top right of the map screen will center the display on the aircraft’s current location.
PLATES
For me, the Favorites—Binders feature is one of ForeFlight’s more useful ones. Before a trip, I create a binder for each leg that includes all of the logical airport diagrams, procedures and so forth for each airport where I plan to land and, depending upon the weather, my potential alternates as well. I don’t necessarily include all of the procedures; I include only those that I expect to use or might want as a backup.
I have a permanent binder for my home airport that includes the two other airports that are my local alternate options. You might want to include the airport diagrams in all binders if they are separate pages because with ForeFlight Pro’s geo-synchronized aircraft display you will be better prepared to follow taxi directions no matter how confusing the airport.
Speaking of that, ForeFlight’s editing capability allows making notes and comments on any chart, airport diagram or document. Think about how easy it might be to follow a taxi clearance if you first draw the routing on the airport diagram. All you have to do then is follow the drawn route.
Consider reviewing all of the settings that can be reached via the More button. Review each setting to ensure that it is set the way you want. For example, I’ve set the Map View to Track Up, Forward, I’ve turned on Extended (runway) Centerlines, and the Track Vector and set the track vector length. Finally, I’ve turned on the Show Auto Taxi option.
There are many other features that we don’t have space to cover. But by now you should know that all you have to do is explore and read the manual—you have added it to the Documents section, haven’t you? If you’re interested in a good instructional book on ForeFlight, The Pilot’s Handbook for ForeFlight is an in-depth guide to most of ForeFlight’s features. Available at thepilotshandbook.com. The purchase price includes online documentation updates that will cover new ForeFlight features as they are released.
Joe Shelton, a Commercial MELS and SELS instrument-rated pilot flies a Columbia 400 from an airport in Northern California when his non-GPS equipped car can find it.


