
In last month’s IFR Clinic we discussed how VORs work. Boring and repetitive as that is, we needed to start there to get the basis for understanding a localizer and a localizer back course using a conventional dedicated navigation indicator (VOR/LOC) and the need to sometimes chase the CDI to correct, and sometimes to pull it. There’s too much material for a proper review, so let’s just skip right to the good stuff.
The Rules
Rule #1
Always (always!) put the localizer inbound front course under the omni-bearing selector (OBS). The OBS setting doesn’t matter to the electronics on a localizer, but this is a good rule as we’ll see a bit further down.
Rule #2
If you’re off course on a localizer or a localizer back course approach, and you’re on the side of the localizer feather on the chart that has the shading or other differentiation, the course deviation indicator (CDI) will swing to the left. It doesn’t matter where you’re headed or what you’re doing—if you’re on the shaded side of the feather, the CDI is to the left. Period.
Rule #3
If you’re inbound on the front course, or outbound on the back course, the shaded part of the feather is to your right and you correct by chasing the needle. If you’re inbound on the back course or outbound on the front course, the shaded part of the feather is on your left, so you correct by steering away from the CDI.
That’s it. Those rules are the takeaway from the previous article. But, they were developed with a conventional navigation VOR/LOC indicator. Now, let’s look at how things work with an HSI. We’ll start by wandering at least 20 years back down memory lane.
Remember NDBs?
Perhaps you once learned to fly an NDB approach. (If not, it’s okay. I won’t hold it against you. Bear with me as we explore a little instrument-flying history.)
The venerable and once-ubiquitous King KR-86—when it worked—provided an ADF bearing pointer on a user-adjustable compass card. The bearing pointer was useful for navigation, but that compass card was a challenge because the numbers on it never corresponded to your actual heading on the heading indicator unless you were really diligent at manually adjusting it. Consequently, most of us struggled to precisely fly an NDB approach. (I’m told it could be done, but I’ve never witnessed it myself.)
If you were lucky—or wealthy—enough to have an RMI (remote magnetic indicator), which was really nothing more than that bearing pointer on a compass card that, instead of merely being fixed or manually adjustable, was slaved to your heading indicator, life got a whole lot easier. No longer did you struggle with the mental heading and correction arithmetic. Instead, you just flew by reference to the heading and bearing as displayed on the RMI. This gave you at least a fighting chance to fly that NDB approach with a modicum of precision.
So, the difference between a rather challenging NDB approach and one that you could fly with relative ease was a fixed or manually adjustable compass card behind the bearing pointer versus a compass card that turned with your heading. So it is also with VHF navigation.
What’s an HSI?
The horizontal situation indicator is a rather busy instrument, displaying lots of useful information. For our purposes, just as an RMI combines a bearing pointer with a heading indicator, let’s think of the HSI as a single instrument that combines a gyro heading indicator with a VOR/LOC navigation instrument. Let’s look at one of many reasons that depiction is meaningful.
As we explored last month, the presence of the OBS with the VOR makes VOR navigation reasonably easy, eliminating the requirement to correct away from the CDI. However on a localizer, there’s only one bearing to select, so the omni-bearing selector is ignored by the electronics. This results in the mental gymnastics required by Rule #3, above. Luckily, if we take that entire VOR/LOC indicator and mount it on a gimbal so it rotates with the heading—similar to that RMI—things get a suddenly easier.
The relative relationship of the OBS setting to the compass card remains fixed and manually set, but now the entire compass card rotates as a heading indicator. Further, not only is the OBS fixed on the compass card (on the setting you select), but the OBS pointer is extended and actually becomes the CDI, which swings about the selected OBS.
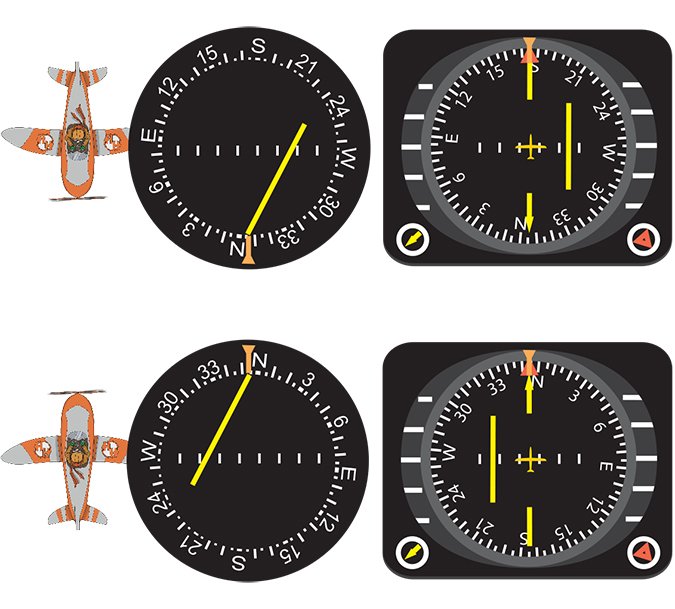
Let’s illustrate by using our standard VOR/LOC indicator on the Grand Forks Localizer Back Course Runway 17R approach. But this time I’ll rotate the entire indicator so the heading is at the top to mimic the HSI. I’ll also depict an HSI so you can see the minor differences.
Fly the Approach
Say we’re coming from the south and we’re on the localizer south course, headed north. We’ll pass MANZA then make the procedure turn, then head back in on final. Let’s say there’s a stiff wind from the west and we’re not very good at making those wind corrections, so we’re east of course.
Remember, I said that the reasoning behind Rule #1 would become evident? Watch. As we set up for the approach, we put the localizer front course in the OBS, in this case 354 degrees. That’s also our heading as we approach the airport from the south, so we’re drifting off course as shown. Note, as we discussed last month, the CDI is to the left since we’re on the shaded side of the localizer feather. With our heading and the OBS the same, the HSI looks just like the VOR/LOC indicator. Both show the correction to be towards the needle.
Next, we’ve completed the procedure turn and we’re inbound on the back course. We’re still struggling with the wind correction so, once again, we’ve been blown east of course, into the shaded area of the localizer feather. Note that the VOR/LOC CDI is to the left of the instrument as it should be. But, now that the indicator is slaved to heading, it has rotated so that left needle deflection is relatively to our right. So, we can still fly toward the needle to correct.
Pretty Simple, Eh?
Now you can see that if you rigorously follow Rule #1 with an HSI, Rule #2 is still true, but we can pretty much ignore it and can absolutely ignore Rule #3. Having followed Rule #1, all we have to do is chase the needle.
On AIS charts it still takes a little mental energy to determine exactly what the inbound front course is. But, if you remember Rule #2, it’s easy. Just orient yourself on the chart so you’re centered on the localizer and the charted feather shading is on your right. What’s your heading? That’s the inbound front course that you set in the OBS on your HSI.
Jeppesen makes that easy. Look at the frequency box for the localizer. In there it tells you the front course setting, so that’s what you put in the OBS. Either way, once your HSI is properly set, you just chase the needle.
Let me wrap up by acknowledging the ubiquitous reality of GPS and moving maps. While some of us still incorrectly attempt to navigate via the moving map, and even do a reasonable job, that map is just for reference. Your primary navigation instrumentation is still the normal flight instruments: attitude, heading and course deviation. Sure, if you can’t remember whether to chase or pull the needle, a glance at the map will help. But it’s ever so better to simply be properly set up in the first place and know from the beginning how to navigate the approach using the HSI.
Frank Bowlin is now so used to the brainless setup of the HSI, that if he flies without one he still has to go through the rules to stay away from that mountain.


