
One friend of mine is a former Navy pilot who flew S-3 Vikings off carriers and commanded P-3 Orions. Despite such experience his transition to civilian light GA was full of new experiences—like mixture controls. He texted me one day thrilled over a bit of old school buried in the glass-panel display options. “This thing has an RMI! It’s like coming home again.”
What he was talking about were the bearing pointers, which are for glass panels what a radio magnetic indicator (RMI) is for steam-gauge cockpits. The RMI combines a heading indicator with a needle that simply points to the station. They’re like an ADF except they point to a VOR location on the ground. The bearing pointer puts that needle on the HSI of your glass panel. So, you have the primary left/right indication of a CDI, plus up to two arrows that point to a selected station. Bonus is that you can point to a VOR or a GPS waypoint, because everything flies by GPS these days.
Well, except you in this challenge.
Ground-Based, Baby
Bearing pointers are wonderful tools for situational awareness when your position isn’t plotted down to the pixel on a moving map. Pilots flying glass don’t need this until the GPS goes out, at which point it could be a life saver. We suggest upping the ante by loading an airplane that has a glass panel capable of showing two bearing pointers on the HSI and only using those—no CDI at all. Leave the primary CDI set for GPS. To show bearing pointers on a G1000 (for real and most sims) push the PFD softkey and then BRG1 and BRG2. That should show a single-line needle pointing to VOR 1 and a double-line needle pointing to VOR 2.
This is also where you can turn on or off the DME display. Leave it off for now. You’ll need it later though.
Now fail the GPS signal. In X-Plane, this would be Instruments > Navigation > GPS1 and GPS2. Don’t fail GIA 1 and GIA 2. That’ll kill GPS, Nav, and Com altogether. Your sim might vary on this setup. Do your best. (You can fly this challenge with steam gauges. Use an RMI for at least one of your VORs if you can.) Also disable the connection between your iPad and your sim (just turn it off in “Devices” if you’re using ForeFlight).
Finally, use realworld weather. This is essential because winds that shift during the flight is a must. Preferably, do this on a day when it’s windy in the mid- Atlantic, because you’ll start on the ramp at Gaithersburg, MD (KGAI). That means you’ll need a “hood view” in the sim that’s zoomed into the panel so you can’t see outside until reaching the missed approach point. The airplane type is your choice; faster equals trickier in this game. There’s no PilotEdge option this far east but make a habit of tuning frequencies anyway.
Depart KGAI as appropriate for a non-turbine aircraft and head direct to the Westminster VOR (EMI) when that’s appropriate. Hold that course to the VOR using one of your bearing pointers. Climb and maintain 5000. Keep track of your position and approximate distance from EMI using the second bearing pointer.
Five miles from EMI, you’re cleared for the VOR-A approach to Clearview Airpark (2W2), and to cross the VOR at or above 3500. Be sure to brief this in advance. You’ll fly it with only the two bearing pointers. No vertical guidance and no DME.
At the MAP, pause the sim and switch to an outside view to see how close you were to overhead the airport. Switch back to your panel view, continue and fly the published missed. Do as many laps as it takes to nail a good track on R-179 and one minute inbound.
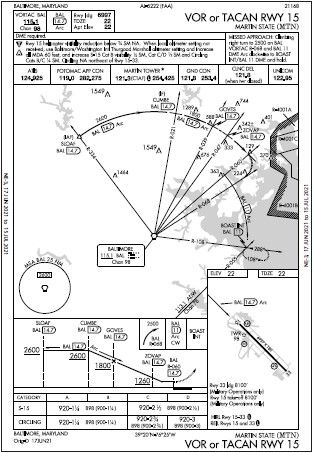
Now turn on DME. Join V268 southeast to SLOAF, the IAF for the infamous Martin State (KMTN) VOR or TACAN Rwy 15. It’s a DME arc all the way to the MAP. Even the missed approach is another arc. Remember, the key to an arc is flying perpendicular to your radial. Miss and hold at BOAST (which you get to do for flying a famous approach). For added challenge, hold there without DME.
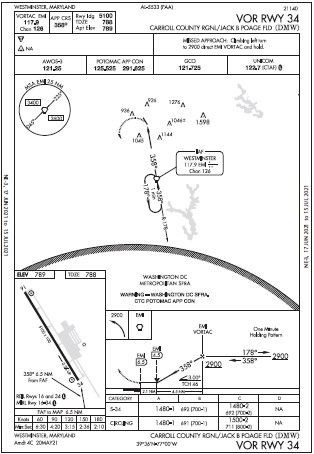
Disable DME again, join V214 to Baltimore (BAL) and V268 back to EMI. Climb and maintain 4000. Cross EMI at 4000 for the VOR Rwy 34 at Carrol County (KDMW). Fly to the MAP before looking up to make a landing on the runway of your choice.
Enjoy the right to nod knowingly when some old Navy pilot says, “In my day…” Or perhaps just to prove that you still have what it takes.
Questioning Yourself
- When did you turn on course for EMI after takeoff from KGAI? Were you able to hold that course the entire time? How did you use your heading bug?
- How did you know you were 5 miles from EMI? Or did the station passage surprise you? How did you fly the leg outbound and make corrections to your course?
- How far out did you go before making the procedure turn at 2W2? How did you identify the missed approach point? If you did want to land at 2W2, how would you have circled?
- Were you able to keep that DME arc approach within checkride standards? How did you make corrections to your course? How’d you use your heading bug?
- When would you fly this DME arc approach for real?
- Was the second arc harder? How did you enter the hold at BOAST?
- When did you switch VORs on V268 between BAL and EMI?
- Did you fly the course reversal at EMI for the KDMW approach?
- Upon breaking out right at the missed approach point, did you make a successful landing? How could you have used the VDP with DME or GPS?
- There’s no obstacle departure procedure for KGIA, so it’s a diverse departure. That means you turn on course at 400
AGL unless instructed otherwise by ATC. For your course to EMI, check your bearing to the station with the needle head on the nose, then keep that relative bearing all the way there. The head of the needle only stays on the nose with calm winds. You can use the heading bug to mark the heading that keeps you on the right bearing, but sometimes it’s easier to use the heading bug as a bearing bug, marking where the needle should stay to fly a bearing, even if that’s not on the nose. Check your track to the VOR on the map in your sim after the flight. If it’s a (relatively) straight line you win. A curved path VOR indicates homing not tracking. - Without DME or GPS, you can use relative bearing to another VOR. Five miles from EMI is roughly R-097 from the MRB VOR. EMI is also roughly R-334 from BAL. You can also use a timer for a sanity check, but don’t forget to factor in the winds for groundspeed. As for correction, the general rule is that you turn toward the head of an RMI needle when you’re flying inbound to the station and away from the tail of the needle as you’re flying outbound from it. Of course, wind makes it more interesting … and more fun.
- Did you notice it was only a five-mile procedure turn limit? Hope you started a timer for that with a plan based on your groundspeed. You’d also need a plan for how long you’d fly after crossing the VOR on final. Both runways are left traffic, and being IFR doesn’t excuse you from that requirement. Landing Runway 32 is simply crossing over the runway and entering a left downwind. Runway 14 would require an aggressive descent to MDA, or turning upwind for left traffic. These are things that need to be planned and briefed in advance. (The terrain around this airport is interesting, too.)
- This KMTN approach is notoriously weird because of the curving approach. Checkride standards are ± 1 NM for arcs, but you should strive for 0.3 NM at the most. That would be full scale for an LNAV approach. Bearing pointers actually make this approach easier. During the arc, the head of the needle should point 90 degrees to the right the entire time, give or take any wind correction. If you’re getting too far from the VOR (DME too high) turn inbound a bit more aggressively and let it tick down. If it’s too low, delay your next turn until it counts up. The tail of the needle indicates the radials you’ll need for altitude stepdowns and the missed approach point. Because your heading is continually changing, use your heading bug as a bearing bug to mark these so you don’t miss them.
- Yeah, neither would we. Then again, curving approach courses are part of RNP procedures at mountain airports. These require special authorization on pilots, equipment, and databases. But Radius-to-Fix (RF) curving legs are part of some RNAV (GPS) procedures.
- The second arc is only 11 miles from the VOR, so it happens faster. By definition you’re hitting this hold off the arc at exactly 90 degrees, so it’s a direct entry by the book. But your actual heading may be quite different depending on your wind correction and heading to follow the arc. Especially if you’re just using bearing pointers, a teardrop can be easier to fly in this case.
- Chart L-36 shows a changeover point 12 miles from BAL, but oddly L-34 and L-29, which also show that airway segment, don’t. Hoever, it’s exactly halfway, so it’s when you’d change VORs anyway. You could estimate that point with timing. You could also use the DCA VOR to track your progress or even the FND NDB. It’s also about the MRB R-103. Of course, with only 12 miles to each VOR, it probably doesn’t matter so long as you get a good signal. Of course, you identified all those VORs…
- There isn’t a “NoPT” segment, it’s not vectors-to-final, and you weren’t cleared “straight-in.” Thus, the course reversal is required. When the IAF and FAF are collocated like this, you’ll always need the course reversal because ATC can’t authorize a straight-in approach. In the real world, Potomac Approach would probably vector you, so no PT needed.
- If all went perfectly, you found yourself 692 feet above the threshold. Hopefully you briefed a circle, because straightin from there is unlikely. If all didn’t go perfectly, you might not have even spotted the runway. With the VOR nearly seven miles off the field, an error of several degrees would put you considerably east or west. (Done a VOR check lately?) This approach is close to 20-degree offset from the runway, so it won’t be straight ahead out the window. A right crosswind would exaggerate that. Or maybe you misjudged the groundspeed, and thus the approach timing. You started the timer exactly at the FAF, right? Speaking of time, you could have two times in mind: One for the published VDP and one for the actual MAP. This lets you switch to a pre-loaded plan for how you’ll circle if you don’t see the airport in time for a straight in.


