
Aspen is home to the rich and famous—senators, movie stars, and industry titans all have second homes here. Aspen is the home of the $10 cup of coffee. And aside from the high prices, what’s not to like? Aspen is the ultimate cute little mountain town that progress has not spoiled. There is fresh air and biking/hiking trails everywhere. Aspen has four world-class ski areas within easy reach. But Aspen is also a long way from anywhere. That’s part of its appeal.
Access
In good weather it’s a four-hour drive from Aspen to the nearest international airport at Denver. That’s much too far for the power brokers of the world. But for all its small-town feel, Aspen does have a commercial airport with flights to Denver and beyond. United, Delta, and American all have flights in and out of Aspen. The ramp at Aspen airport is littered with private jets taking their passengers in and out. One of the six remaining airworthy Beech Starships is based at Aspen. There are also a lot of small aircraft based in Aspen.
But getting in and out of the airport at Aspen is no easy feat. The airport sits at the end of a box canyon that prevents a late go-around. The terrain around the airport is unforgiving. There are several peaks nearby that extend above 14,000 feet. The airport sits at an elevation of 7837 feet raising density-altitude concerns even for jet powered aircraft.
The approaches into Aspen take all of these factors into account. The MDA’s for both approaches (there are only two) are high and visibility minimums are nowhere near the half mile you’d expect on an ILS. Many accidents have occurred on these approaches, including one several years ago where the customer bullied a charter jet into continuing an approach that should have been abandoned.
The Approach
Aspen has two approaches and neither is particularly easy. The GPS approach has the higher minimums of the two approaches but also has the lower visibility requirements. The LOC/DME-E approach requires three miles of visibility but gets you nearly 400 lower than the GPS approach. It’s this approach that causes so many problems. Let’s dig into it.
The LOC/DME-E approach has two IAFs—the Red Table VOR (DBL) east of the final approach course and AJAXX intersection out on the localizer. Beginning at AJAXX [A] gives you more time to become established, so let’s begin there. Once inbound from AJAXX you will need to be navigating via the localizer rather than GPS. AIM 1-2-3.c. tells us (in note number 2) that when on a localizer-based course we must use a localizer for course guidance. Certainly you can back up the localizer with a GPS needle to confirm what the localizer is telling you, but you have to use the localizer for primary navigation.
But what if there is a GPS outage from sunspots? In that case, even your trusty ol’ iPad won’t be working. Or, heaven forbid, what if you’re flying a plane that doesn’t even have a GPS? Yep, there are plenty of those still around and last time I checked, my license did not have a restriction printed on it that said, “Limited only to aircraft equipped with suitable GPS equipment.”
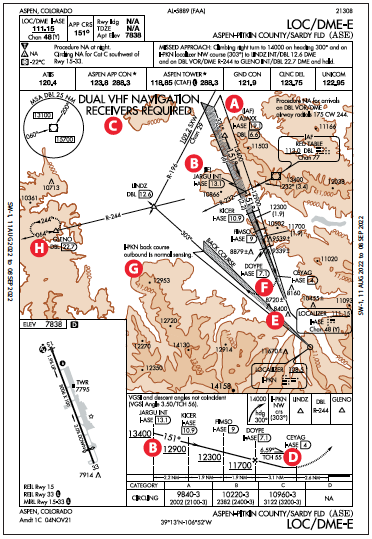
So if we are inbound on the localizer, how do we identify the first fix, JARGU?  [B] The easiest way would be with DME. JARGU is 13.1 DME from the localizer, I-ASE. But it’s also on the 232 radial from Red Table VOR. So a good backup would be to have your second VOR receiver tuned to the Red Table VOR and have the CDI preset to 232. Then when you arrive at JARGU, you can double check the DME against the CDI. Check the large note at the top left of the plan view [C]
  that says, “Dual VHF navigation receivers required.” This is one of several places where having two VOR receivers can be very helpful.
You note during the approach briefing that the descent profile [D] (in the profile view) is an astounding 6.59 degrees. That’s dramatically steeper than your normal 3.0 degree approach slope. You know that you will be required to descend at rates far greater than what you have been using for other approaches. Therefore you conclude that you will need to calculate the extreme descent rate for each segment.
Going Down?
Departing JARGU, you have 2.2 NM to descend 500 feet before reaching KICER. If you are flying the approach in a 90-knot Category A aircraft, about a 350 fpm descent or more will get you there. But if you are flying a Category C aircraft and doing 120 knots, you’ll need to descend about 460 fpm or greater to make it. So far, so good.
The next step down is FIMSO at 9 DME. The descent here is about the standard three degrees, needing 474 and 632 fpm at 90 and 120 knots ground speed. And the next step down to DOYPE at 7.1 DME is the same 1.9 NM to drop 600 feet, so you can continue on your standard three-degree descent path.
The final stepdown to mins at CEYAG is 3.1 NM but requires a loss of 1860 feet for Category A (to 9840 feet). At 90 knots you’ll have over two minutes to make the descent and you’ll need to get down at 900 fpm to get there. If you’re in your CJ2 doing 120 knots (max in Category B) mins are 10220, so you’ll need to lose 1480 feet, a descent rate of 955 fpm. For many operations that is playing in unstablized-approach territory.
But once you make it all the way to mins at CEYAG, you still have to get on the ground. The visibility minimums for the approach are three miles and CEYAG is 2.6 NM from the runway. But this is where a thorough briefing is mandatory to recognize the subtle gotchas hidden here.
First, recall that visibility is in statute miles, but the approach is charted in nautical miles. So, with visibility at three statute miles, that’s 2.6 NM, exactly the placement of CEYAG—probably no coincidence. So, you either see the runway from mins at CEYAG or you miss.
The airport elevation is 7838 feet. Now, if you’re a Category A aircraft, your MDA is 9840, leaving you 2002 feet to descend in the remaining 2.6 NM. Say you’ve slowed, now to 80 knots (groundspeed), meaning you’ve got to descend at 1027 fpm to make the threshold. The Category B MDA is 10220 feet, 2382 feet to the ground. At a final descent speed of 110 knots that requires a breathtaking 1680 fpm to make the end of the runway. How do you define “stabilized”?
With such aggressive descent rates, it will be easy for speed to build up. And although the runway is 8000 feet long, it can take some time to bleed off the speed to be able to land. Be ready for a go-around.
But these are circling minimums, the only ones available, exactly because of the descents. Of course you’re permitted to land straight in from circling mins, but can you at these required rates? How’s the wind? Could you circle? That requires a careful look at the chart. In good visibility you might be able to circle west (bad idea with those obstacles [E] so close). Circling east isn’t much better with the terrain there. (See the plan view.)
Probably the best (least worst?) circling option would be to fly the full left-traffic pattern: upwind above the runway, crosswind, etc. There’s still terrain, but you’ll hopefully have better situational awareness for avoidance. Be sure to keep it in tight.
And If You Miss
Back to CEYAG. If you have to miss, the tricky gets downright diabolical. The missed approach begins with a climbing right turn to a heading of 300 degrees [F] . But then it intersects a localizer. Except the localizer is not the one you were following on the way in. Instead this is the back course of another localizer, a localizer installed solely to serve the missed approach. With a flip-flop frequency button on your LOC receiver a simple button push will get you the I-PKN localizer. Of course, you did set that up properly in advance, didn’t you?
There’s no requirement to slew the OBS here—remember localizers have a single fixed alignment; the OBS is irrelevant other than for situational awareness. They are just comparing two broadcast signals and telling you left or right. But, for that situational awareness, it’s still a good idea. And, with an HSI you better set the OBS on 303 quickly or you’ll risk some serious confusion.
Pop quiz: Do you correct toward the needle or away from it? You’re flying a back course, suggesting so-called reverse sensing. But, you’re outbound on the back course—the shading on the feather is to your right—so there’s normal sensing. Or, just see the note [G].
But wait. The TERPSters haven’t finished making your life miserable. Your next waypoint is LINDZ out on the I-PXN localizer. There’s no DME on that localizer, so you’ll need a crossing radial, either R-196 from Snow (SXW) or R-244 from Red Table (DBL). Choose DBL since you’ll then track that outbound to the hold at GLENO [H]  at D22.7. Once at GLENO either a parallel or teardrop entry will suffice. Whew!
If you somehow get lost in all this the MSA ring at the top left of the plan view tells you that for the most part, while you are on the approach, you will need to climb to an altitude of 15,700 MSL. Most normally aspirated aircraft should stay home.
I have flown this approach with students many times. It does require a turbocharged aircraft for these altitudes. But even then the steep descent rates and tricky missed approach require the pilot to be fully briefed, radios set up correctly in advance, and a steely eye to get it right. Try practicing difficult approaches like this one in a sim or in good VMC to help insure that the next time the weather is near minimums on a difficult approach in your airplane, you’ll breeze through it, having already been there and done that.


