
In the opening phases of World War II, our country was feverishly training pilots for war. Thousands of cadets earned coveted US Army Air Corps wings. Six months later, half were dead. Investigation revealed that deaths attributable to VFR into IMC far exceeded combat losses. IMC was more dangerous than the enemy.
Realizing this, the Air Corps strengthened its instrument training program. Beyond needle-ball-and-airspeed, students had to learn the attitude and heading indicators, compass, and clock and fuse them into what became attitude instrument flying. To stimulate the development of a composite scan, they developed Patterns A, B, and the vertical S.
Mastering these patterns can be fun and challenging. They’ll strengthen your instrument scan, fine-tune your eye-hand coordination, and stretch your mind by demanding you think ahead, just as in IFR flight. They are genuine IFR muscle-builders.
Start Easy
This basic maneuver helps you solidify your understanding of the relationship between pitch, power, and trim. Instrument pilots must learn to understand this as second nature.
Begin in level flight at a given altitude at cruise speed. Reduce the power to approach speed, and retrim. Then advance the power to maximum continuous (or 75 percent) and trim again. Repeat as necessary until, in smooth air, you can hold the airspeed, heading, and altitude within five knots and five degrees and altitude within 50 feet.
Now you’re ready to extend this into another excellent pitch and power exercise focusing on aircraft configuration. Set the airplane at approach speed. Maintain altitude, heading, and airspeed while the instructor or safety pilot alternately raises and lowers the flaps and landing gear if equipped. The same performance expectations as above apply. Note that many aircraft will balloon in altitude on application of flaps. Anticipate and counteract this to remain within your target.
Pattern A
You’ll immediately recognize the first element of this pattern as a procedure turn. We sometimes use these for ground-based approaches, of which many remain. Accordingly, you must know how to fly them.
The second element is a 45/135-degree turn to enter a hold that ATC suddenly snaps on you, a so-called “emergency hold” entry. The third element resembles a holding pattern. Pattern A is a good start because it requires no descents, speed changes in turns, or an intentionally distracting checklist. All elbow turns are 45 degrees in both patterns A and B.
Halfway through the maneuver, you are doing it right if the one- and two-minute legs are reciprocal headings. The total time should come to 15:15 in Pattern A, and you should end on the same heading as when you began. Start with easy cardinal headings and ratchet up the difficulty by using non-cardinal headings, starting on, say, 115 degrees.
Vary the pattern to keep it challenging. Try doing it on a partial panel or use a VOR or a GPS waypoint as a starting point. Just recognize it will not also be the endpoint. You can shorten the two-minute legs to one minute to save time because two minutes might seem to be too much time learning too little.
Invisibly but crucially, learn patience. Being patient enough to hold a 180-degree turn to escape IMC can be a lifesaver. In IFR, rushing precipitates sloppy flying and sometimes forces an avoidable correction had the pilot only held course and waited for that needle to center.
The exercise forces you or the student to calculate the next heading before it arrives and turn accurately to the new heading. During heading and/or altitude changes, the pilot should focus on the instruments, not the diagram. Glance at the diagram only when straight and level. This division of attention helps keep the pilot’s maneuvers accurate and is especially important to those flying single-pilot IFR.
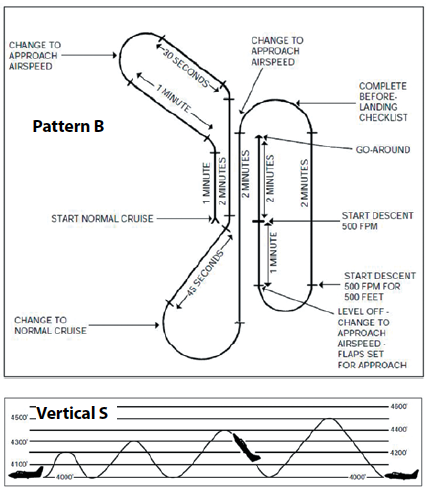
Pattern B
Pattern B is the same as Pattern A but includes flap and gear configuration changes and descent and climb profiles at various points, as shown. Once you master Patterns A and B, you’re ready for more advanced maneuvers.
These exercises constantly challenge pilots to know where they are during many minutes of intense concentration. All are foundational skills that pay off whether training, building proficiency, or on an IFR flight.
The Vertical S
The Vertical S further develops your instrument scan and fosters a further understanding of the relationship between pitch and power. It’s a series of climbs and descents on a constant heading, VSI rate, and airspeed singly or in combination.
First, establish level flight at Vy. Your altitude should be at least 3000 feet AGL. Then set up a 500 fpm climb to a predetermined altitude, usually 500 feet above your starting altitude. Once there, transition to a 500 fpm descent back to the starting altitude.
For the second cycle, climb 400 feet and descend at 400 fpm. In the third cycle, perform it at 300 and 200 feet. It gets more challenging as the numbers diminish.
Master the Vertical S in stages. First, keep vertical speed constant, then airspeed, and finally, both. Remember the FAA dictum that when power is available and variable, power controls vertical speed, and pitch (with trim) controls airspeed. The benefit of the Vertical S is that power and pitch must be used to achieve the desired result. Knowing this relationship in your gut is an essential IFR skill, especially during approaches.
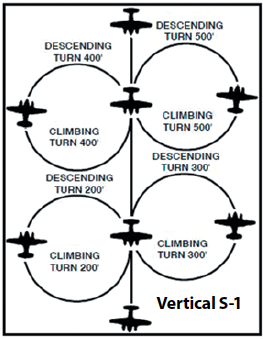 The Vertical S-1
This exercise adds standard rate turns to the Vertical S. When you start the Vertical S as above, begin a 360-degree standard-rate turn either way. If you climb 500 fpm, you should have turned 180 degrees in one minute at standard rate once you reach 500 feet above your starting altitude.
Now begin a 500 fpm descent back to your original altitude, continuing the turn. If you maintain standard rate and 500 fpm, you will arrive back at your starting altitude and on your original heading. Congratulations!
Now try it at 400, 300, and 200 fpm. The key is that a one-minute turn at standard rate is a 180-degree turn.
Try to hold airspeed within ten knots in smooth air, heading within five degrees and altitude within 100 feet. Stop the descent no more than 50 feet above the desired altitude. For spice, lower approach flaps and gear for the descent. Retract them for the climb.
The Vertical S-2
This variation of the Vertical S-1 has you reverse the direction of a turn to the right at 400 feet, left at 300, and back to the right at 200 feet. You may also start with a turn to the left.
The Dana Weave
An advanced maneuver, the Dana Weave strengthens instrument cross-check and aircraft-handling skills during changing airspeeds, configurations, and attitudes. The objective is to maintain altitude and bank angle as the aircraft is maneuvered into an approach to a stall and then recovered.
First, establish level flight at a given altitude, airspeed at Va, with alternating left and right 60-degree turns. These double as clearing turns.
Now reduce the power to idle. When the stall warning activates, note the airspeed, and add ten knots while still turning back and forth. Once stabilized at this airspeed, set full flaps, and lower the airspeed to the bottom of the green arc. Arriving at the landing configuration, level the wings and recover using your balked landing/go-around climb procedure when the stall warning goes off again.
Feel Better?
You can do all these maneuvers in a simulator or even chair-fly them. You’ll find yourself flying IFR more precisely, safely, and comfortably than ever, as well as any Air Corps pilot.


