You can think of your sim like a desktop operating system: By itself, it’s not extremely useful; only when you install third-party applications on top of it are you truly enabled to do real work. Same is true for X-Plane.
The fact is most simulators rely on a vast array of third-party add-ons to provide a more immersive flying experience. But navigating this ecosystem is not only a daunting task in itself, but also risks falling down a rabbit hole that can (read: will) waste both your time and money. Again, repeat after me, think of the mission.
Instrumentation
One of the most essential skills of being an IFR pilot is your scan. Your scan is something you develop during your initial training and then constantly refine throughout your flying career. So it’s paramount that your setup allows you to practice that scan every time you sim.
As our recent intermission talked about, there is a good chance that your plane’s panel doesn’t quite match the layout of your virtual one. So this begs the question on whether you should spend most of your time (and money) trying to replicate it or focus your resources elsewhere? The good news is that platforms like X-Plane give you a wealth of low-cost, effective options to customize any panel to fit your needs.
For example, the stock 172 that ships with X-Plane has the standard “six pack” we all know. But maybe the real Skyhawk you fly has gotten rid of the CDI in favor of an HSI? Or maybe you’ve replaced your AI and your CDI altogether with EFIS, perhaps a pair of G5’s, or an Aspen? What can you do?
Well, Sim Innovations’ Air Manager allows you to quickly build a custom panel by literally dragging and dropping components as you see fit. Their collection of round dials is vast, and they even have a number of pre-configured panels that can get you up and running pretty quickly too. Add their Knobster device and you can then couple it to control any number of gauges and devices with ease—say goodbye to those occasional awkward mouse clicks.

Buttonology
The venerable Garmin GNS navigators are still prevalent if not still dominant throughout both the real and virtual GA fleets. Consequently, almost all virtual GA aircraft support it. So if you fly a plane with a 530W, but your virtual version of it only has a 430W (or vice-a-versa), there is usually a way to switch between the two with a simple edit of the aircraft’s configuration file.
A better option however, especially if you are Windows based, is to use RealityXP’s GNS series of plugins. These plugins run the actual Garmin desktop training software inside the sim, giving you true flow parity. They also have plugins for the newer GTN series (650/750) as well. One downside though is that the unit’s database is always out of date because the underlying Garmin training software is never current. There are some backdoor ways to update it but none of them are really sanctioned. Google it.
Speaking of which, if you’re comfortable using X-Plane’s built-in GNS navigator (which is for many of us acceptably faithful to the real thing) for a nominal cost, Navigraph provides updated database files that are drop-in replacements for your virtual plane’s avionics. You can either use their easy-to-follow graphical installer or just download the files directly and install them yourself. Think of this process as the digital equivalent of swapping your data cards out every twenty-eight days.
For glass pilots, most sims, including X-Plane, ship with a default G1000 that is good enough for government work. However, even if you accept some of its known limitations, a bigger issue is the user interface itself: A full G1000 bezel costs hundreds to even thousands of dollars for a set. A more frugal solution is to combine two used iPads and install SIMiONIC’s G1000 PFD and MFD apps. Once installed, these apps provide a full G1000 interface on your iPad and are compatible with almost any aircraft.
If your budget allows, RealSimGear’s suite of Garmin hardware bezels are high-quality replicas of the real thing. They not only manufacture a complete line for all the major Garmin devices from the GNS and GTN boxes up to the G1000, but they even have their own version of the G500 and G5 as well. Throw in a GMA350 audio panel and GFC500 autopilot for good measure and your virtual cockpit may feel more up to date than your real one! All the RealityXP simulator software work seamlessly with RealSimGear’s hardware right out of the box; they were practically made for each other.

Hard IMC
Truth be told, no simulator (or numerical prediction model for that matter) really gets weather right. Furthermore, there is always going to be some latency between what you see in the sky and weather rendered in the sim since the atmosphere being modeled is based on observations downloaded over the web. So just keep in mind that trying to replicate an active sky virtually is more challenging than you think.
You can have X-Plane just grab the latest weather observations. However, for the more adventurous, you might want finer grain control over the sky.
X-Plane 12 Early Access has been released, which features volumetric clouds (read: puffy), a new weather engine, and other atmospheric improvements. Most of these changes deprecate or replace a lot of the popular atmospheric plugins like Enhanced Skyscapes, ActiveSky, and xEnviro. All three of these popular add-ons tried to improve upon X-Plane 11’s limitations by smoothing out in-flight weather transitions, adding 3-D cloud modeling, enhancing lighting effects, and offering even more finer grain atmospheric controls.
But even before considering a third-party plugin, first explore the built-in options. In X-Plane, the weather configuration page allows you to select preset weather like CAVOK, MVFR, LIFR, etc. or actually add up to six custom cloud and/or wind layers manually. And within each layer you’ll find a multitude of options to play with as well. Keep in mind though that each layer you add will be pushed on top of the previous one, so designing your exact weather scenario has to be done from the bottom up (lowest layer to highest).
Note that if you do experiment with X-Plane 12, not all hardware or software plug ins yet work with the software. Supported versions change rapidly, so be sure to check before purchasing something and merely hoping it works.
Pilotage
With MSFS2020, Microsoft literally owns a mapping company, thus their flight simulator leverages Bing’s advanced photogrammetry to create stunning procedurally generated scenery in real-time—truly, an enormous technical accomplishment in its own right.
X-Plane, on the other hand, needs a lot of help. Luckily, there is a vast collection of third-party scenery available you can install, both free and payware, to create photorealistic landscapes.
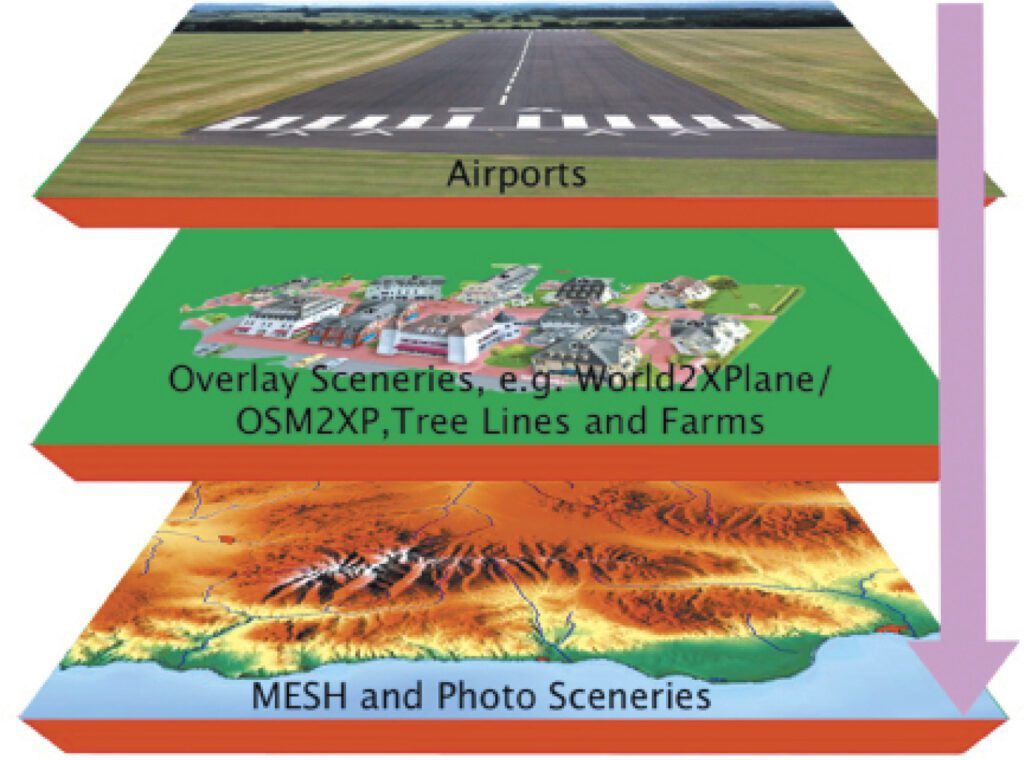
When talking about installing add-on scenery, you have to separate the objects that are autogenerated like buildings, cars, vegetation, various landmarks, etc. from the textures that they live on. Those underlying textures are usually referred to as mesh scenery. High-quality mesh scenery is composed of large orthophotographic imagery (“ortho” for short) that are then stitched together to form an orthomosiac.
One great highly quality ortho is OrbX’s TrueEarth series. Taken from high-definition satellite imagery, TrueEarth is a collection of ortho that is converted into files that X-Plane can render as you fly. It’s beautiful and a must have for pilots who fly on the U.S. West Coast and Florida or certain select areas of Europe. The only caveat is that you will probably need high-capacity disks to store all of it—each collection takes up usually a few hundred gigabytes of space.
To fill in the gaps, you can supplement TrueEarth with alpilotX’s free high-definition mesh scenery package, which covers most of the Earth and offers high-quality textures that will make your VFR flying orders of magnitude more enjoyable than the stock ground textures that ship with X-Plane.
Still not satisfied? Well, you can even create your own ortho using the venerable Ortho4XP package using free satellite imagery from your favorite mapping website. It’s actually not as involved as you think, and there are tons of great YouTube videos that walk you through it step-by-step. Ortho4XP has even been recently updated to support XP12 as well.
In addition to mesh, you might also want to layer on top of it various landmarks for even more added realism. For instance, Drzewiecki Design offers landmarks and airport scenery for popular destinations like Seattle, Chicago, and New York City. I’ve personally used the New York City one to practice flying the infamous Skyline route on the Hudson in real life with great success.
Up until now, most of the scenery I’ve mentioned thus far require some form of investment, but there are tons of great free options too. For just airports, the first place to look is the official X-Plane Scenery Gateway site where community artists regularly submit updates to the stock scenery for inclusion in the next major update. If your airport is still not available, the next place to check is the Scenery Development Forum over at x-plane.org. There you will find tons of great free options created by the community at large. A word of caution though: Typically, free scenery relies on a number of dependencies to work properly. This means that installing a scenery package may in fact require you to install several dozen additional software libraries that go along with it. And depending on the scenery’s documentation, this may be more challenging than it first appears. Caveat emptor.
Conclusion
As you probably guessed, customizing your sim is an essential step in your journey. The good news is it’s not nearly as complicated as it sounds. By picking a few essential add-ons, you can leverage your sim as an honest-to-goodness training platform, but you still won’t be able to log the time. In the next article, I’m going to continue our discussion of add-ons that bring even more realism to the virtual skies. Stay tuned.
Alexander Sack pretends to be a Senior Software Engineer who wrangles a lot of big data for a living. In reality, he is an instrumented-rated commercial pilot who studies Jepp charts, Skew-T diagrams, and enjoys simming.