
Autopilots save us from the routine tasks of keeping the shiny side up while allowing us the freedom to concentrate on higher-level tasks, like figuring out how the approach we’re about to fly is supposed to work. In so doing, they keep the plane going where it should—under our watchful eyes—and keep us out of trouble while we concentrate on those other chores.
Given the importance of autopilots to instrument flight in busy airspace, we should fully understand how to use them. Last month we covered some of the basics of how autopilots work and what they can do. (See “Autopilot Basics.”) Let’s now begin a two-part look at how we can best put those capabilities to use. Perhaps we’ll even pick up some tricks along the way.
When?
Most standard operating procedures (SOP) include limitations on when to use, or not use, the autopilot. Altitude restrictions are common such as don’t use the autopilot below 1000 feet AGL except if you’re flying a coupled approach. Here are a few things to consider as you pick your own limitations.
When are you below 1000 feet AGL? Obviously, the answer is in the terminal area. That’s also where there’s the highest potential for conflicting traffic.
George, your autopilot, doesn’t have eyes. He can’t see traffic that’s about to occupy the same airspace. So, you need to be focusing all your attention on flying the aircraft and looking for traffic.
You might reason that if you’re not engaged in anything besides looking for traffic and monitoring George’s performance, it’s okay to let him fly. Let me give you an example of why that’s not sound reasoning.
When I was flying airliners, I flew regularly into John Wayne Orange County Airport (KSNA) in Southern California. Besides occasionally being insanely busy airspace, Orange County is a noise-sensitive airport, giving us even more to do on departure. (Chop power and nose over at 1000 feet AGL—what genius comes up with this stuff anyway?)
It was the first officer’s departure and he engaged the autopilot as soon as our SOP allowed. Just as he’d configured George to resume our reduced-power climb to the south, Departure called crossing traffic for us. It was a little ahead, a bit higher, crossing left to right, and directly on our projected path. We easily spotted the VFR traffic.
The FO then started mashing buttons on the autopilot, trying to alter course. First, he started fumbling with the altitude preselect to level off before the traffic, but then decided that wasn’t such a good idea. So, he slewed the heading bug over to miss the traffic, but neglected to change modes from NAV to HDG, so we continued our converging path.
Exercising that “command authority” they taught us in captain school, I took over. I simultaneously punched the autopilot disconnect button on my yoke, gently lowered the nose a smidge and easily rolled a little to the left. Neither maneuver amounted to more than a few degrees, but it was enough to pass a little behind and a bit below the crossing traffic.
The point here is that once George is flying, our mental paradigm becomes letting him fly and just telling him what to do. This occasionally results in way too much energy and button-mashing to make a last-minute change. It’s ever so much simpler to be hand flying in the first place and, well, aim elsewhere. So, pick an altitude below which you’ll always hand fly. Perhaps it’s 1000 feet AGL, or maybe all the way down to 400 feet (but no lower).
This example illustrates another opportunity to give George a break—avoidance maneuvers. Even if you’re properly flying under autopilot control, any time you need a traffic- or terrain-avoidance maneuver—including on approach when you’ve got to miss—hand fly it. Chances are good that you’ll do a smoother job with a lot less commotion than if you frenetically try to reprogram George to handle it.
Not a Crutch
Most autopilots do an exemplary job flying the airplane—usually far better than we human pilots can. However, that’s no excuse to abrogate your responsibility to George and mentally check out. I can confidently say that in the history of manned flight, no autopilot has ever been violated for busting an altitude, heading, etc. No, it’s always the pilot in command; when you engage George, you can’t disengage yourself.
Do you rely on the autopilot to make up for a lack in your own abilities? Aack! Bad idea! You must first be able to fly the airplane yourself. Once you’ve mastered flight, you can ask George to relieve you at times to alleviate the routine (okay, “monotony”), such as at cruise, or to give yourself time for higher-level mental activities as we discussed.
Does your autopilot have altitude preselect? Do you often find yourself engaging the autopilot before that altitude is reached simply because you’re uncomfortable levelling off? Again, bad idea. Don’t use George as a crutch; use him as an aid to your own flying, to your own mastery of the aircraft. Used that way, George can be as valuable as a skilled, but highly inexperienced copilot.
Keep It Trimmed
Art by Ben Bishop
Okay, enough of the for-your-own-good stuff (although that really is important). Let’s cover some actual tips on using your autopilot, starting with the importance of trim.
Assume you have no autopilot. As you learned in your primary flight training, it’s far easier to keep your aircraft doing what you want when you keep it in neutral trim. The most basic aircraft—and nearly all general-aviation autopilots—only have elevator trim.
If your autopilot has pitch capability, even if it’s just altitude hold, it’ll need to adjust the elevator trim to minimize the force needed to manage the pitch. It can do this manually by telling you to do it, or automatically with some type of powered or electric trim.
Recall how much force you have to apply to an out-of-trim elevator when needed. Well, the autopilot has to do the same. But, all autopilots can be manually overridden while they’re engaged. So, you don’t want the required force to exceed the override force, lest the autopilot be unable to do what it needs.
There’s another consideration, and it’s behind the knobs. Servos exert the needed force on the controls. In an out-of-trim situation, the servo must continually exert the needed force. That continuous force could prematurely wear out your servos. Initially, a worn servo will just be sloppy, but eventually you’ll have a distressingly large bill to replace it. Trim your airplane.
Let me share a recent autopilot-trim experience. My twin-engine aircraft has tip tanks. I also have a nacelle tank that can only be used if it’s pumped to the tip tank. My normal technique is to turn on the pump and when the imbalance gets too big, I’ll crossfeed to draw down that tip tank by feeding both engines from the one tip tank. Except on this one flight I forgot.
Even with only about a 15-gallon imbalance (left tank at 40 gallons, right tank at 25) George called it quits and left me to figure out why. As I grabbed the yoke to level the wings (from the developing left spiral in hard IMC), I was surprised by how much force was required. Fortunately, I have aileron trim so I dialed that in and re-engaged the autopilot. All was well, but if I hadn’t been paying attention, it might not have been.
Course Changes
A basic wing leveler isn’t coupled to hold a heading or track a navigation source. It can only keep things going pretty much straight. But, you have to maintain altitude, so as noted above trim becomes even more critical, lest you look away for a moment and return to find yourself 200 feet low and descending.
In stable conditions, a wing leveler will stay on a given heading for some time. So, once you’ve determined what heading you need to track your navigation source, the wing leveler will allow you some slack. Remember, though, that the autopilot isn’t tracking anything, so you must constantly check to make sure it’s on course. Also, you’ve still got that pesky altitude to monitor. Trim, trim, trim. Then monitor closely.
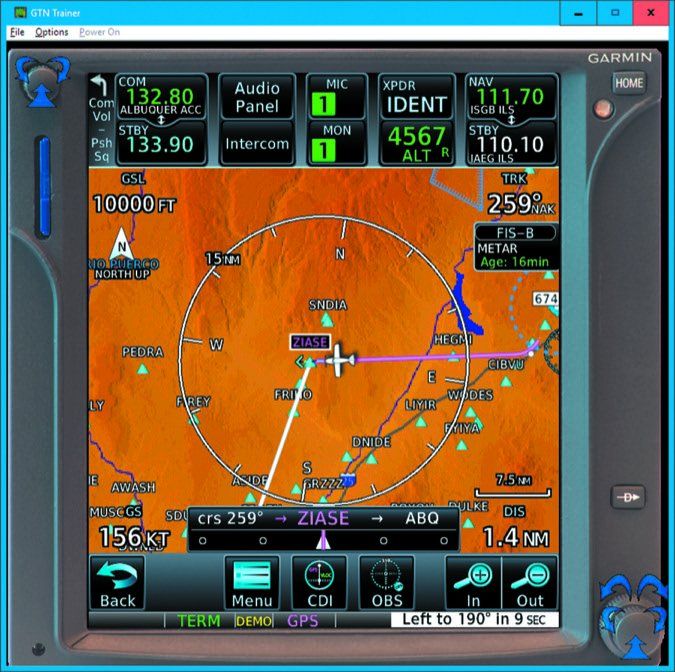
If you’re navigating by GPS, even with GPS Steering (GPSS), your navigator will tell you to change your OBS as needed for course changes. If you have EFIS (Garmin G500/G600 or Aspen, for example) they do this for you. However, if you have a mechanical navigation instrument, it’s important that you do this quickly when prompted. The autopilot uses the OBS to help it stay on course, so help it out by promptly dialing in the current OBS.
Don’t have GPSS? Most of the time, that’s not much of a limitation. Use NAV mode and select the GPS as the navigation source. The only real difference with GPSS comes at course changes where it’ll anticipate the turn and roll out on centerline. As a rule of thumb, you could manage up to about a 45-degree course change by just being on top of the OBS change and using NAV mode. Sure, your track will overshoot the next course, but you’ll stay within limits as long as you’re prompt with that OBS change—just like using VOR nav.
Most modern navigators will provide guidance around a procedure turn or a hold, and that guidance can be coupled to your autopilot if you have GPSS. How they present that, though, is variable. So, there’s no formulaic advice I can give you beyond dialing in the course change on your OBS when prompted.
Course Intercept
As we noted last month, there’s variability in how autopilots handle a heading to intercept a navigation course. The simplest won’t handle it and as soon as you engage NAV mode after being in HDG mode, the autopilot will treat any error as a wind and it can take some time to actually get on the desired course.
More commonly, if you’re on a heading to intercept and select NAV mode, the autopilot will simply change heading to a 45-degree intercept. If that’s what you want, you’re golden. If not, well, oops…
The most capable autopilots will maintain the current heading until intercepting the navigation course. This, obviously, is what you want. First, figure out what your autopilot does. If it doesn’t maintain the current heading, if it behaves with either of the two previous scenarios, it’s best to just hand fly the intercept. But, you’re most likely to get a heading to intercept when you’re busy so you might not have the luxury to hand fly the intercept.
In this case, leave the autopilot in HDG mode until the CDI comes off the peg (“course alive”) and comes in to about half scale. Then select NAV mode (with the needed course already selected) and let George handle the intercept. By waiting to select NAV mode, you’ve mitigated the effect of whatever behavior your autopilot uses for the intercept. Of course, the risk here is that you won’t notice the CDI coming off the peg. Pay attention.
Pitch
Let’s upgrade our hypothetical autopilot now to include altitude hold, but not altitude preselect. How do you handle a climb or a descent? The autopilot is perfectly capable of tracking a course and you’re likely to want to establish an appropriate vertical speed and let it go, watching for the target altitude and engaging altitude hold when you get there.
That works just fine when you work just fine. However, it’s very easy to get distracted (complacent?) as the autopilot chugs along. The result is a call from ATC, “Say altitude.” This is usually followed by your off-mic off-color expletive, followed by an on-mic sheepish and often lame reply. Tip: Hand fly when you’re changing altitude. Then, engage George when you get there. If you absolutely can’t do that, at least take over for George and hand fly the last 1000 feet to your assigned altitude. If you don’t, it’s virtually guaranteed that you’ll bust an altitude someday.
If you do have altitude preselect, however, things aren’t as simple as you might think. Yes, you can let George handle the altitude changes, but know the buttonology cold. You typically get a lot of altitude (and other) assignments while being vectored for approach. You often can’t afford the time to be fumbling to use your altitude preselect. In my aircraft, for example, there are four separate tasks for things to work. 1) Dial in the new altitude. 2) Disengage ALT mode on the autopilot. 3) Arm the newly selected altitude. 4) Dial in some vertical speed on the autopilot.
It’s best to rehearse the necessary moves and do them the same each and every time. Most autopilots with altitude preselect will also give you a warning tone as you approach the target altitude. This is a good wake-up call to first check that everything is set properly for the capture, and then monitor to make sure it happens as you expect.
Next
We have covered a lot and given you some things to think about. But there’s a lot we haven’t covered yet, mostly having to do with some more technique items, and a deep look into autopilot use on approach. We’ll cover those next time.
Then, in the final article in this short series, we’ll give a nose-to-nose report on thorough flight tests of the industry’s two newest state-of-the-art digital autopilots: Garmin’s GFC 600 and Genesys Aerosystems’ S-TEC 3100.
Frank Bowlin is an autopilot junkie—so much so that he’s always trying to get more out of the cruise control in his car.


