Contributing editor Joe Shelton recently wrote about his use of the “turn 10, twist 10” method of flying a DME arc. But with a modern G1000 at the center of his tool set, he learned there is a better way. In fact, all curved courses can become much simpler with a modern navigator and EFIS.
In the Old Days
I’ll stipulate right here that “The Old Days” remain quite the present for many of our aircraft and their pilots. For those of you with an EFIS and a modern navigator, however, this will be either nostalgic or get you thinking about an easier way if you’re stuck “In the Old Days.”
We’ll consider DME arcs and holds. Sure, teardrop procedure turns are also curved courses, but our discussion of arcs and holds will cover the basics.
The objective of the DME arc is to simply fly a portion of a circle centered on the ground station (VORTAC or VOR/DME). The basic principle is simple—just ratchet your turns toward the station to maintain the desired distance.
Fly the Arc
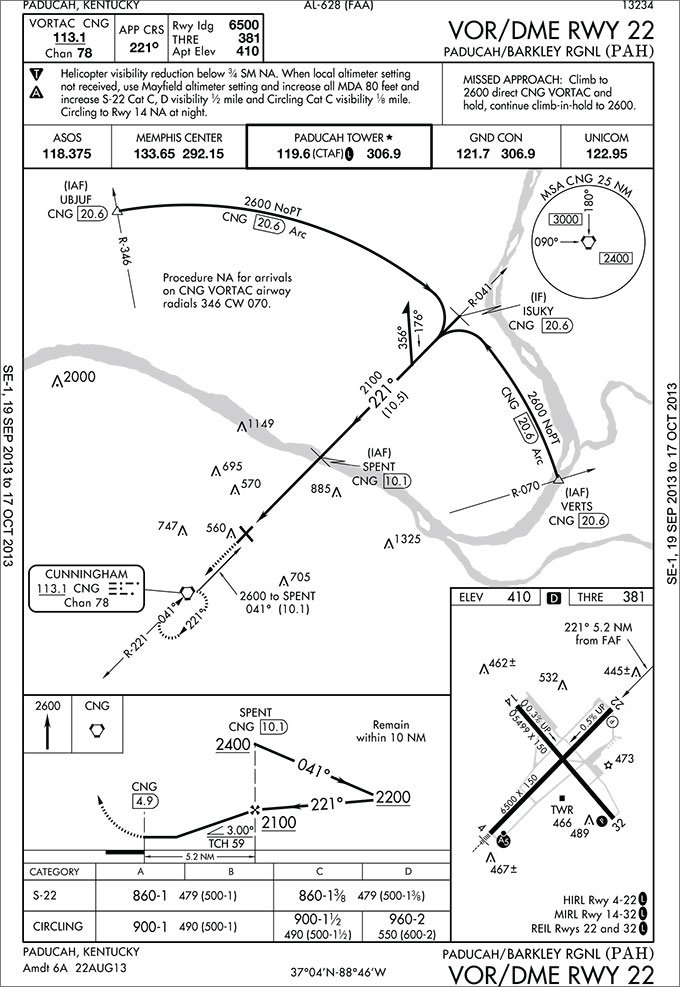
Let’s fly the Paducah, Kentucky VOR/DME Runway 22 approach from UBJUF on the north arc. UBJUF is on V67 from Marion to the Cunningham VORTAC on which the approach is based. Your inbound course to UBJUF is 166 degrees. Shortly before UBJUF, you’ll make a 90 degree left turn for the arc. To monitor progress around the arc, some pilots put the radial in the OBS while others use the inbound course.
I use the inbound course to avoid the mental math—either after my course inbound to CNG or for the turn to the final approach course. I’m already tracking inbound on a 166 course. As I intercept the arc, I’ll twist the course 10 degrees to 176 and watch the DME. If the DME is more than 20.6, I’ll nudge my heading right a couple degrees. If the DME doesn’t decrease to and past 20.6, I’ll turn a few more degrees toward the VOR. While using the classic “turn 10” technique produces satisfactory results, it’s a bit imprecise for my taste and I just tweak my headings a few degrees at a time based solely on the DME readout.
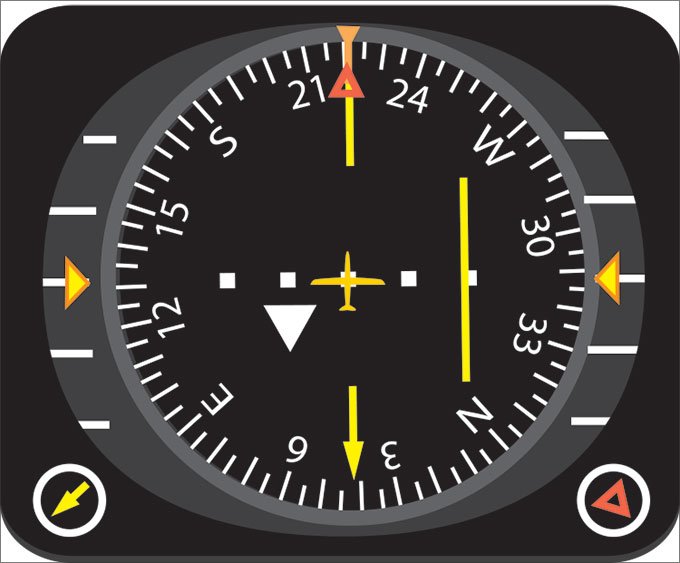
I’m also watching the CDI. With an inbound course and a “TO” indication, I’ll have a left needle deflection on the arc until I cross the 176 course to the station. As I cross that course, the needle will continue its swing from left to right. As it’s about half way to the right peg, it’s time to twist the course another 10 degrees, to 186. On an HSI this works out well—the course points to the VOR, about 90 degrees off your heading.
While managing the OBS, the DME continues to change. As it ticks up past my desired 20.6 DME arc, I just turn more to the right. The DME will probably decrease a few tenths below the desired 20.6, but it’ll start back out again, unless there’s a monster crosswind pushing me inside the arc. If the DME gets too low for comfort, say approaching half a mile inside the arc, I’ll turn a bit back towards the arc. Arc tolerance is actually 4 nm from center but this technique allows me to stay within a few tenths.
You don’t actually need a VOR to fly a DME arc. The VOR is used to join and leave the arc, and the twisting of the OBS course and watching the CDI are simply for situational awareness. Continuing this process, the OBS will be 196, then 206 and 216. The desired final approach course is 221, so as the CDI centers on the arc with the OBS on 216, it’s time to think about the turn to final.
Hold the Hard Way Made Easy
Say I made that turn to final and descended. At the MDA I didn’t see the airport. At 4.9 DME from CNG, I begin the missed approach—climb to 2600 and continue straight ahead to the VORTAC to hold as shown. Sitting in your easy chair reading this, it’s easy to see that the hold entry is a toss-up between a parallel and a teardrop, but when busy cleaning up the airplane after the miss heading to the fix about two minutes away, it might not be so obvious.
When I was getting my CFII, my instructor taught me a trick to figure out hold entries quickly, without having to envision any hold layout and with no math. I’ve found others who know the trick, so it’s not unique, but I’ve not often seen it documented. I’ll share this rule of “thumb” with you.
Approaching the holding fix with standard right turns, put your right thumb over the heading indicator with the bottom of your thumb at the three o’clock position. If you’ve got a perfect 20-degree thumb—use your imagination—from the top of your thumb around to straight up you’ve described a 70 degree segment of the compass rose. If the holding radial is in this segment, a teardrop entry is prescribed.
If the holding radial is in the segment left of straight up around 110 degrees to directly opposite the top of your thumb, make a parallel entry. If the holding radial is in the bottom half of the compass rose, below those two segments, a direct entry is best.
Inbound to the holding fix on a course equal to the holding radial, we have a choice of parallel or teardrop entry. For a teardrop, turn to a heading 30 degrees left of the outbound leg as you cross the holding fix, fly one minute, then turn right to intercept the inbound course—here, 041—to the fix. For the parallel entry, just keep on flying for a minute, then turn left direct to the fix. In both cases, as you’re inbound back to the fix and cross it, make the normal right turn for the outbound leg.
If the hold specifies left hand turns, just reverse everything. Use your left thumb just above the nine o’clock position. If the holding radial is in the upper left segment, it’s a teardrop entry. If the holding radial is in the upper right segment, it’s a parallel entry. If the holding radial is in the bottom segment, it’s a direct entry.
The keys to remember for this trick are to use the thumb of the hand that’s the same as the direction of the holding pattern turns, to put it at the three or nine o’clock position, and to read the holding radial (the reciprocal of the inbound course) in the segment to tell you the appropriate entry.
Magical Electronic Arc
VORs only offer straight navigation, and our mechanical indicators are set up for that straight navigation. This requires all those gyrations above to fly a curved course. But if you’ve got GPS and a computer involved, it can compute and display that curved course for you to follow. Add EFIS and your HSI will even guide you along that curved course. What could be easier?
To illustrate how the magic boxes handle all this, we’ll fly the same approach. Assume we’ve got the navigator programmed for the approach from the UBJUF IAF. Because that arc is a specific path over the ground, the boxes compute everything exactly and provide full navigation to fly it precisely.
We’re southbound on V67 toward UBJUF. When the navigator decides it’s time to turn onto the arc, it’ll simply slew the course pointer to the left about 90 degrees. If you’re using a coupled roll steering autopilot, it’ll turn to the left as the course pointer swings. As it rolls out on the desired heading, the CDI should be centered, plus or minus wind drift.
Continuing around the arc, the course pointer will creep its way to the right, following the exact course of the 20.6 mile arc. The CDI will properly indicate your error right or left of that course and you can manually track the arc simply following the CDI, but if you’re coupled to the autopilot the CDI will essentially remain centered all the way around the arc, even automatically correcting for wind drift. After all, it’s still keeping the CDI centered with reference to the course pointer, same as it would on any course.
When the navigator computes that it’s time to turn inbound to final, it’ll behave like it did when intercepting the arc. It’ll slew the course to 221. You—while hand flying—or the autopilot on roll steering, will make the turn and roll out on the final approach course. You then just keep the CDI centered all the way down final while managing your altitude to the profile. Of course, since this is not a GPS approach, you’ll really be flying using VOR navigation, but our discussion is on the behavior of the magic boxes.
When you get to the MAP and make sure the navigator sequences into the missed approach procedure, just keep following the CDI and course pointer to CNG. Once you reach CNG, behavior of different boxes vary, but the system will in some way tell you a heading to fly for the hold entry. The G1000 tells you with some text and briefly slews the course pointer to the hold entry course. Other boxes might behave differently.
Unlike DME arcs, a hold is not a precisely charted path over the ground. Instead, it’s a procedure with a lot of variables. The path you’ll follow over the ground is not a constant and is governed by the wind, your airspeed, rate of turn, etc. For this reason, the navigator cannot give you positive guidance all the way around the racetrack.
Again, some boxes vary, but generally, the box will keep the course pointer on the inbound course. When it’s time to make a turn, either to complete the entry or to just remain in the hold, there’s usually some annunciation. Your turns are all just standard turns.
In this case you’re inbound on the 041 course to CNG, the course pointer will be on 041 and the CDI will give you accurate steering information to follow that inbound leg. As you cross the fix, you must turn right to the outbound leg of 221. The course pointer and CDI will still indicate relative to the inbound leg, so there’s little guidance, even from the magic, on the outbound leg. “Little guidance” but not “no guidance.”
Of course, if you have a roll steering coupled autopilot, it’ll fly the entry and the hold perfectly without you doing anything more difficult than begging ATC for a release from the hold. If you’re hand flying, you’ll get that positive guidance only on the inbound leg—other than that it’ll only tell you when to turn. But, with the course pointer remaining on the inbound leg, you’re left trying to figure out what to do with the outbound leg. There’s a trick.
In this case, you know the outbound leg should be flown with a 221 degree track. As you make the turn from the inbound leg to the outbound leg, watch your track pointer. On the G1000 it’s that little magenta diamond that’s usually close to your heading. That tells you your current track over the ground. Steer to keep that track pointer on the tail of the course pointer. When it is, you’re tracking a perfect 221 over the ground. Then, just turn inbound when the box tells you.
At present, Garmin systems can only provide guidance for charted holds. User entered holds are not currently possible.
The Map Is Not for Nav
Remember, the PFD is your primary navigation instrument. The map on the MFD is for situational awareness. Avoid the navigating by trying to keep the little airplane on the course lines of the map. To do so accurately, you’ll need such a close scale that you’ll lose situational awareness. Zoom out to a reasonable scale for a bigger map picture and keep yourself on course using the HSI.
The proven methods we’ve used for around half a century still work well, but with modern electronics, the mental gymnastics are eliminated and all you have to do is manage your pointers. Of course, a little additional situational awareness from the MFD and from knowledge of the old ways will help you avoid—or minimize—the embarrassing moments that result from incorrectly configuring all the electronics.
Frank Bowlin has flown with electronic hold guidance so long he nearly forgot how to use the thumb trick. But it’s best for him to keep using the EFIS as his thumb is wider than 20 degrees.